
0 Comments
Demonstration video showing augmented reality photo capture in RightBooth: How to create your own greenscreen videos for use in RightBooth: How to take augmented reality photos in RightBooth using greenscreen videos: How to record augmented reality videos in RightBooth using greenscreen videos: RightBooth now includes support for wireless Canon cameras, including wireless live view. Details here
See the Release notes page to read the complete list of new features and fixes in this release. Here are some suggestions to help reduce your GoPro video transfer time and also reduce the video processing and enhancement time in RightBooth. 1 - Reduce the GoPro Video File Transfer Time 1.1 - Record GoPro videos in HEVC format Newer GoPro models provide the following choice of video recording formats:
Choose HEVC (High Efficiency Video Coding). This is the H.265 format and it produces smaller file sizes than the older H.264 format. By choosing HEVC you will benefit from faster file transfer times between the GoPro and the PC. Note: RightBooth can process HEVC files. Here is a comparison of the file sizes and transfer times of a 10 second video that was recorded at 1920x1080x120fps using each of the formats:
1.2 - Record videos at 60fps or less Most GoPro models let you record videos at 120fps and some allow recording at 240fps. Recording at a higher frame rate will produce larger files which will take longer to transfer and longer for RightBooth to process. Try dropping the recording rate on the GoPro to 60fps (or even 30fps). Transfer times and processing times will be quicker and most people will be unable to see much difference in the finished results. 1.3 - Use the GoPro 5Ghz WiFi Band If your GoPro offers both the 2.4GHz and 5GHz WiFi band options, try using its 5GHz WiFi band. In our tests we have seen that this can significantly reduce the file transfer times. Typical saving: 11 second transfer time on the 2.4GHz band equates to an 8 second transfer time on the 5Ghz band. Note: If you find that the GoPro 5GHz band is not working with your PC WiFi adapter you will have to use the GoPro 2.4GHz WiFi band. 2 - Reduce the Video Processing and Video Enhancement Times 2.1 - Reduce the frame size of the video file The GoPro will usually be set to record videos at a frame size of 1920x1080. After each video file has been transferred to RightBooth, you can set RightBooth to reduce the frame size of the videos, which effectively reduces the amount of data in the video file. This can have a significant effect on reducing the video enhancement times and most people will not be able to see any difference in the final video quality. We recommend you reduce the videos to 1280 x 720 or (better still) 960 x 540 (quarter HD). You can do this in RightBooth Settings --> Miscellaneous --> Conversion settings: 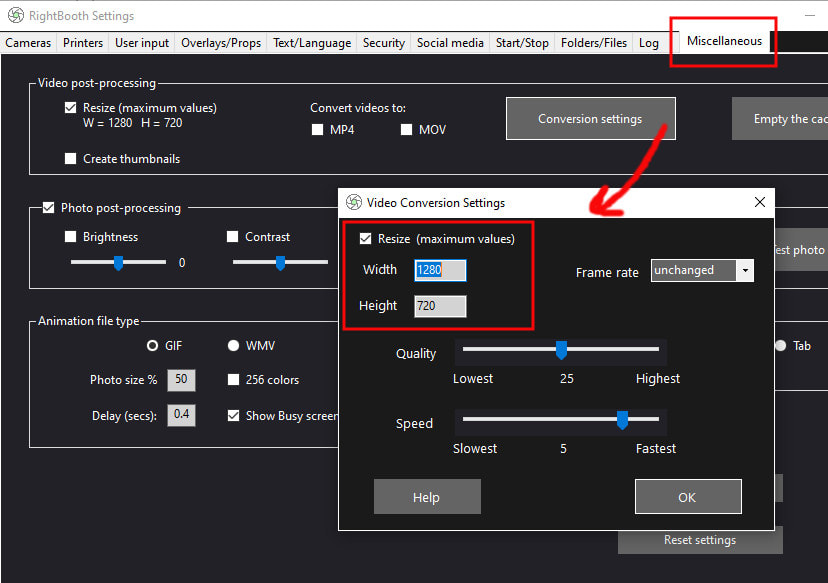 2.2 - Reduce the video quality and increase the conversion speed In the Video Conversion Settings, experiment with reducing the Quality slider setting and increasing the Speed slider setting:  2.3 Reduce the number of video enhancement segments If you are using RightBooth Video Enhancements and you are including a list of video segments, try reducing the number of segments used. Each segment you define will add extra time to the overall enhancement process. Also, try to use 'Fast mode' if possible: 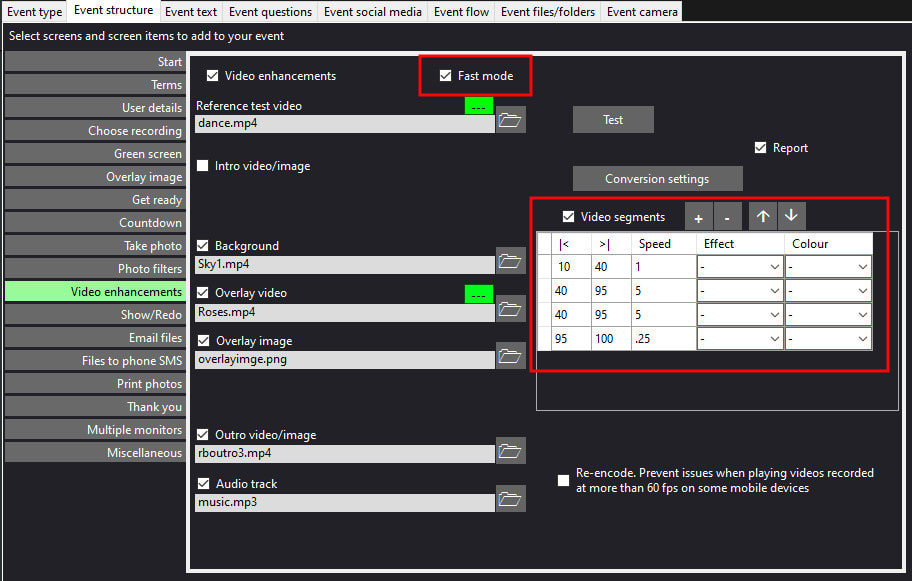 This video demonstrates 2 new features in RightBooth version 7.7.33: RightBooth Version 7.7.31 was released on July 5th 2022. It contains the following new features, modifications and fixes:
RightBooth version 7.7.27 is released today. The full list of new features and bug fixes is available here. Watch this video for an explanation of the main new features: spacedesk is an amazing app. It lets you use a tablet as an extended desktop to your main computer. Then you can show and interact with RightBooth on the tablet. Here's how:
Then:
Watch this video that demonstrates this setup: RightBooth version 7.7.25 is now released, containing the following new features and bug fixes:
I was recently asked if it is possible to reduce the amount of time it takes for a recording event to process video files, which in turn allows you to have a greater throughput of users at the recording station. This question seems particularly important when recording videos and then applying video enhancements, prior to showing them on a sharing station. Let's consider recording videos using a wireless GoPro. This is a typical workflow: 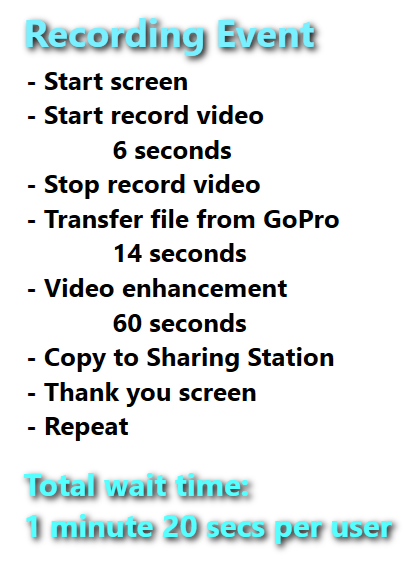 One way to reduce this time is to use another instance of RightBooth on the same computer as the recording event to play an intermediary Watch folder event that does the following:
Then you can remove the video enhancements from your recording event and set it to simply copy the GoPro videos to the watch folder event. Here is the new setup, using 2 instances of RightBooth: 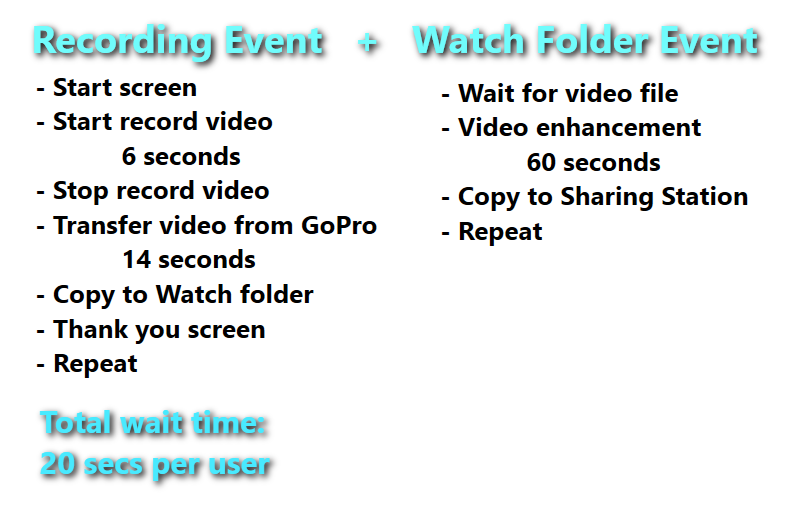 Note: The file copying steps can be performed automatically by the 2 events:
RightBooth Version 7.7.22
RightBooth Version 7.7.20
RightBooth allows you to choose a User Input Setting. This is done in RightBooth Settings --> User input. The choice you make will be applied to all the events you play on the computer. Here you can see the User input setting has been set to Touchscreen: 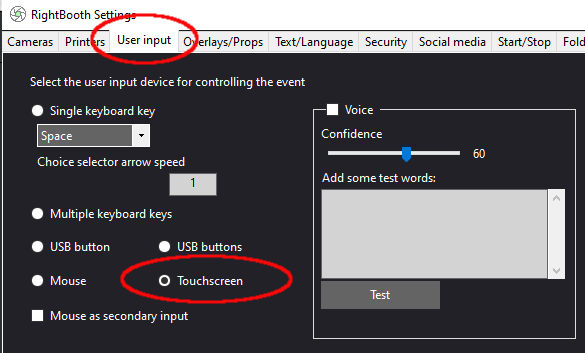 The chosen device can then be used to progress through the event screens and to make choices on various event screens.
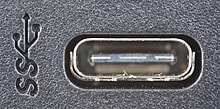
Single keyboard key – Selecting this option will require users to interact with events by pressing a key on the computer keyboard. By default this key is set to be the keyboard spacebar, but this can be altered to another key from the Key list. With this input mode you will need to give users access to the physical computer keyboard during events. Key list – This setting lets you choose one keyboard key that can be used to control your events when the User input mode is set to Single keyboard key or USB button. By default the control key is set to be Space (i.e. the spacebar on your keyboard). Other valid keys you can use are the function keys 1 – 12, the Scroll Lock key or the Pause key. Multiple keyboard keys – When this option is chosen, then during the event each text prompt that accompanies a choice button will also be shown with the associated key required to select the option. The keys that are associated with the various button actions are listed in the 'Action Key' table (see below). USB button – Users will be prompted to ‘press button’ during events. A USB button is an optional peripheral device that connects to your computer via a USB lead and it can be configured to send one or more specific keystrokes to the computer. By doing this, your users would simply need to press the USB button in order to control the recordings and you can then hide your computer keyboard and mouse out of sight. When using the ‘USB Button’ input mode, your USB button should be configured to send the keyboard key to the computer that matches the key you have selected in the Key list box (see earlier), which by default is the Space (spacebar). USB buttons – Users will be prompted to ‘press button’ on various screens during the event. This mode allows you to control RightBooth with a number of USB buttons attached to your computer. The USB buttons must be configured to send keyboard keys to the computer that match the keys listed in the Action key table. Compatible, low cost USB buttons can be obtained here: www.usbbutton.com Details on how to configure a USB button for sending keyboard characters to the computer are provided in the USB button user manual. However, in order to configure a USB button so that it works with RightBooth, we have included a USB button configuration file (rightbooth.ubn) with our software. This file can be found in the RightBooth program installation folder and can be loaded into the USB Button Configuration utility available from www.usbbutton.com. Mouse – Selecting this option will require users to interact with events using the computer mouse. Touchscreen – Selecting this option will require users to interact with events using a touch screen monitor. You can then hide your computer keyboard and mouse out of sight during events. 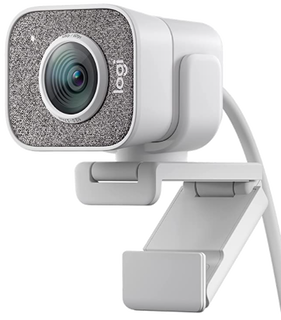 Logitech StreamCam RECOMMENDED FOR USB-C Connection Price: around $100 We have been testing the Logitech StreamCam which offers recording frame rates at up to 60 fps. This webcam offers fantastic video quality, audio quality and recording frame rates when connected to a USB-C port. In our testing, we achieved the following recording results:
IMPORTANT. If you connect this camera to a standard USB port you will not achieve recording frame rates greater than 30fps.
Latest video demonstrating the new photo post-processing features introduced in RightBooth version 7.7.10. The latest version of RightBooth is now released and contains the following improvements:
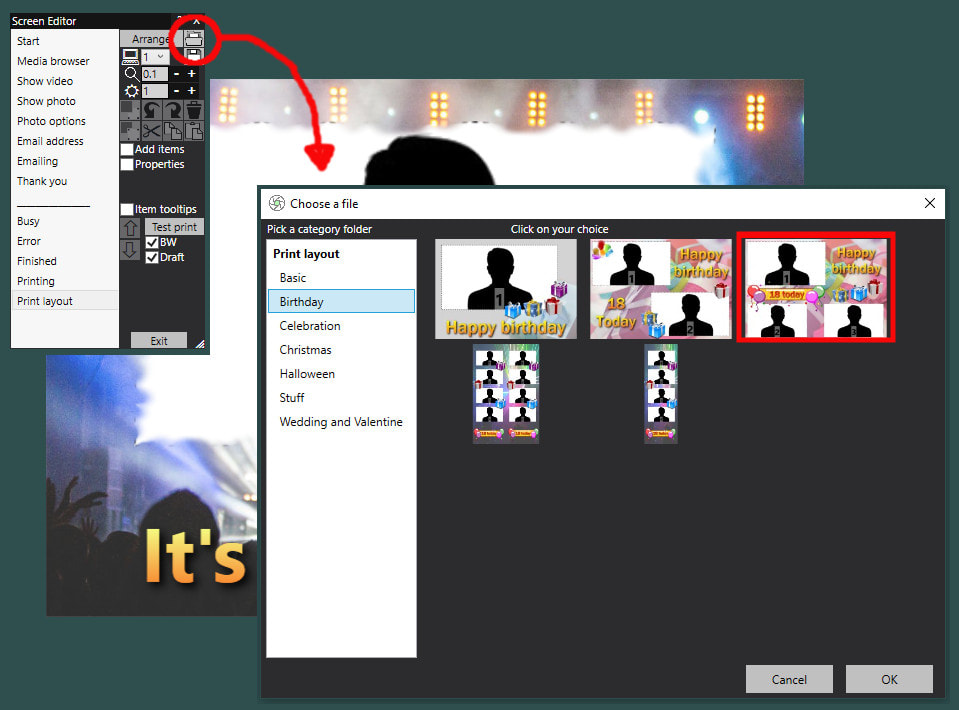
Latest training video explaining how to make use of RightBooth screen animations in order to add animated transitions between your event screens: Here is a flowchart showing the general process that RightBooth takes when recording videos using different camera types. Note that the hour glass indicates where RightBooth will display the Busy event screen for the time taken to perform the associated task. 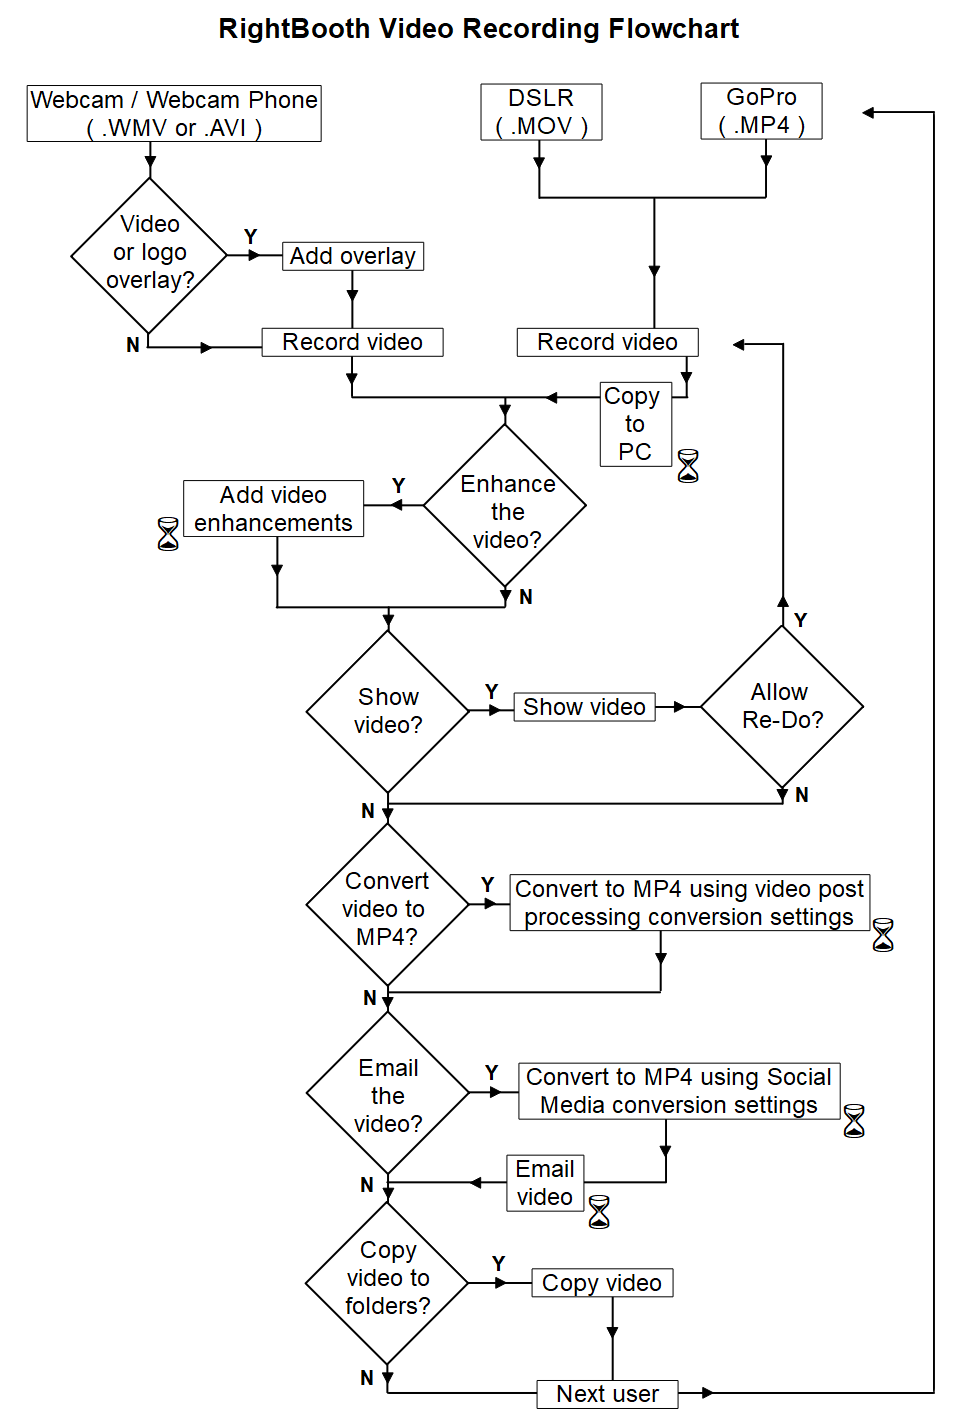 When you install RightBooth it also installs a Media Library. Part of this includes the Print layout library which (starting with RightBooth version 7.7) contains a number of pre-designed layouts that you can use in your photo capture events. There are two ways to choose a layout from the Print Layout Library: 1 Choose a Print Layout in the Event Wizard You can create a new photo capture event by clicking the 'Create' button on the main RightBooth window and choosing 'Create a photo capture event' You can then work your way through the Event Wizard and at the Printing stage you can choose to include printing in your event and then browse the Print layout library for your preferred layout. In this screenshot I have chosen to include printing by selecting 'Ask the user', then I clicked the 'Choose a photo print layout' button and I am browsing for a pre-made layout from within the library: 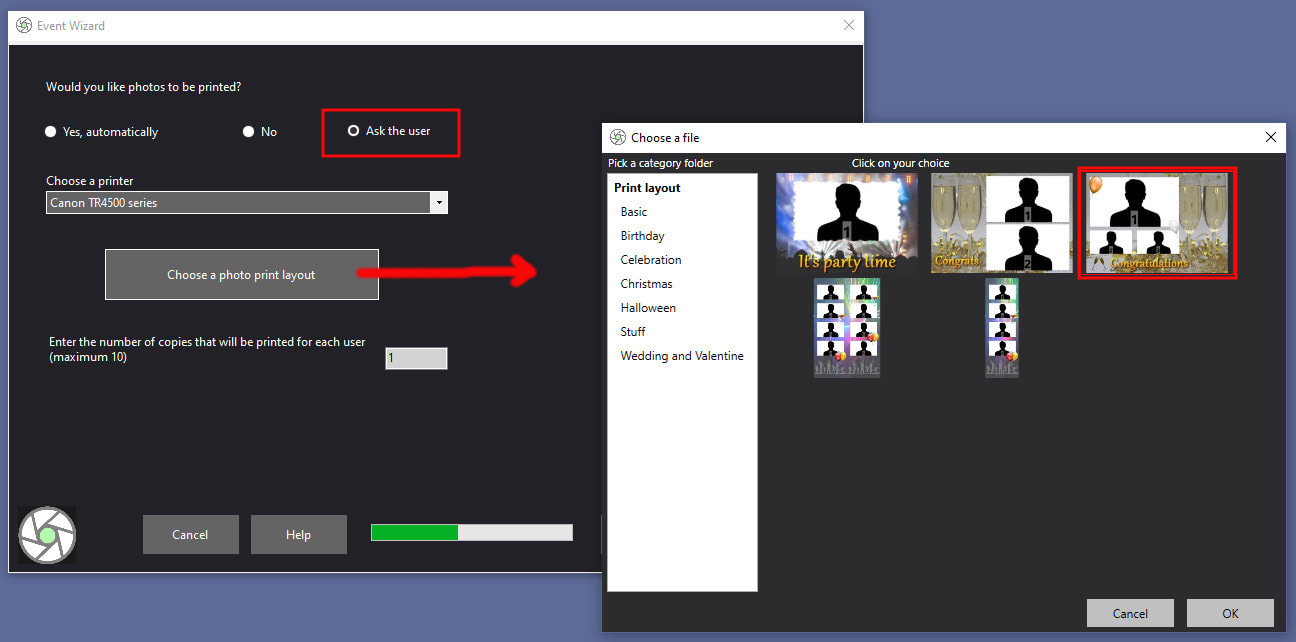 2 - Choose a Print Layout in the Screen Editor If you have designed your photo capture event to include photo printing then you can access the event's current Print layout in the Screen Editor.
 |
AuthorNigel Pearce 
Archives
April 2024
|
 RSS Feed

|
|