
|
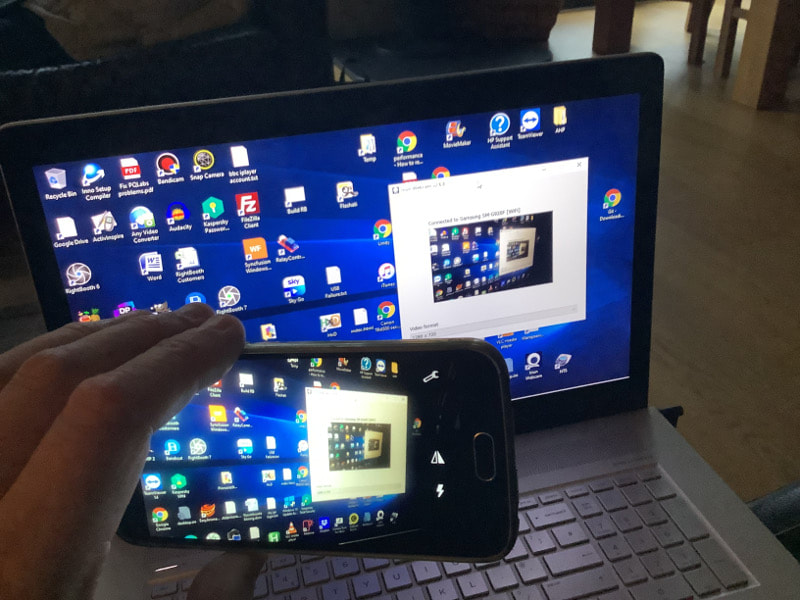
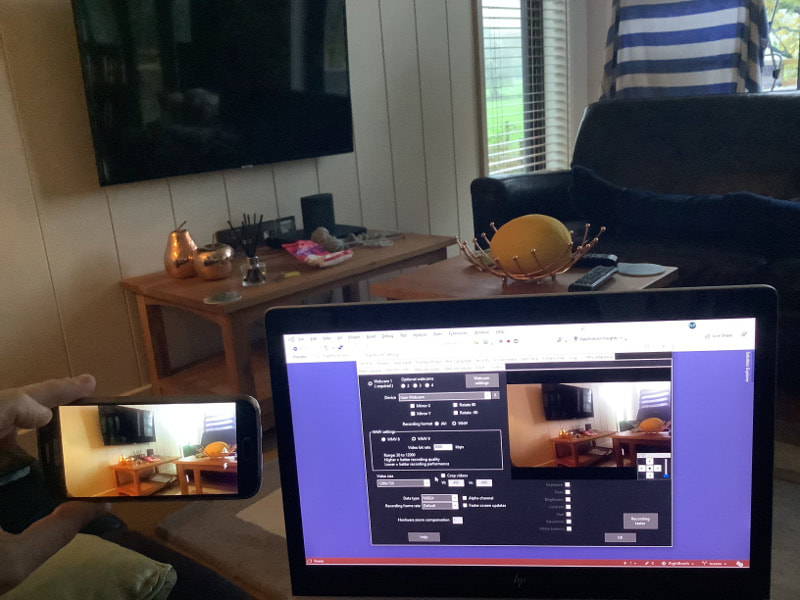
Update: 26th May 2022 This article describes the use of the iriun webcam app, but since writing it, DroidCam has been brought to my attention and in many ways it is more reliable and better performing than iriun. So when reading this article, also consider using DroidCam: https://www.dev47apps.com/ Want to use an iPhone's camera as a wireless webcam input into RightBooth? This article explains how. Also note that this solution works with an iPad's camera, or any Android phone or Android tablet's camera. Note: This is a great solution for wirelessly capturing photos and recording 'talking head' videos. It may not be ideal for fast motion video recording, such as that obtained from a 360 spinner booth. See Suggestions to improve performance (below). Note 2: If you are looking to record 360 (or fast motion) videos wirelessly in RightBooth, we recommend using a GoPro camera, because the videos are recorded on the camera prior to them being transferred over WiFi to RightBooth for video processing. Setting Up Step 1
Step 2
Step 3
Step 4
Step 5
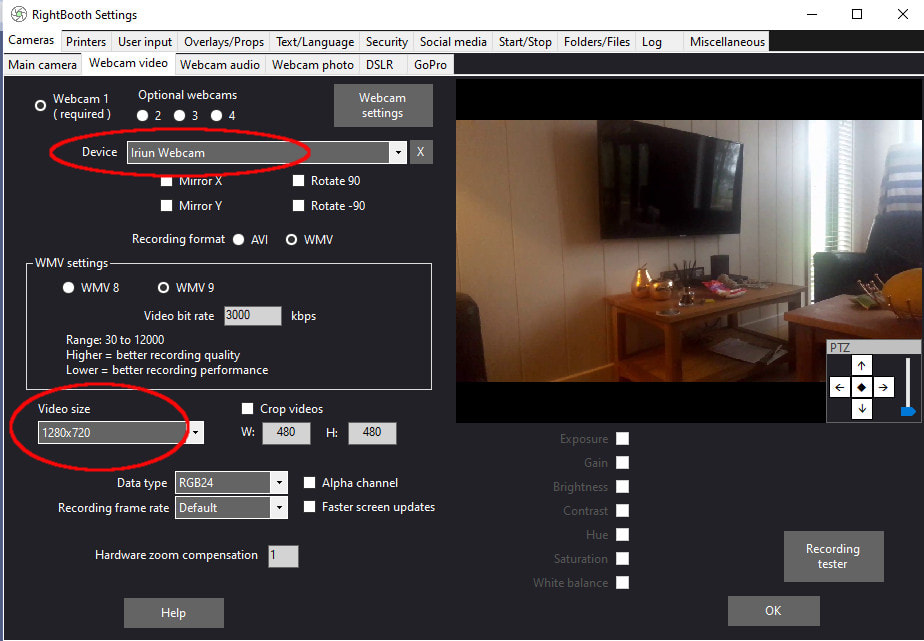
  Working in Portrait Mode If you prefer to work in Portrait mode, there is an option to switch to Portrait in the Iriun Webcam app Settings on your mobile phone. You will then need to tick the 'Rotate 90' check box in RightBooth Webcam video settings. Step 6
 Job done!
You can now capture high quality videos and photos in your RightBooth events, directly from your mobile phone (or tablet). And because the camera input is treated as a webcam by RightBooth you can also make full use of all RightBooth's webcam features, including Snap Camera overlays, digital props, ink drawing, face detection, video enhancements and video augmentation. Suggestions to Improve Performance A number of users have reported that the video recording is not fluent when using iriun and that it can skip frames, especially when recording fast movement, such as that obtained on 360 spinner equipment. If you are finding this happening, try the following:
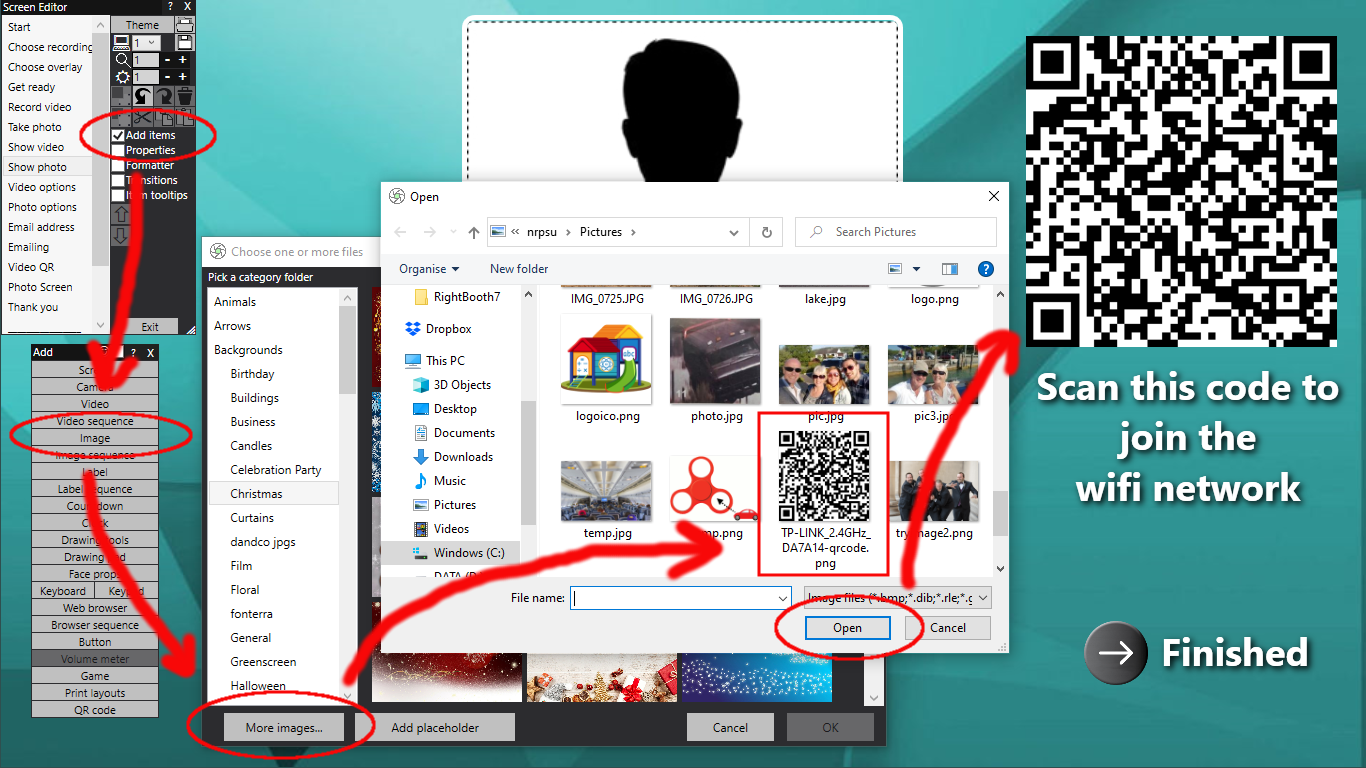
In addition to standard text, QR codes have evolved to encode text that has special meanings to QR code scanner apps. When a QR code scanner detects a special encoding it can then instruct your device (e.g. mobile phone) to perform an associated action or run an associated app. Examples of special QR codes include Skype codes, email codes, URLs and WhatsApp messages. In this article we are going to consider WiFi QR codes and how to add them onto your RightBooth event screens. Then, when scanned, the code will allow your event users to connect to a WiFi network of your choice without them having to manually select the network or enter the required WiFi password. Step 1 - Create a WiFi QR Code Image RightBooth has a feature that lets you show QR codes on your event screens but it currently doesn't provide the ability to generate WiFi QR codes. However, there are a number of apps online that can generate WiFi QR code images for you free of charge. The one I am using for this article is the JS WiFi Code Generator which can be found here: https://qifi.org/ At this website, simply enter the SSID, Encryption method and Key (password) for your WiFi router. In this example, I am creating a WiFi QR code for my TP-Link N600 router which uses the WPA2 encryption method: 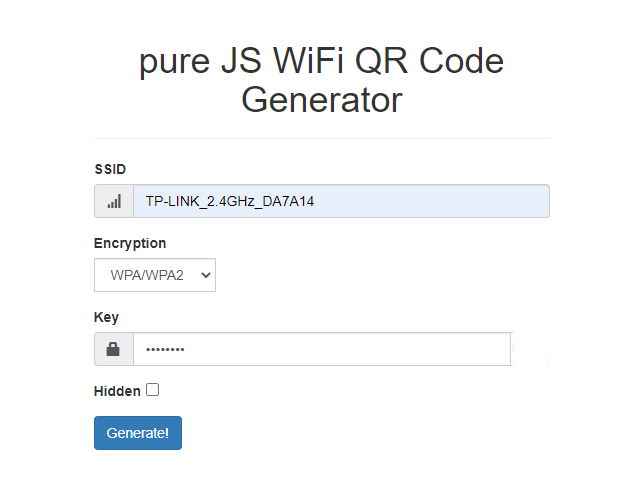 When you have entered your WiFi details, click the 'Generate' button, then click 'Export' to download the generated QR image to your PC... 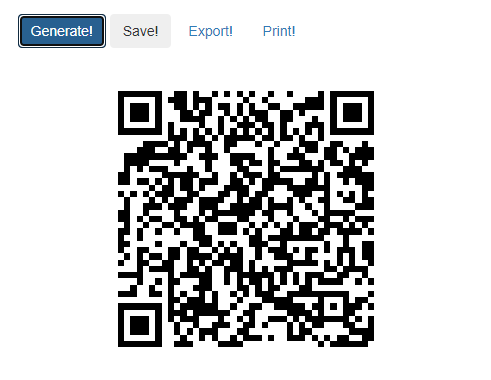 By default your browser will download your QR code image into your Downloads folder, so make sure you move it to somewhere more permanent such as your Pictures folder. Step 2 - Add the QR Code Image onto your RightBooth Event screen
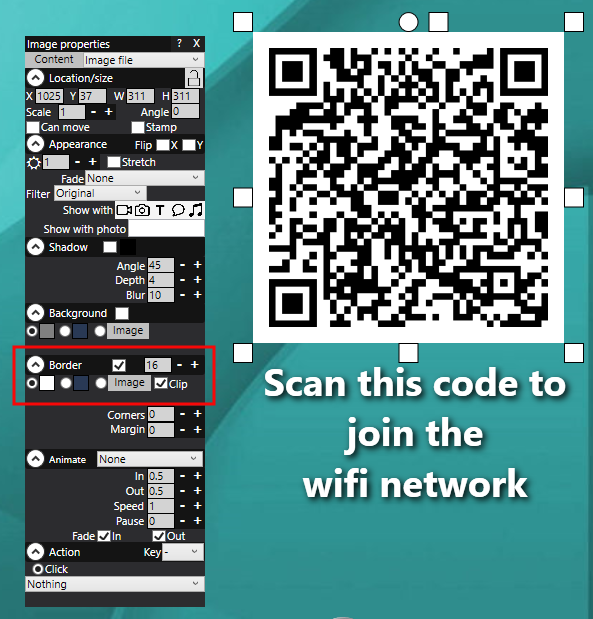
 Step 3 - Add a white border to the QR code image This is required to help improve the ability for QR code scanner apps to detect the QR code.
 Job done!
Now when the QR code appears on your event screen, users can scan the code using the QR code scanner on their WiFi enabled device (e.g. mobile phone) to join your WiFi network. So you want your RightBooth users to enter one or more coins into a coin acceptor before they are allowed to use your event. What you need to do is to find a coin acceptor that can be used to send a keyboard keypress into Windows. Then you can alter your RightBooth event so that it cannot be used until coins have been inserted into the coin acceptor. Option 1 Coin acceptor with a micro switch connected to a StealthSwitch 3 or a U-HID There are many companies providing arcade style coin mechanisms that generate pulses on a micro switch output, such as can be found here: https://www.arcadeworlduk.com/categories/Arcade-Parts/Coin-Mechs/ Obtain a StealthSwitch 3 here: StealthSwitch 3 or a U-HID board. Connect the StealthSwitch to the PC using a USB cable. Then wire the coin acceptor to the StealthSwitch and test that the coin acceptor can control the StealthSwitch input. For information on how to do this, see the section: Connecting the coin acceptor to the StealthSwitch 3 on this website Other Options If you are feeling more adventurous, you could experiment with solutions like this: www.casino-software.de/cash-interface2_e.htm#keystroke or this: jukeblaster.com/coinkit.html Modifying RightBooth to accept the keyboard key Once you have your coin acceptor working and connected to the PC, here is the change you need to make in RightBooth:
 Now when you play the event, RightBooth will wait at the Start screen until a coin is inserted into the coin acceptor. You can design the Start screen so that it prompts your users to enter a coin (or coins) in order to use the system.
Once coins have been entered, RightBooth will receive the specified key input and will then progress onto the next screen in your event, allowing the user to access the rest of your event features. Also, at the end of each user session, RightBooth will return to showing the Start screen, waiting for the next user to enter coins into the coin acceptor. With this setup, you can set RightBooth to be used by touchscreen (or mouse) so that once your users have successfully progressed past the Start screen, they can then fully interact with all the other screens in your event. Please note: If you run into difficulties with your chosen coin acceptor or StealthSwitch you will need to contact the supplier for help. As far as RightBooth is concerned, it will be simply waiting at the Start screen for the keypress to be generated. Updated: April 2022 Training video explaining:
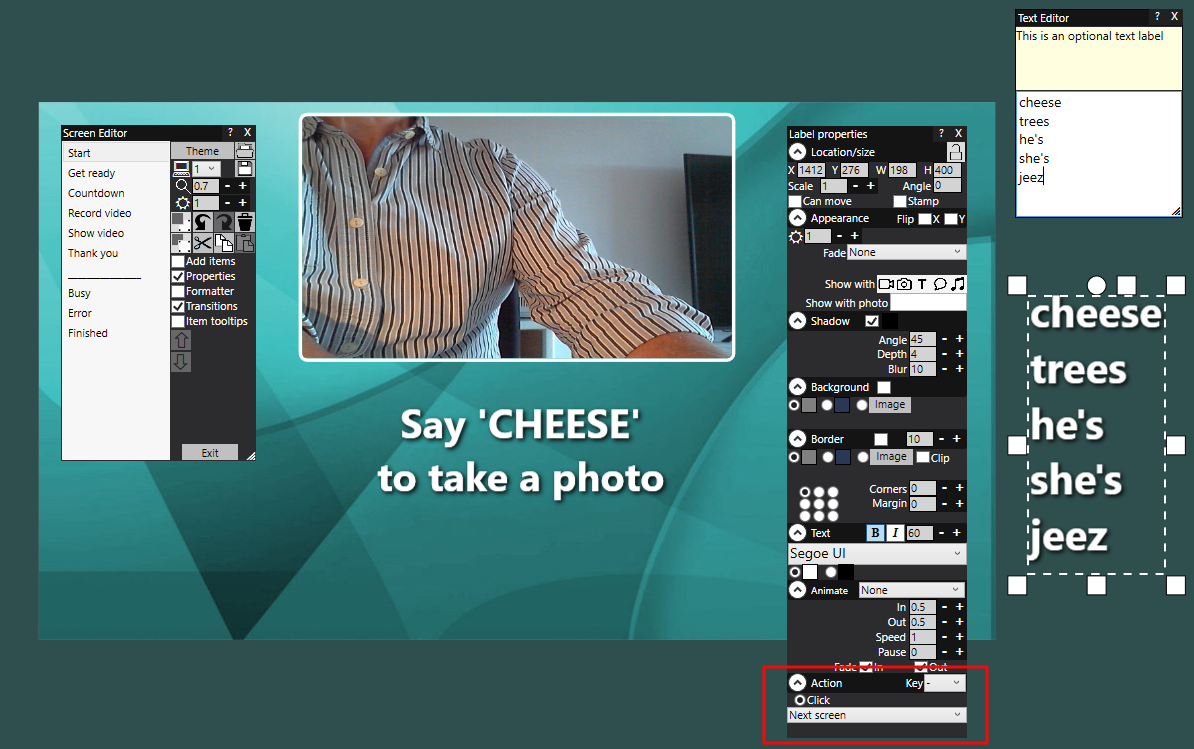
IMPORTANT. You will need to be using RightBooth version 7.6.28 (or newer) in order to implement the solution described in this article. I had an interesting email chat with one of my RightBooth users about the consistency of the Voice Recognition feature. He was simply wanting his event users to say the word 'cheese' in order to trigger the taking of a photo. So he created a photo capture event and on his event Start screen he added the word 'cheese' as a label item having the action 'Next screen', and then he turned on the Voice Recognition feature. But when playing the event he was finding that the spoken word 'cheese' was not always being recognised as such, and this led to our email chat. On testing this myself, I discovered that when speaking the word 'cheese', the recognition engine was occasionally (and incorrectly) recognising my spoken word as one of the following similar sounding words:
Now this recognition inconsistency is actually inherent in the Microsoft Voice Recognition system and it makes RightBooth appear to ignore quite a few spoken words. So here is my suggestion to improve the reliability:
 Job done!
Now when any user says 'cheese' and it is incorrectly recognised as one of the similar sounding words, RightBooth will still accept the word as a voice command and will progress to the next screen as intended, effectively making the voice recognition more reliable and consistent. RightBooth version 7.6.27 has been released and contains the following new features and fixes:
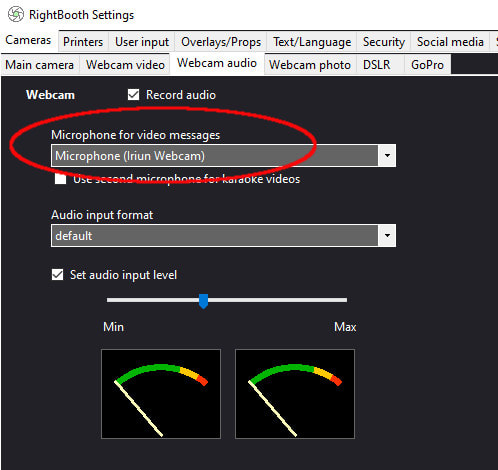
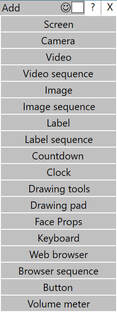
1) Add the 'Record audio' checkbox in RightBooth Settings --> Cameras --> Webcam audio. This allows you to record webcam videos that do not contain an audio track. 2) Allow .wav files to be used as the audio track in the RightBooth Video Enhancements. 3) Add the QR code item to the 'Add items' toolbox in the Screen Editor. This allows QR codes to be added to event screens with a fixed aspect ratio and a correctly sized white border that improves the ability for QR code scanner apps to identify the QR code. 4) Add the 'Choose when to perform file copy actions' options in Event Designer --> Event files/folders. These new options allow you to choose at what point in the playing event flow that various file copy actions will occur. You can choose from the following:
Fixes:
So you have a DJ at your event and you want to allow your guests to send song requests to the DJ throughout the evening. This article explains how you can facilitate this using RightBooth. 1) Use the RightBooth Event Wizard to create a message event. Or in the Event Designer --> Event type, tick the Message check box to include the Message option in your video recording or photo capture event. In this screenshot we have chosen to include messages in our Photo event: 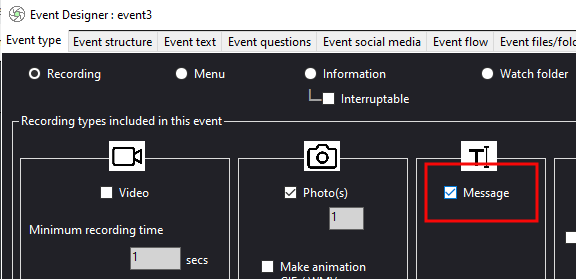 2) In Event Designer --> Event structure --> Email files, in the section 'Email the event messages' choose the 'Yes' option. This will force each message entered during the event to be automatically emailed to the DJ: 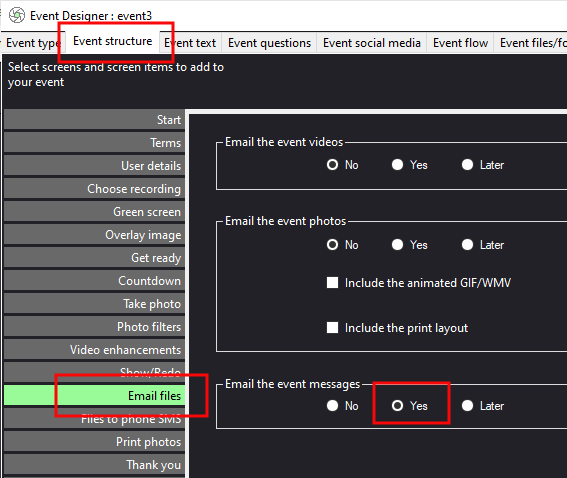 3) In Event designer --> Event social media, untick the option 'Send to user email address'. (see screenshot below). This prevents each user from being asked to enter their own email address after they have entered their message. 4) Enter your DJ's email address into the 'To' text box. This will cause RightBooth to automatically send each message to the DJ's email address. You can also customise the email Subject and Body text accordingly: 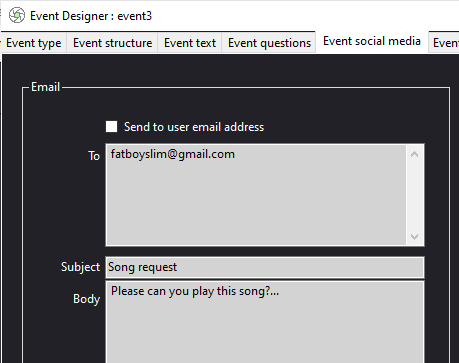 Note: If you want to send the messages to more than just the DJ, enter each of the other recipient's email addresses on new lines in the 'To' field. 5) In RightBooth Settings --> Social media --> Email server, enter your email Server Host and your account details. This is the email account from which RightBooth will use to send emails to the DJ's email address: 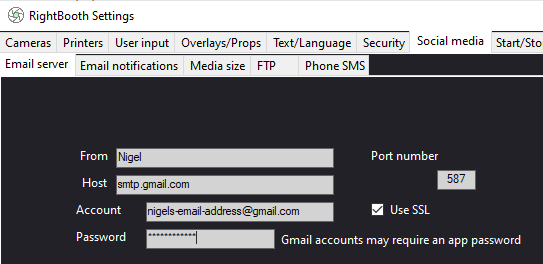 Note: Please refer to your email provider's documentation for the details of your email account. 6) In the Screen Editor, on the Choose recording screen, alter the Message button text item with appropriate wording: 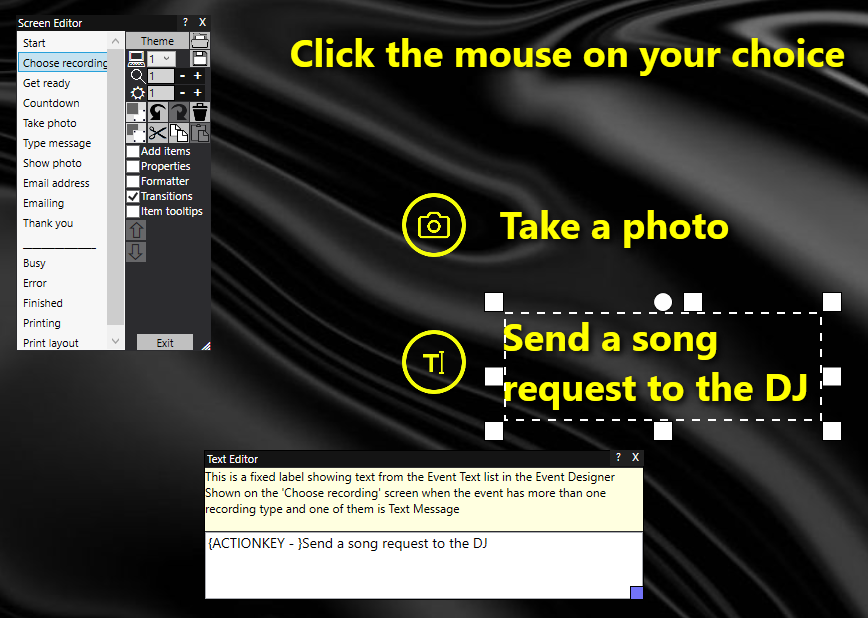 7) In the Screen Editor on the Type message screen, alter the text prompts with appropriate wording: 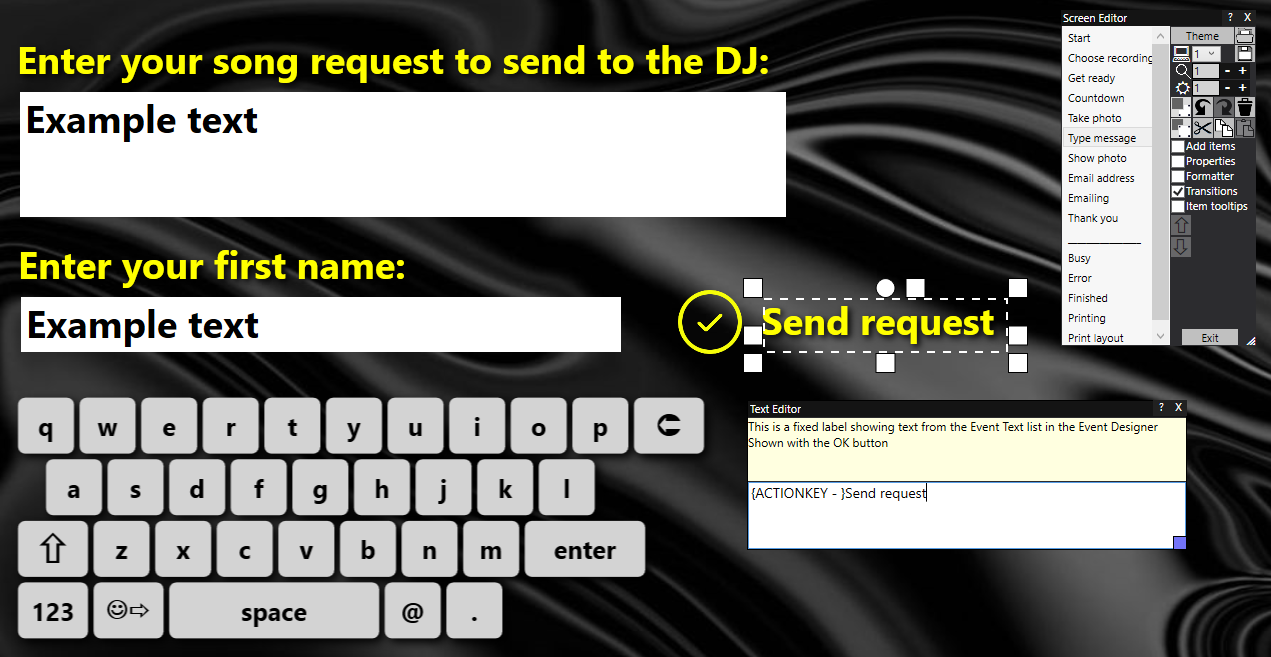 Job done ! Now play the event and each time a user enters their song request, it will be automatically emailed to the DJ for his consideration. A guide on how to use a single USB button for controlling your RightBooth events. 1 - Buy a USB button. We recommend using this button: www.usbbutton.com 2 - Plug the USB button into a free USB port on your PC. Wait until Windows configures the button for use. 3 - Download and install the USB Button Configuration utility, available from the website link mentioned in 1). 4 - Run the USB Button Utility 5 - Use the File --> Open menu to open the following file: c:\Program Files (x86)\RightBooth\rightbooth.ubn 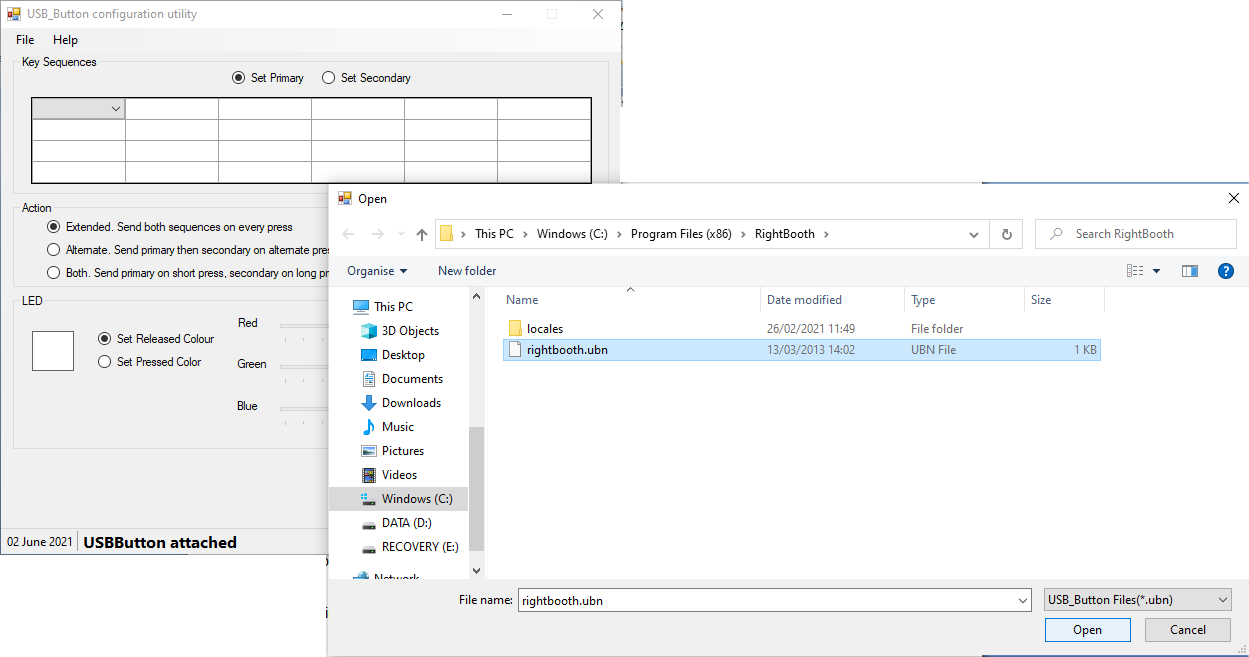 6 - Press the 'Program Button' button to configure the USB button so that it will send the Spacebar keyboard character to Windows. Note that this is a one time requirement... 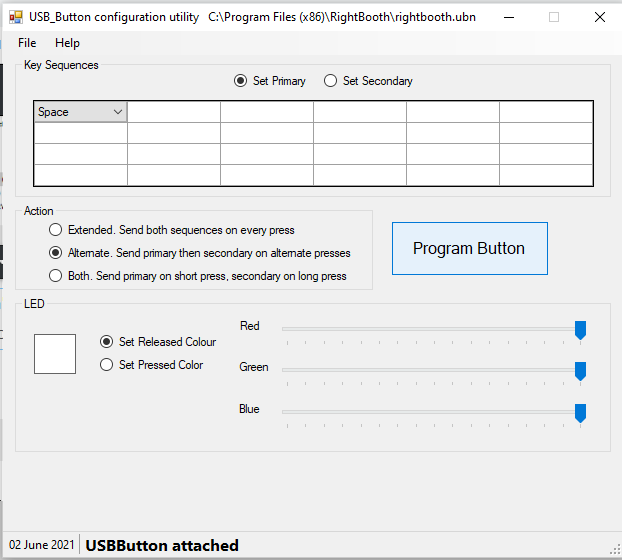 7 - Run RightBooth. Go to Settings --> User Input 8 - Select the option 'USB button' and make sure the Single keyboard key is set to 'Space'... 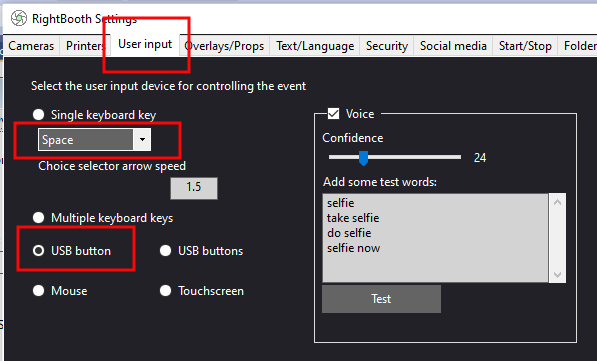 9 - Open your event and go into the Screen Editor. 10 - Look at each screen that has a choice selection and ensure that the selection arrows correctly point at the text choices. If they don't, edit the label items accordingly. In this example screenshot the selected label item has been widened so that it straddles the accompanying button and its text contents have been right justified so that the selection arrows are positioned to the left of the button and to the right of the label item: 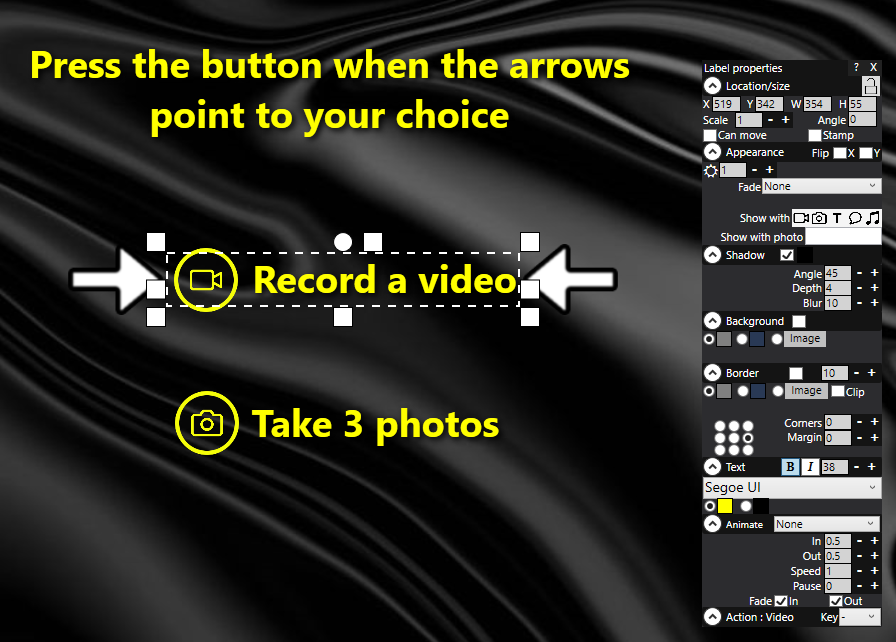 11 - Play the event. The arrows will move automatically between the text choices. When the arrows are pointing at your required choice, you can press the USB Button to select the choice.
12 - If the arrows move too quickly between the choices, return to Settings --> User Input and increase the Choice selector arrow speed IMPORTANT: If you need to edit the selection arrows, you must always select the 'left most' arrow. Any changes you make will be applied to both arrows. Updated: December 2023
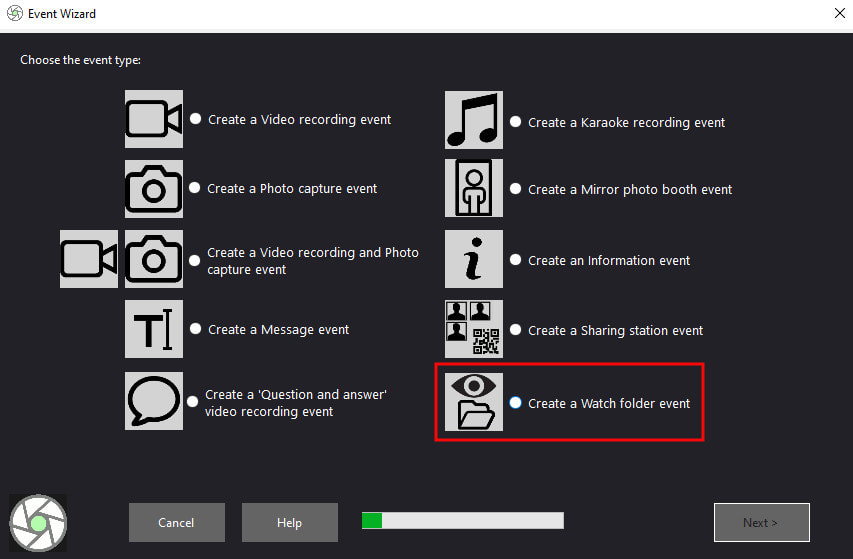
RightBooth now provides the new event type: 'Watch folder'. This allows the event to watch a folder when it plays and then to process videos and photos that appear in the folder. The event flow is as follows:
In 'Watch folder' mode, the event will not allow any video recording or photo capture to take place within the event itself, it is purely watching for files to appear. Here's how easy it is to set up:
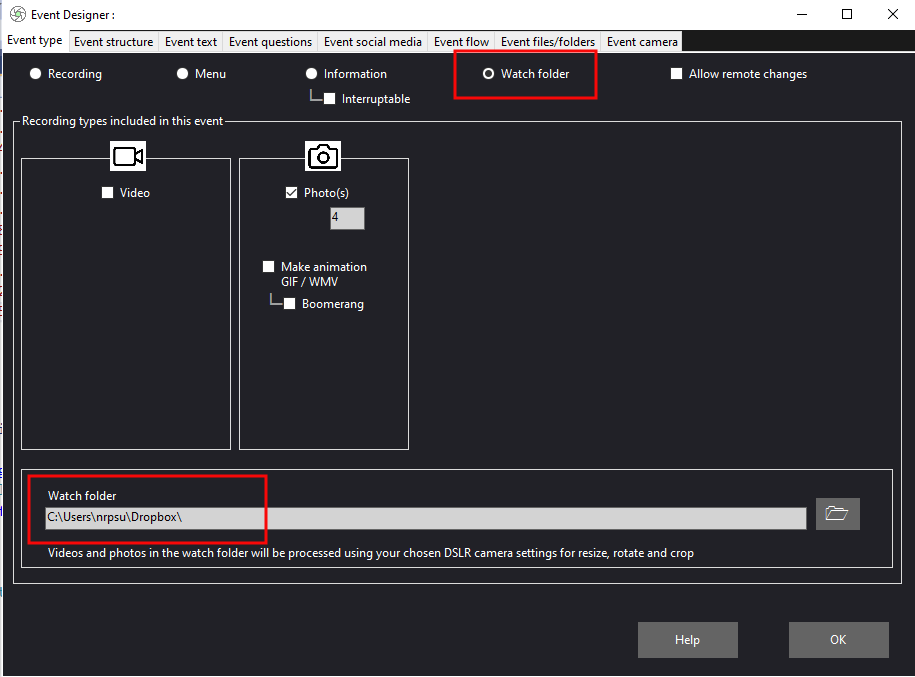 Notice in the above screenshot that we have chosen to watch a Dropbox folder. You just need a free DropBox account and install the DropBox client app on the computer. Then choose the Dropbox folder as the Watch folder.
This allows you to implement a very interesting workflow. If you make your Dropbox folder available on other devices, such as mobile phones and tablets (via the Dropbox mobile app), then you (and possibly others) can roam around, away from the computer, taking photos and/or recording videos with your mobile device, while allowing the DropBox app to automatically copy them to the RightBooth Watch folder back on the computer. And each time these files appear in the folder, RightBooth will process them for you, for example, automatically resizing and cropping photos, adding an overlay logo and then maybe printing them, and/or perhaps emailing them to a predefined email address. RightBooth version 7.6.9 is released today, including the new Video enhancements features. Full details
RightBooth 7.6.5 is now released. See the Release Notes for a full list of the updates. This release contains the new Send to Phone feature which is explained in these training videos:
Demonstrating the following screen editor enhancements: - Toolbox sizer - 'Intelligent' tooltips - Toolbox fading and layering - Monitor selector - Move forward and Move backward buttons - The new Keypad item
RightBooth version 7.6.1 has a new 'Print layouts' item in the Screen Editor that can be added to any of your event screens and can contain any number of your pre-designed photo print layouts. Then when the event is playing, your event user may choose one of the layouts for RightBooth to use when printing their photos... If you want to know how to create your own print layouts in RightBooth, check out this video: https://youtu.be/3_Z-kA7pDLA
It is possible to allow your users to change the order of the photos on the print layout prior to the layout being printed. Note you will require RightBooth version 7.5.31 or later for this feature. To do this:
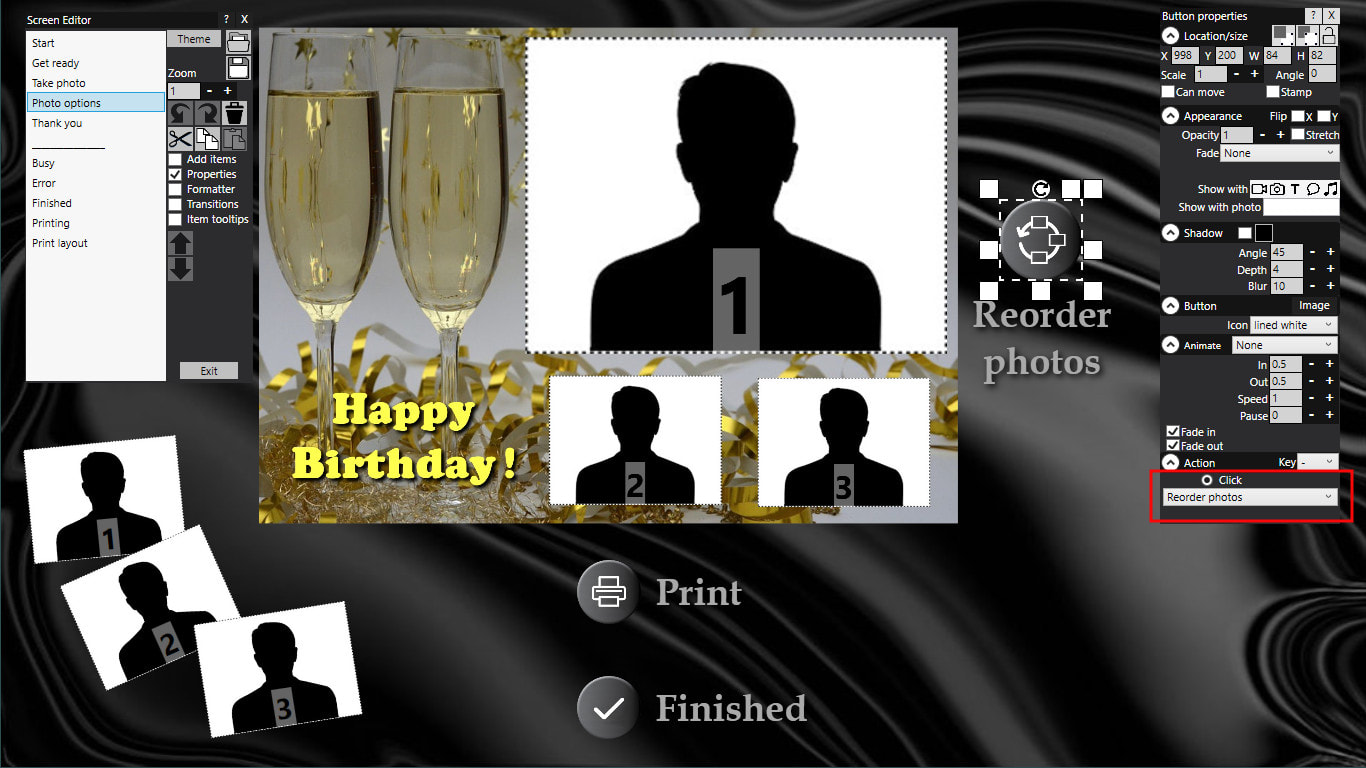 Now when you play the event and after taking 3 photos, they will initially appear in the print layout in the order that they were taken: 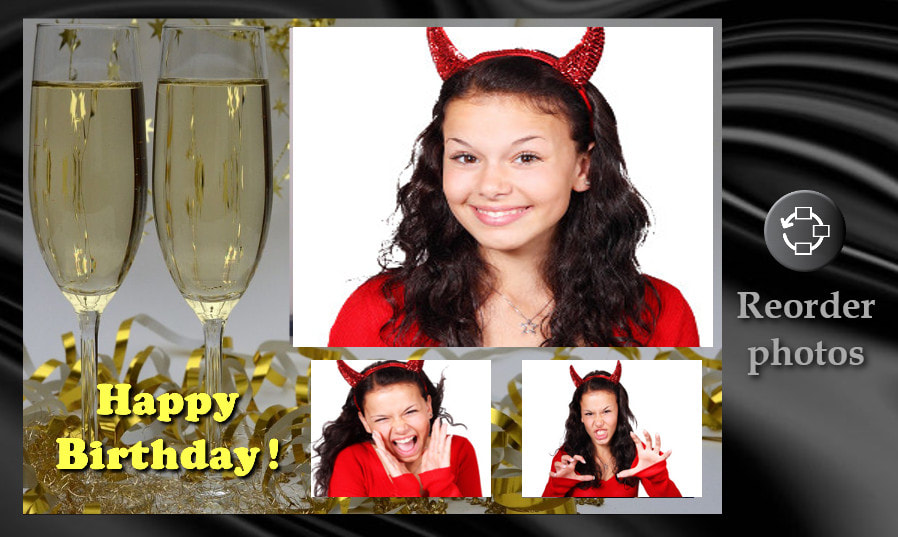 Now if the user clicks the Reorder photos button, the photo order will be changed as follows:  The user can continue to click the Reorder photos button until the photos are in the preferred order, prior to printing.
Here is the latest training video demonstrating how to:
Here is the envelope.png image that is used in the video:
Showing how to:
Updated: October 2023 A number of questions were recently posted on the RightBooth Facebook forum. Here are the questions, together with the answers: - How to take one photo and print at 10x15cm? - How to make and use your own print layouts? Watch video: - How to sign and draw on a photo? Watch video: - How to give the user a choice of green screen backgrounds? Watch video: - How to make a menu for games? - How to add games other than those in the RightBooth Media Library? Watch video: - Are there any 'printing' animations or 'countdown' animations?
The RightBooth Media Library comes with a limited number of video animations that can be included on your event screens. They are all installed in the following folder: C:\Users\Public\Documents\RightBooth7 Library\Videos RightBooth is able to play many video file types including MP4, AVI and WMV files, so it will be able to play most files that can be obtained from any of the companies who specialise in creating video animations for mirror booths and photo booths, such as: Mirror Booth Animations Simply search the Internet for 'animations for mirror booths' - Is there a way to share photos to Instagram, Facebook or WhatsApp? RightBooth can currently send files by email, upload files to websites via SFTP, copy files to network folders and upload files to cloud storage services such as Google Drive and DropBox. You can also send files to WhatsApp accounts. Sharing files onto other social media sites is currently not available but we continue to research this feature. However, it can be achieved using tools like IFTTT and Zapier that can automate the transfer of files uploaded by RightBooth to cloud storage drives, then onto social media accounts. Further information is available in the RightBooth User Manual. RightBooth version 7.5.25 introduces the following new features that can help improve the quality and variety of your quiz and survey events. 1 - Scoring Questions When entering answers on the Multi Choice Answer table, you can now choose to make any question a scoring question by ticking the appropriate check box under the new ‘Correct’ column. Note that specifying a correct answer is optional. In this example screenshot you can see that the answer 'Washing D.C.' has been set as the correct answer to the multi choice question: 'Capital of USA?'... 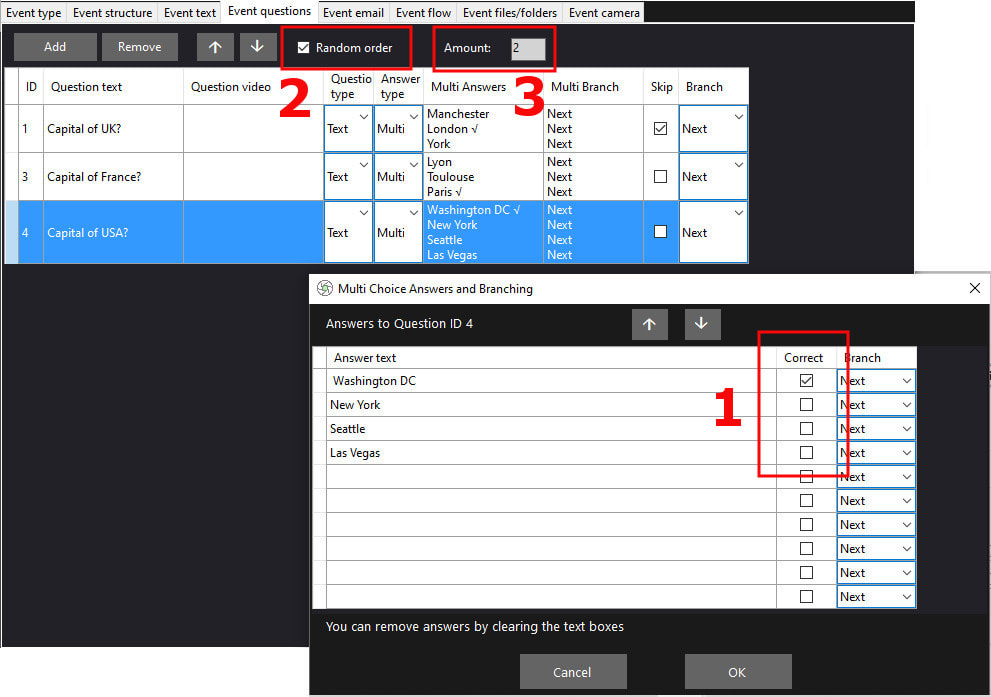 2 - Random question order You can now optionally randomise the order that the questions are presented to each user. In the above screenshot you can see that the Random order check box has been ticked so each user will be shown the questions in a different order. 3 - Question Amount You can now specify the number of questions you would like each user to be shown. This value can be particularly useful in combination with the 'Random order' setting where you want to show a different sub-set of questions to each user. In the above screenshot each user will be shown 2 of the 3 questions randomly selected from the table. Note: Entering ‘0’ causes the Amount value to be ignored, meaning all users will be shown all the question in the table. 4 - Show the Question Score to Users Two new text variables are now available for use in any label item content. {CURRENTSCORE} - This will show the current score for the current user. The current score is the total number of multi choice questions that the user has answered correctly (see above). {QUESTIONSASKEDCOUNT} - This will show the current number of questions that the user has answered. In this screenshot we have added a new text item to each of the Question screens and used the two new text variables in the label content to show the user their current score, which will then be updated on-the-fly as users progress through their questions... 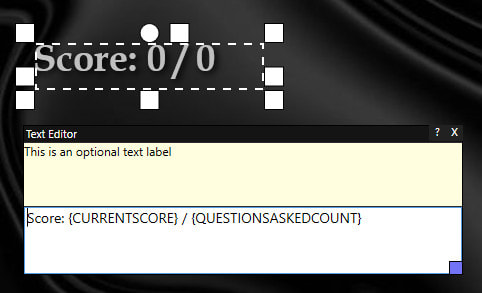 Adobe are removing support for SWF files starting from 31st December 2020 and they are blocking content from running in their stand-alone Flash Player app from 12th January 2021. Adobe are currently encouraging you to uninstall the Flash Player from your PC and all the web browser companies will soon be removing the Flash plug-in from their products.
For these reasons any SWF files that you have embedded on your RightBooth event screens will no longer play if the Flash Player is removed from your PC. My understanding is that if Microsoft had previously (and automatically) installed the Flash Player on your PC it will also be automatically uninstalled by Microsoft in a future Windows update, probably during or shortly after December 2020. However if you had independently installed the Flash Player on your PC then it should remain installed after December (unless you manually uninstall it). If you rely on SWF files in your events and you can manage to keep the Adobe Flash Player installed on your PC then you may find that SWF files continue to play in RightBooth after these dates, but this statement is not guaranteed and can only be verified after 12th January 2021. Therefore you should now plan to move away from using SWF files in your RightBooth events and use embedded video files instead. Also with interactive SWF games, our advice is to start using HTML5 games in your event designs instead, as these continue to be fully supported via the RightBooth Web browser item. I can only apologise if this causes you some inconvenience but the decision to 'kill' the SWF file format has been made and its days are over. Updated: Nov 9th, 2022 Starting with RightBooth version 7.5.24 we have introduced a White Label Editor for use with RightBooth. The White Label Editor allows you to completely customize the main RightBooth window to make the app look like your own product. This can be useful when you have created a RightBooth powered solution and you want to:
Let's look at how this works using an example. The company J&M Gifts have used RightBooth to create a survey event that will be used by visitors to their exhibition stand and they want to make RightBooth look like their own app. 1 - Unmodified RightBooth First let's remind ourselves what RightBooth looks like. Here is the unmodified main window ready to play the survey event: 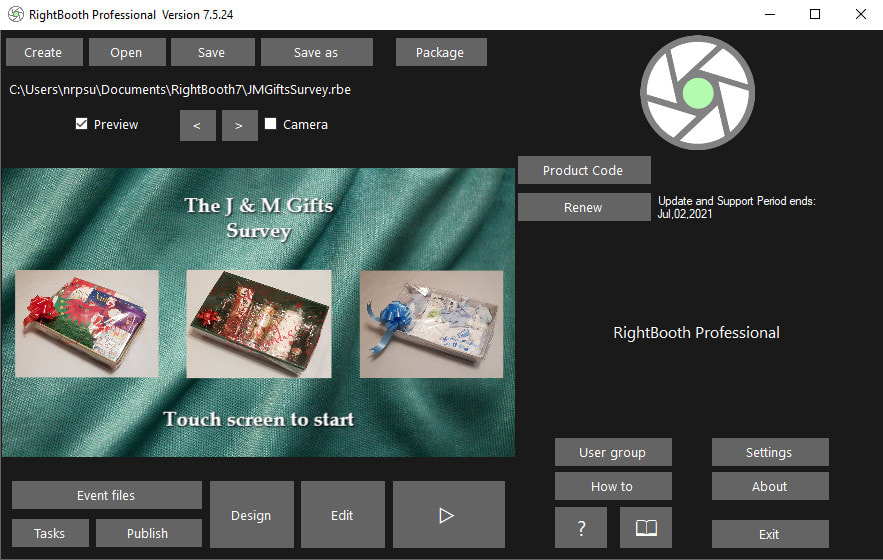 2 - The White Label Editor J&M Gifts now run the White Label Editor. In the screenshot below you can see that they have renamed the app, added a logo and a background, added company information, hidden various RightBooth buttons and changed various user interface colours. And finally they have ticked the 'Use White Label' checkbox to activate the White Label feature... 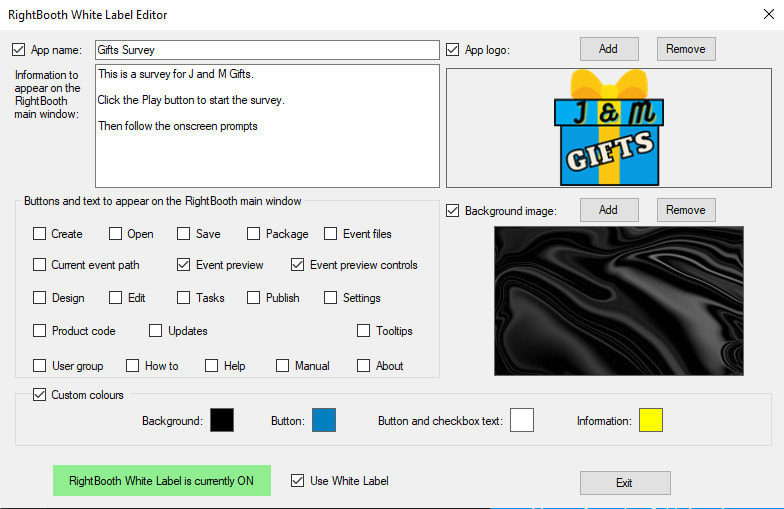 3 - RightBooth - with White Label Feature Activated They now exit the White Label Editor and restart RightBooth. This is how the main window looks with all their white label features applied: 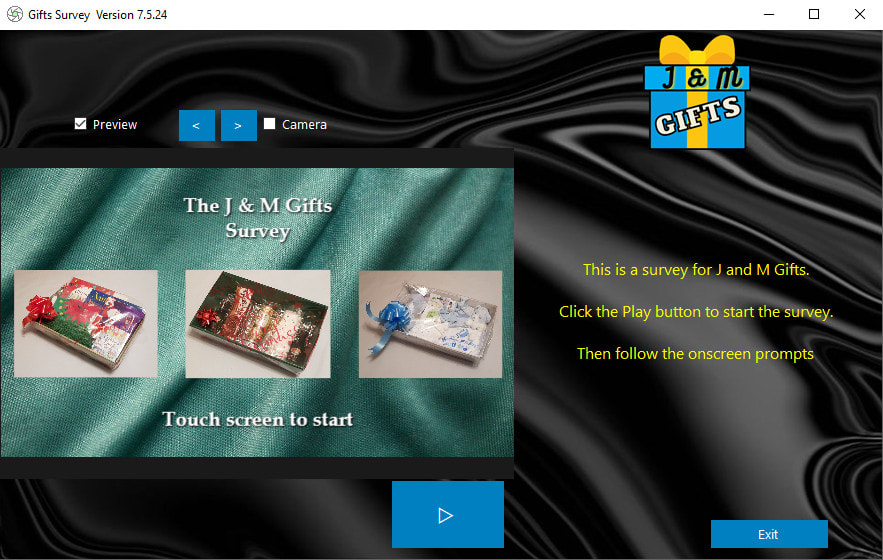 Notice that there is no mention of RightBooth on the main window, everything is branded 'J&M Gifts' and their users may only Play the survey or Exit the app.
How to access the RightBooth White Label Editor
RightBooth version 7.5.21 adds the new button 'Game' to the 'Add items' toolbox in the Screen Designer. This allows you to add interactive games onto your event screens. RightBooth includes 16 pre-selected games to choose from: 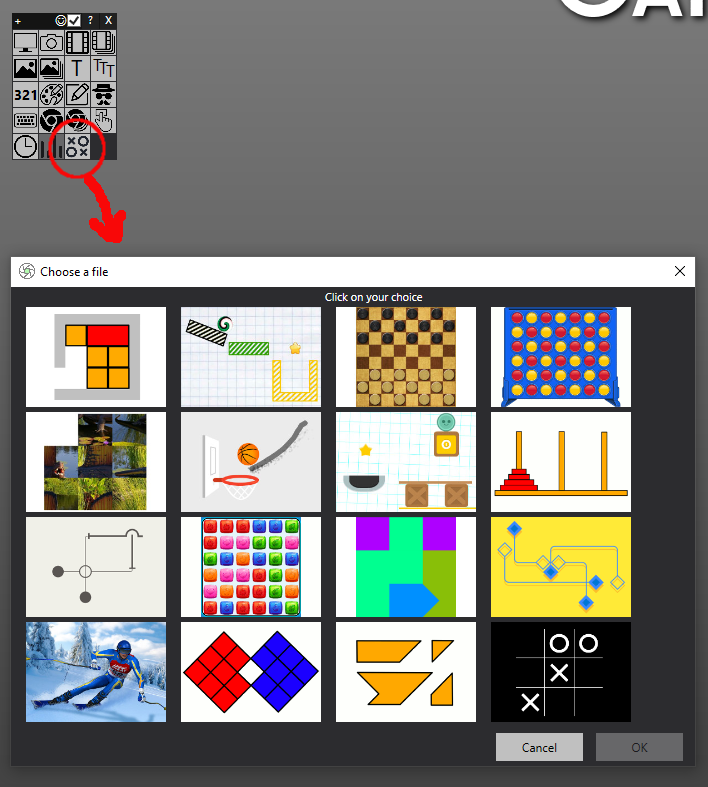 It is also possible to add further games that are hosted at various online websites and this training video explains how to do this:
|
AuthorNigel Pearce 
Archives
April 2024
|
||||||||||
 RSS Feed

|
|