
Creating Animated GIFs
Updated: Jan 2021
RightBooth can automatically create an animated gif from each set of user photos taken during the event. RightBooth supports creating both Standard gifs and Boomerang gifs (in RightBooth version 7.1.1 onwards).
But what's the difference?
Here are some Standard animated gifs:
RightBooth can automatically create an animated gif from each set of user photos taken during the event. RightBooth supports creating both Standard gifs and Boomerang gifs (in RightBooth version 7.1.1 onwards).
But what's the difference?
Here are some Standard animated gifs:
|
|
Here are some Boomerang animated gifs of the same activities:
|
|
In the standard animated gifs, photos are added in the order they are taken.
The examples above all use 10 photos, added into the gif from 1 to 10.
In the boomerang animated gifs, the photos are added 1 to 10, but they are also added again from 9 back down to 2, creating a cyclic animation sequence.
So how is this all done? Read on...
The examples above all use 10 photos, added into the gif from 1 to 10.
In the boomerang animated gifs, the photos are added 1 to 10, but they are also added again from 9 back down to 2, creating a cyclic animation sequence.
So how is this all done? Read on...
|
|
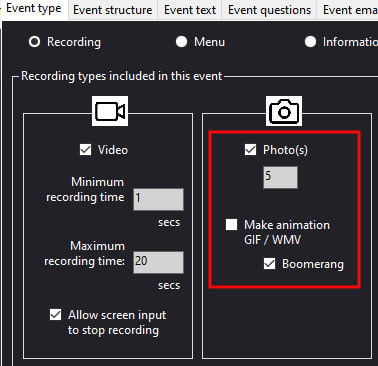
Now play the event, each user will capture 5 photos, then RightBooth will automatically create the animated gif and save it in the same folder as the photos. But what if you want to show the user their animation?...
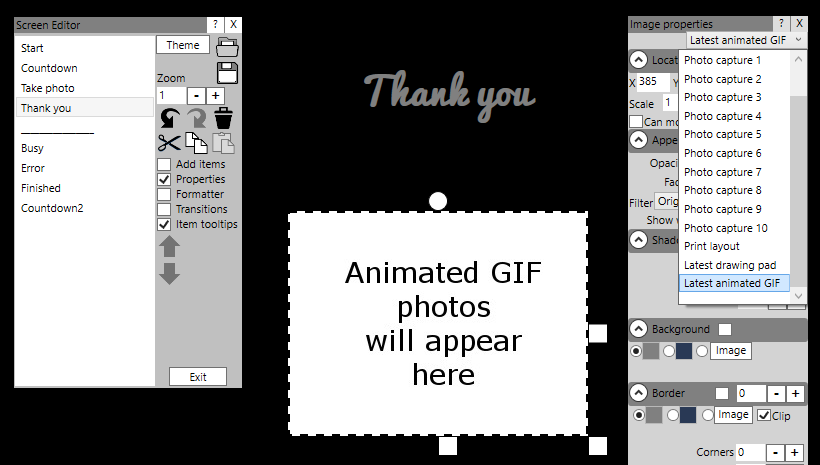
Now when you play the event, the user will get to see their animation on the Thank you screen. |
|
|
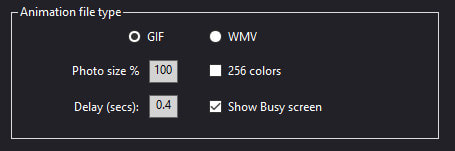
Animated GIF settings
These are available in RightBooth Settings --> Miscellaneous --> Animation file type section and they will apply to each animation that RightBooth creates. Tips:
|
|
Tips
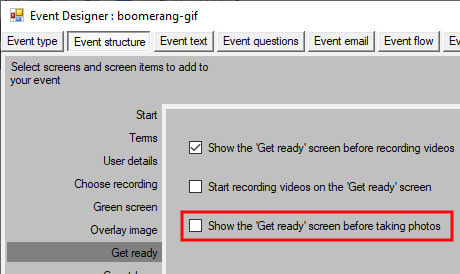
To avoid a lot of delays between each photo capture, in the Event Designer --> Event structure --> Get ready, try removing the 'Get ready' screen from the design...
Doing this will cause the 'Take photo' screen to be shown in quick succession when playing the event, once for each photo capture.
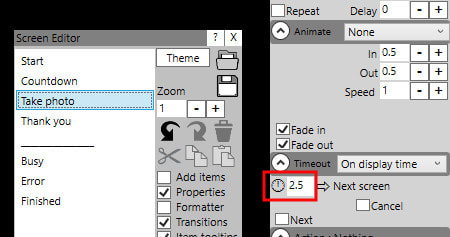
In the Screen Designer you can also choose how long you would like each photo capture to take by setting the Screen timeout value on the 'Take photo' screen. Here we have set this to 2.5 seconds which means our 5 photos will be captured over a period of 12.5 seconds...
In the Screen Designer you can also choose how long you would like each photo capture to take by setting the Screen timeout value on the 'Take photo' screen. Here we have set this to 2.5 seconds which means our 5 photos will be captured over a period of 12.5 seconds...
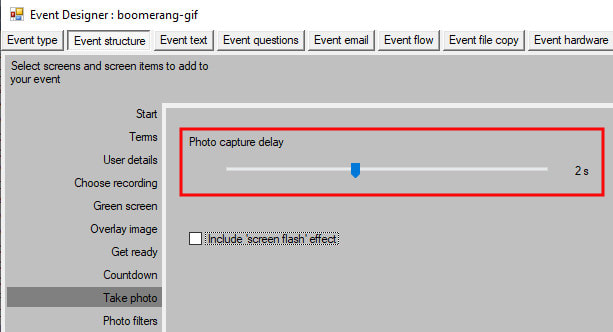
Back in the Event Designer --> Event structure --> Take photo we have set the Photo capture delay to 2 seconds. so that each photo will be captured 2 seconds after showing each 'Take photo' screen...
But why do we want to delay the photo capture?
We have a delay here to allow us to make use of a Label sequence item on the 'Take photo' screen that contains short instructions for the user as each of the photos are being captured, In our example we require 5 instructions, one for each photo. Also notice that we have set the label sequence item to Show 1 only and not to Reset list to start.
We have a delay here to allow us to make use of a Label sequence item on the 'Take photo' screen that contains short instructions for the user as each of the photos are being captured, In our example we require 5 instructions, one for each photo. Also notice that we have set the label sequence item to Show 1 only and not to Reset list to start.

Now when the event is played, the user will see the first instruction for 2 seconds, then photo 1 will be taken, then after another 0.5 seconds the second instruction will show (again for 2 seconds), then photo 2 will be taken and so on until all 5 photos are taken. Then the animated gif will be created and it will be shown on the Thank you screen.
Here is an example event file that implements all these suggestions. Simply download it, place it in your Documents\RightBooth7 folder and then open and play it in RightBooth...
Here is an example event file that implements all these suggestions. Simply download it, place it in your Documents\RightBooth7 folder and then open and play it in RightBooth...
| boomerang-gif.rbe |
Please note that everything described above are merely suggestions, not hard and fast rules, so feel free to experiment with the settings, the timings and the screens until you achieve your required event flow.
Enjoy !!
Enjoy !!
Can I Brand My Animated GIFs?
Yes you can. All you need to do is add stamp items over the camera item on the Take photo screen. Try this event file which includes an image item and a label item that have been set as stamps...
Yes you can. All you need to do is add stamp items over the camera item on the Take photo screen. Try this event file which includes an image item and a label item that have been set as stamps...
| animated-gif-branding.rbe |
