

Recommended Webcam Video Settings for RightBooth
Here we explain how to configure your webcam, your computer and your RightBooth settings in order to give you the greatest possibility of achieving satisfactory video recordings using your equipment.
The general approach you should take is to start recording videos at a fairly low resolution, check the results and then gradually increase the video settings until you find the limits of your equipment. It is fair to say that using a newer, faster computer with a good graphics card and a fast, uncluttered hard disk will provide better recording results than older, slower equipment.
As Logitech webcams tend to be the most commonly used make of webcam among our customers, this article concentrates on Logitech. But much of the information presented below is common to all webcams.
Check out our recommended webcams
Preparation
- Connect your webcam to a USB 2.0 (or USB 3.0) port on your computer. This will provide the best throughput of video data from the webcam to the PC. Do not connect your webcam via a USB hub or a USB splitter. Check your USB ports
- Ensure you have good quality, even lighting in the region directly in front of your webcam. This is very important as you will be turning off any automatic light and gain settings (see later). Variable lighting can cause problems with webcam focusing and exposure and this can lead to reduced video recording performance.
- Ensure that there is little or no background noise in the vicinity of the webcam. This is important to ensure your webcam microphone is focused on capturing only the voices of your users.
Before running RightBooth...
- Try to ensure no other programs are running on your computer such as web browsers or wordprocessors.
- Ensure all unnecessary background services have been stopped and are unlikely to re-start during the session, by this we are referring to things like scheduled file backups or disk de-fragmenters. For information on how to do this and which services to stop, search the Internet for unnecessary windows services
- If you are not going to be using RightBooth for emailing or uploading files to the Internet then we recommend you disconnect your computer from your Internet connection. For example: unplug any network cables and also disable the wireless connectivity on your computer. This will avoid the risk of any automatic system (and software) updates occurring while using RightBooth.
- Temporarily close any virus protection software. Again, virus checkers can slow down video recording performance especially if they start performing background tasks during the recording.
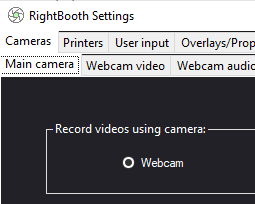
Step 1 - RightBooth Settings
- Run RightBooth.
- On the Start Screen click the Settings button.
Step 2 - Video Settings
|

|
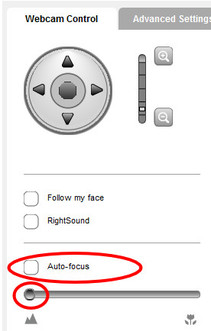
Step 3 - Webcam Focus Settings
|
On the Logitech Webcam Control panel...
This will ensure that fixed focusing is achieved across the full depth of field of your webcam lens. This will help improve the performance of the video recording by reducing the changes between each video frame that might be caused by the camera lens re-focusing. |
|
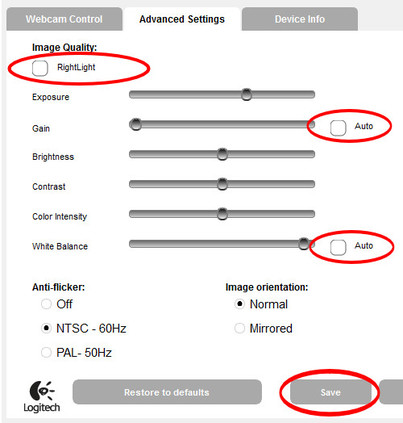
Step 4 - Webcam Advanced Settings
|
Go to the Advanced Settings panel...
Again, this will help to improve recording performance by reducing the changes between video frames. Note that some of the settings mentioned in Steps 3 and 4 may not be applicable to your webcam. |
|
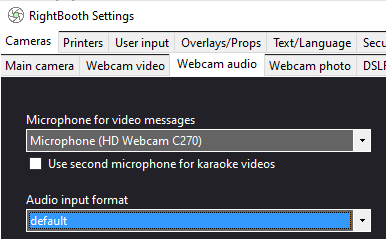
Step 5 - RightBooth Audio Settings
|
On the Webcam Audio sub-section...
|
|
|
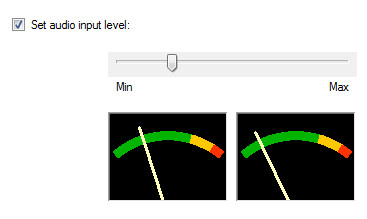
Whether you are using the webcam's internal microphone or another external microphone for recording audio, we recommend that you test and set the audio input level when at your venue location, and prior to your guests recording any video.
Then talk and shout into the microphone, while adjusting the level slider until you minimise the meter needles going into the red |
|
You are now ready to try a number of video configurations to see which will generate the best video recordings for you.
We recommend you try recording a number of video files using each one of the configurations described next.
We recommend you try recording a number of video files using each one of the configurations described next.
Configuration 1 - WMV Video
In the RightBooth Settings Webcam video sub-section, select the following:
This configuration will create good quality video with small file sizes.
Click the Video Recording Tester and record some test video files.
If the recorded video is satisfactory, try one or more of:
If the recorded video is unsatisfactory, try:
- Recording format: WMV
- WMV settings: WMV 9
- Video bit rate: 3000
- Video size: 800x600
- Data type: default, RGB24 or YUY24
- Recording frame rate: 15
This configuration will create good quality video with small file sizes.
Click the Video Recording Tester and record some test video files.
If the recorded video is satisfactory, try one or more of:
- increasing the webcam video size, trying a test recording each time you change it.
- increasing the Video bit rate to 6000 or higher, again trying a test recording to see how this affects the recording performance
- increasing the recording frame rate to 20, 25 or 30.
If the recorded video is unsatisfactory, try:
- reducing the webcam video size to: 640x480.
- reducing the frame rate to 10
Configuration 2 - AVI Video Using Webcam Defaults
In the RightBooth Settings Webcam video sub-section, select the following:
Click the Video Recording Tester and record some test video files.
If the recorded video is satisfactory, try:
If the recorded video is unsatisfactory, try:
- Recording format: AVI
- Data stream: Default
- Webcam video size: 800x600
- Data type: RGB24
- Recording frame rate: 15
Click the Video Recording Tester and record some test video files.
If the recorded video is satisfactory, try:
- increasing the webcam video size and recording frame rate
If the recorded video is unsatisfactory, try:
- reducing the webcam video size and frame rate
Recording H264 MPEG Video
Using Configuration 2 some webcams will record video using the H264 MPEG data format. This format produces exceptional quality video at very small file sizes, without placing great demands on your computer processor. This means that you can achieve fluent 1920 x 1080 HD recordings at 30 frames per second on most computer equipment.
Using Configuration 2 the Logitech C920 webcam should automatically provide this recording format under Windows Vista and Windows 7.
If you are running Windows 8 or 10, the Logitech C920 driver will normally prevent the webcam from exposing the H264 data format to non-Logitech applications, however, you may be able to use the following solution to let RightBooth access the C920 H264 data format:
http://support.logitech.com/en_us/article/Install-native-UVC-drivers-for-your-Logitech-webcam?product=a0qi00000069uigAAA
How to check if your webcam is recording video using the H264 format data
- Go to the RightBooth Settings
- Set up the video and audio settings as described in Configuration 2
- In the Settings Log, tick the option 'Log information messages'
- Now run a RightBooth Video event and record a video file.
- Return to the RightBooth Settings and look at the Log file listing in the Log tab
- If you see the following line: 'recording subtype: H264', then your webcam is recording data in the H264 format.
Configuration 3 - Compressed AVI Video
Use the same settings as Configuration 2, but change the following:
Click the Video Recording Tester and record some test video files.
If the recorded video is satisfactory, try:
If the recorded video is unsatisfactory, try:
- Data stream: Compressed
- Video compressor: MJPEG Compressor
- Audio compressor: PCM
- Also set the Data type property to MJPG if your webcam provides it. The Logitech C920 and the Creative Live Cam both provide this.
Click the Video Recording Tester and record some test video files.
If the recorded video is satisfactory, try:
- increasing the webcam video size and frame rate
If the recorded video is unsatisfactory, try:
- reducing the webcam video size and frame rate
Other Things To Try
If you continue to experience recording problems, see our FAQ for a list of other things you can check on your computer that might help improve recording performance.
Converting recorded videos to MP4 (or MOV)
RightBooth can convert videos to MP4 format after they have been recorded in AVI or WMV format. This is done as a post processing task. If you want to convert your recorded videos to MP4 (or MOV):
Now after each video has finished recording, RightBooth will automatically convert the video to the chosen format.
RightBooth can convert videos to MP4 format after they have been recorded in AVI or WMV format. This is done as a post processing task. If you want to convert your recorded videos to MP4 (or MOV):
- Go to RightBooth Settings
- Select the Miscellaneous tab
- In the Video post-processing section, tick either MP4 or MOV check boxes.
Now after each video has finished recording, RightBooth will automatically convert the video to the chosen format.
We hope this information helps you to achieve satisfactory video recording results using RightBooth.
If you require further assistance or advice, please Contact Us
If you require further assistance or advice, please Contact Us
