
Configuring your DSLR Camera to work with RightBooth
This article takes you through the steps of setting up your DSLR camera to record videos and photos and to get them to appear in your RightBooth events (via the digicamControl app).
1 - Prepare your DSLR Camera
Make sure your camera:
- is fitted with a fully charged battery OR is mains powered
- is using a large capacity SD card. Something like 64Gb or 128Gb would be ideal, especially if you are going to be recording videos. ( Note: If you attempt to use your camera using only its in-built memory you will likely experience problems accessing the camera from RightBooth ).
- is configured to not power off after periods of inactivity.
Example: On Canon cameras, locate the Auto power off setting (on the camera menu) and set it to Disable - is configured to record either MP4 or MOV video files. RightBooth can accept both video file formats. In the example image below, the Nikon D7100 has been set to record MOV files at 1920x1080x30fps.
- is configured to capture JPG photos. Most DSLR cameras can capture photos in RAW format and/or JPG format, but RightBooth can only process JPG format files. In the example image below, the Canon 80D has been set to capture high quality 6000x4000 JPG files and to not capture RAW files. Having said this, we recommend that you keep your capture resolution lower than this possibly down at 3M pixels (S2), which is plenty good enough even for A4 sized prints.
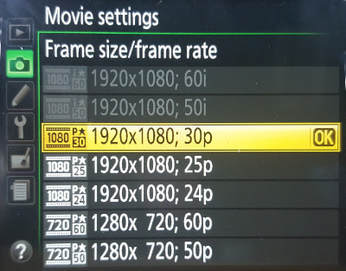
Nikon movie settings menu
|
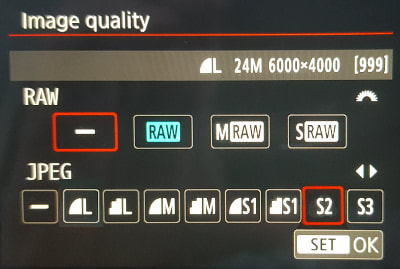
Canon image quality menu
|
2 - Set the DSLR Camera Mode Dials
2a - Canon Cameras
|
Set the Canon main mode dial to any of the following modes: P, Tv, Av, M, B, Auto, or Auto no flash. Do not select A+
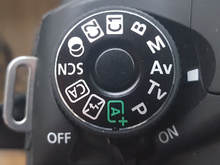
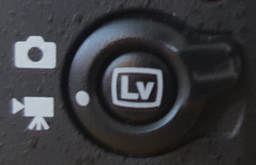
Canon 80D
|
If present, set the Canon Live Mode switch to Camera:
Canon 80D
|
2b - Nikon Cameras
- Set the Nikon main mode dial to any of the supported modes, except for Automatic mode. We suggest you use mode M (Manual).
- If present, set the Nikon Live Mode switch to Video:
Nikon D7100
- You should also manually configure your camera with appropriate exposure, aperture and ISO settings.
Set-up Considerations
Ideally you want to avoid auto focus where possible as this can take a lot of time in between photo shots, so try the following set-up on-site:
The reason for taking a full auto test shot is to allow the the camera to automatically configure settings for the specific light conditions at the event. Also, if you left the camera on full auto it could later struggle to focus on anything moving (e.g. people) and would probably fail to take some of the photos within the allotted RightBooth capture time when the event is playing.
Note that if you have your camera mounted behind the glass in a mirror booth housing, the mirror reduces the light to the camera by around 25 - 50% depending on what type of mirror it is and when an external TTL flash is used it could flash a few times to establish the best power setting. I flight conditions are low, the Auto test (above) will apply the Flash and this should be maintained when switched to Manual mode.
- Set the camera and lens to full auto, then take a shot of a subject approx 1.5 - 2 meters away from the booth with a 18/55 lens set to 18.
- Then when you are happy with the photo, set both the lens to manual focus to prevent it auto focusing
- Set the camera dial to manual (M).
- Or for those of you who are using led camera lights, set the camera to no flash.
- You might also want to place a physical line (tape) on the floor indicating where users should stand in order to be correctly in focus when photos are taken.
The reason for taking a full auto test shot is to allow the the camera to automatically configure settings for the specific light conditions at the event. Also, if you left the camera on full auto it could later struggle to focus on anything moving (e.g. people) and would probably fail to take some of the photos within the allotted RightBooth capture time when the event is playing.
Note that if you have your camera mounted behind the glass in a mirror booth housing, the mirror reduces the light to the camera by around 25 - 50% depending on what type of mirror it is and when an external TTL flash is used it could flash a few times to establish the best power setting. I flight conditions are low, the Auto test (above) will apply the Flash and this should be maintained when switched to Manual mode.
3 - Connect the DSLR Camera to the PC
|
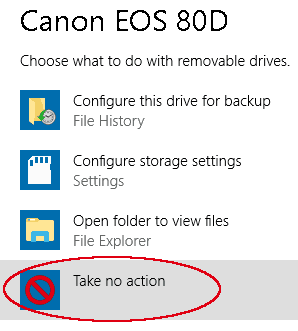
Turn the camera on and connect it to a fast USB port (USB 2 or 3) on your computer.
The first time the camera is attached to your computer you will be prompted to decide what will happen when the camera is connected. Choose the option: 'Take no action' (see image) |
|
4 - Configure RightBooth for DSLR Photos and Videos
Ensure your computer is connected to the computer and is switched on.
- Run RightBooth
- On the main window, click Settings
- In Settings, click the Cameras tab
- If you plan to take photos with your DSLR camera, select 'Take photos using DSLR camera'
- If you plan to record videos with your DSLR camera, select 'Record videos using DSLR camera'
- Click the DSLR tab
- Select your camera make (Canon or DSLR). If your camera is detected you will see a confirmation message in the panel. Note: You may need to re-attach your camera and restart the app.
- Click the Live view button to check that RightBooth is receiving the live feed from your camera.
- Make sure the Temporary folder path references a folder on your computer that has full access rights for creating and writing files.
- You should make sure that the temporary folder name and path is composed of alphanumeric characters only. So for example, this is an acceptable folder name: c:\temp123, and this is not acceptable: c:\temp-123
- Use the Photo test and Video test buttons to check that RightBooth can capture files from your camera. Note: If your temporary folder is not set up correctly you will receive a warning message.
IMPORTANT
Digital cameras can capture photos with very large dimensions and as such, excessively large photos may cause memory issues with RightBooth, therefore we strongly recommend that you use reduced width and height values in order to reduce your digital photo files to more manageable processing sizes. We suggest that the photo files for use in RightBooth are no larger than approximately 2000 x 1500 pixels. Note that the values you enter into the W and H boxes (in the settings panel) should match the aspect ratio of your chosen camera photo size. For example, if you have set your DSLR camera to capture photos at size 8000 x 6000, then you could enter W = 2000, H = 1500, or (better still) W = 1000, H = 750 pixels, which maintains the 4:3 aspect ratio of the original photos. If your W and H values do not match the aspect ratio of the original photos, then the photos that appear in RightBooth will incur some stretch distortion.
If everything is set up correctly. RightBooth will then be able to capture photos and videos from your DSLR camera and you will be able to use the camera when playing events.
5 - Other points
Reduce your Camera SD Card Storage Requirements
Tick the options: Delete videos from camera and Delete photos from camera.
This will help to reduce the chance of filling up the SD card with files.
Tick the options: Delete videos from camera and Delete photos from camera.
This will help to reduce the chance of filling up the SD card with files.
File Transfer Time
After each photo or video is captured by your camera, there will be a delay while the file is transferred to the computer (via the USB cable). When RightBooth is playing an event it will display the Busy screen during the file transfer process.
You can try to reduce the transfer delay by:
If you find that the transferred videos and files are not appearing in RightBooth it may be because the transfer wait time needs increasing. You can increase the transfer wait time for photos and videos in RightBooth Settings --> Cameras --> DSLR.
After each photo or video is captured by your camera, there will be a delay while the file is transferred to the computer (via the USB cable). When RightBooth is playing an event it will display the Busy screen during the file transfer process.
You can try to reduce the transfer delay by:
- lowering the camera's preset photo capture file size and/or JPG quality and also reducing the camera's preset video recording size and/or frame rate. Refer to your camera documentation for details
- connecting the camera to a high speed USB port on your computer.
If you find that the transferred videos and files are not appearing in RightBooth it may be because the transfer wait time needs increasing. You can increase the transfer wait time for photos and videos in RightBooth Settings --> Cameras --> DSLR.
