Getting Started With RightBooth
Once you grasp the basics of RightBooth you'll realise just how easy it is to create amazing event presentations in exactly the way you want them. This is what you need to know to get started.
1) Get a camera

Perhaps it goes without saying, but we'll say it anyway...
If you want to record videos and take photos with RightBooth then you will need a camera.
You can choose to use a webcam or a DSLR camera.
If you are running RightBooth on a laptop or a graphics tablet, the chances are high that you already have a front facing webcam built into the top-middle of the laptop lid. But if you are running RightBooth on a desktop computer then you probably need to obtain an external webcam or a DSLR camera and connect it to one of the USB ports on the PC. See here for some recommendations.
2) Create your event
What is an event? This is simply the term we use to describe a RightBooth presentation, which is a sequence of interactive screens that involves users recording videos, taking photos, answering questions or simply viewing on-screen information.
|
You can create an event using the Event Wizard (which will run automatically the first time you run Rightbooth) or by creating a standard event.
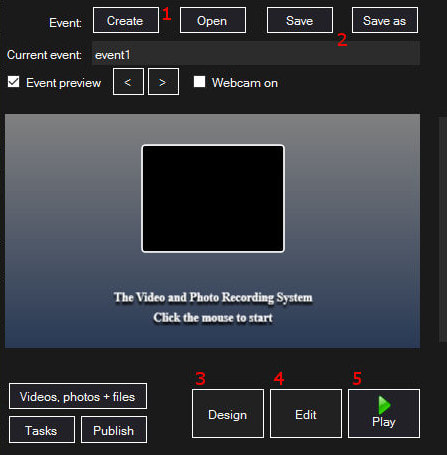
To do this, start RightBooth and click the Create button on the main window (1), then choose one of the event types on the 'Create new event' screen. Events are files (similar to Powerpoint presentation files), so you can create and save as many event files as you need using the Save and 'Save as' buttons (2). After creating your event it is ready to be used. Simply click the Play button (5) on the RightBooth main screen, to play your event in full screen mode and let your users record videos and take photos. When you have finished playing the event, press the Escape key on the keyboard to return to the RightBooth main window. |
3) Design your event
After creating an event you may want to alter what it does and what it displays. This happens in the Event designer which is accessed from the Design button on the RightBooth main window, (3) above.
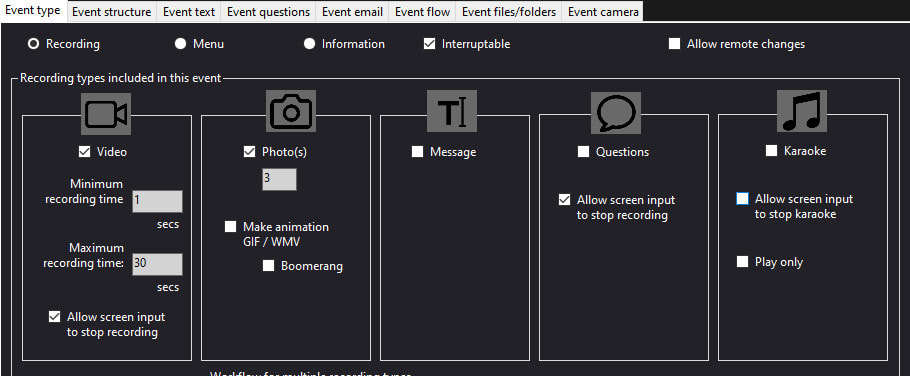
Among other things the Event Designer lets you choose the Event type. Here you can choose the type of activity you want to provide to your event users. You can select from a number of type options including Video, Photos and Questions. You can also select more than one activity type within the same event...
Among other things the Event Designer lets you choose the Event type. Here you can choose the type of activity you want to provide to your event users. You can select from a number of type options including Video, Photos and Questions. You can also select more than one activity type within the same event...
|
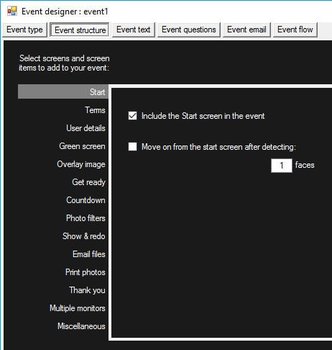
As mentioned earlier, your event comprises a number of screens that are shown to the user in a sequence and the Event Designer lets you choose which screens you would like to include in your event. We call this the Event Structure and it is accessed from within the Event Designer.
For example, you can choose to show a Start screen, a Terms and Conditions screen, a Video Review screen and a Thank you screen (to mention just a few). Certain screens are automatically added to your event depending upon which event types you include. For example, if you choose the Video event type, then the 'Record video' screen will be automatically added to your event. If you make changes in the Event Designer, always return to the RightBooth main window, save your event then play it to see the results of your changes. The Event Designer provides lots of other features, but we'll leave them for another article. |
4) Edit your event screens
When you create a new event, all screens are created using a standard design and style. But you will probably want to alter the look and feel of your event screens. This is done using the Screen Editor which is accessed by clicking the Edit button on the RightBooth main window, (4) above.
|
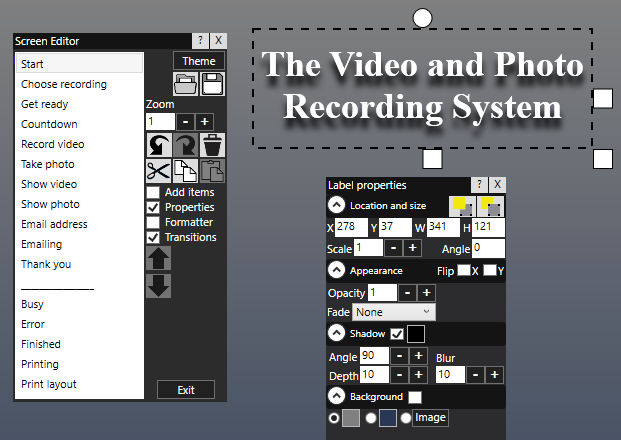
You will then be shown the first screen in your event (usually the Start screen), together with the Editor Toolbox.
The Editor Toolbox shows you a list of all the screens in your event and you can simply click on a name in the list to show the screen, ready for editing. Each screen contains a background and a number of items, such as images, text, video and the live camera feed. The screen background can show a single colour, a colour gradient, an image or a video. Each item can be sized and positioned anywhere on the screen using the mouse. You can also change each item's content by double clicking on it. For example, double click on a text label item to change its text contents. The screen background and all the screen items each have a set of properties that you can alter. Simply click on an item (or on the background), then click the Properties check box to show the Properties panel which will provide access to all the properties of your chosen item. |
There are many things you can alter in the Screen Editor. For example, you can:
RightBooth provides you with almost limitless possibilities to customise the look and feel of your event in exactly the way you want.
- alter the position, size, layer, color and border of text prompts, images, backgrounds, video items and the webcam feed.
- add your own image and text content to any screen.
- alter the amount of time a screen will be shown.
- add screen transitions and item transitions.
- add countdown items, image sequence items, video and audio clips and web pages.
- create new screens that contain anything you like, and these can be optionally set to appear on other monitors attached to your computer.
RightBooth provides you with almost limitless possibilities to customise the look and feel of your event in exactly the way you want.
Taking it from here
This article just scratches the surface of what you can achieve using RightBooth. From here you can go on to create events that will also print user's photos, send their videos and photos as email attachments or upload to cloud storage, present users with video questions and multi choice questions, and host karaoke recording sessions ( to name but a few ).
There are 'How To' articles that describe many of these features, so make sure you read them all.
And remember, if you have a question, simply Contact Us, as we pride ourselves in providing timely and comprehensive answers.
There are 'How To' articles that describe many of these features, so make sure you read them all.
And remember, if you have a question, simply Contact Us, as we pride ourselves in providing timely and comprehensive answers.

