
Adding Props to Videos and Photos
Updated: November 2023
RightBooth allows you to add image props such as hats, masks and wigs onto faces in videos and photos.
This feature works using RightBooth's face detection features, so that chosen props will automatically track and follow faces in the live camera feed.
IMPORTANT:
This video demonstrates how to set up your event to use face props.
RightBooth allows you to add image props such as hats, masks and wigs onto faces in videos and photos.
This feature works using RightBooth's face detection features, so that chosen props will automatically track and follow faces in the live camera feed.
IMPORTANT:
- You can use Face Props with any supported webcam while taking photos and recording videos at any size provided by the webcam.
- You can use Face Props with any supported DSLR camera when taking photos. PLEASE NOTE: For Face Props to align correctly on your DSLR camera live feed, your DSLR camera MUST be set to take photos with an aspect ratio of 3:2. Please check your camera settings.
- Face props use face recognition technology which requires a bright and evenly lit scene to give the best face tracking results.
This video demonstrates how to set up your event to use face props.
Detailed description
Deciding When to Add Props
You can choose to make props available for selection by event users at the following times:
You can choose to make props available for selection by event users at the following times:
- before the start of a video recording
- before each photo capture
- during the video recording
- after each photo has been taken
Adding Props Before Recording Videos and Capturing Photos
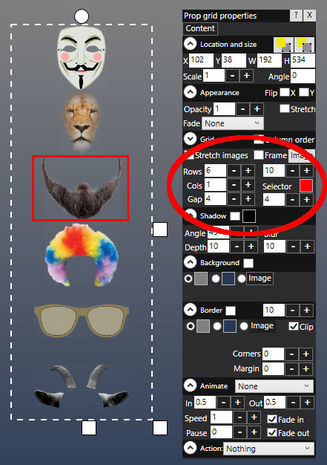
In the example opposite, we've chosen to add 6 props to the Start screen. You can use the grid's Rows and Cols properties (circled) to arrange the items in the grid. In our example we have the items arranged as 6 rows in 1 column, but you can alter this to suit your screen layout. Now run the event. When the Start screen appears you can click on any of the props to overlay them on faces in the live camera feed. Note that if you click the same prop again it will be removed from the camera feed. You can add more than one prop to the camera live feed depending on the type of prop chosen. So in the example opposite you can select the lion and the sunglasses and they will both appear on the live feed. |
|
When you are happy with your selections, click anywhere on the screen to continue. Your chosen props will then remain overlaid on faces in the camera feed while videos and photos are taken. And the props will be saved into the recorded videos and photos.
Note: Props are only added to videos when recording videos from a webcam.
Once the system returns to the Start screen, all previously chosen props will be removed from the camera feed, allowing the next user to select their own props.
Note: Props are only added to videos when recording videos from a webcam.
Once the system returns to the Start screen, all previously chosen props will be removed from the camera feed, allowing the next user to select their own props.
Adding Props Before Each Photo Capture
Suppose you are allowing users to take 3 photos and you want them to be able to select different props before each photo is taken.
The easiest way to achieve this is to add the props grid to the 'Get ready' screen as follows:
The 'Get ready' screen is automatically set to be displayed for only 2 seconds, so you need to alter this to allow your users time to choose their props, as follows:
Now when you run the event, prop selection will be available each time the 'Get ready' screen is shown prior to each photo being taken.
The easiest way to achieve this is to add the props grid to the 'Get ready' screen as follows:
- Go to the Screen Editor.
- Select the 'Get ready' screen from the screen list on the Toolbox.
- Add a props grid to the Get ready screen as described above.
The 'Get ready' screen is automatically set to be displayed for only 2 seconds, so you need to alter this to allow your users time to choose their props, as follows:
- Show the 'Get ready' screen properties
- Alter the screen's Timeout property to 'Never'
- Tick the Next property to add a Next button to the screen. This will allow users to continue after they have selected their props.
Now when you run the event, prop selection will be available each time the 'Get ready' screen is shown prior to each photo being taken.
Adding Props After Each Photo Has Been Taken
You can allow users to add props to photos after they have been taken:
Now when you play the event, the props will appear when each photo is shown to the user, allowing them to add props to the static faces in the photo.
- Go to the Screen Editor.
- Select the 'Show photo' screen in the screen list on the Toolbox
- Add a props grid to the 'Show photo' screen as described above.
- Alter the screen Timeout to Never and add a Next button as described above.
Now when you play the event, the props will appear when each photo is shown to the user, allowing them to add props to the static faces in the photo.
Adding Props During Video Recording
Add a props grid to the 'Record video' screen (as described above) to allow users to add and remove props while the video is being recorded.
Note: Video recording with face props is only possible when using a webcam.
Note: Video recording with face props is only possible when using a webcam.
