|
Updated: Feb 2021 RightBooth provides a 'Remote Changes' feature. This will cause RightBooth to monitor a specified folder on the computer looking for a text file containing your ‘change instructions’ which will cause RightBooth to make content modifications to the currently playing event file. The changes folder can also contain new or updated image and video files, which RightBooth can be instructed to display within the playing event file. So the Remote changes feature provides you with a flexible system for updating your events with new content ‘on the fly’. And if the designated ‘changes folder’ is a shared cloud storage folder such as a Google Drive folder, it then becomes possible for you to change your playing events from a remote location. We will explain how to do this by way of the following example... You run a party room hire business and you have a number of rooms at various locations country wide that can be booked for events such as birthdays and anniversaries. At each of your locations you have RightBooth running on a permanently installed video booth, allowing party guests to record video messages and photos for the host. You like to make the RightBooth events more personalised so you always edit the event to include the name and a photo of the party host. For example, for a particular booking at one of your locations you have an event file called ‘host’. In this event file, you edit the Start screen by adding a label item that states: ‘Welcome to John’s retirement party!!’ And you also include a photo of John on the Start screen contained within an image item. The following week, the same location is booked for Jill’s 40th birthday. You now have to physically visit your location, and edit the RightBooth event file, changing the label item message and replacing John’s image item with an image of Jill. However, there is an easier way to make these changes without having to travel to your locations, by using the RightBooth Remote Changes feature. Continuing with our example, at your host location, perform the following: Set up RightBooth for remote changes
Set up your host event file for remote changes
Name the screen items that are to be changed
Performing a remote updateFrom your home location you now want to change the remote event from John to Jill. Obtain a photo of Jill (in our example: jill.png) and place this file in your local cloud storage folder. The file will then be automatically uploaded to the cloud and downloaded into the cloud storage folder on the system at your remote location. Run NotePad and type the following lines:
Event-message=Welcome to Jill’s 40th birthday party! Event-image=jill.png Now save this file into your local cloud storage folder using the reserved filename: rb6changes.txt. This file will then make its way to your remote system, again courtesy of your chosen cloud service software. On the remote system, RightBooth will automatically open the file rb6changes.txt and will then make the specified content substitutions for the named text and image items on the Start screen. And this will happen each time RightBooth shows the event Start screen, allowing you to make further remote changes whenever you require. If you have a number of remote locations and you want to alter different event content at each location, in order to avoid any mix ups you can simply configure RightBooth at each location to monitor a different sub folder on your shared cloud storage folder. That way, each folder can have its own rb6changes.txt file. Specifying an Event Folder Name You may want to alter the folder into which the remote RightBooth event will save all users photos and videos. To do this you need to add another line into the rb6changes.txt file that defines the following key: event-folder-name followed by the required folder name. So continuing with our example you could add something like this: event-folder-name=jills40birthday So now all Jill's photos and videos will be saved into the folder \jills40birthday on your remote system and therefore they will not be mixed up with Johns files. Note: Don’t forget to use the ‘=’ character in all your content definitions within the rb6changes.txt file.
0 Comments
Today we are announcing the release of RightBooth version 6.3. This version is available as a free upgrade to all RightBooth 6 users and it contains the following new features... Control the Switching of Peripheral Equipment
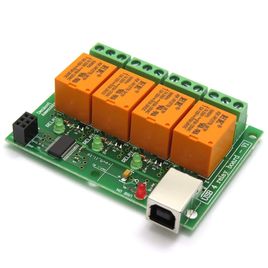
The Denkovi board connects to your computer via a USB cable. You can then connect external electrical devices to the board’s relay connections and use RightBooth to switch these devices on or off at various times throughout the event. A typical example of this would be to configure RightBooth to switch on a light at the start of each video recording, then turn it off when the recording is completed. There are full details on how to do this in the latest RightBooth User Manual (and Help file) which you will find installed with the updated software. See this Blog post for an example on how to use the denkovi board. Running Remote ProgramsWe have added new event actions to allow you to run other software directly from RightBooth while it is playing an event. This can be triggered by the user when they click on any item on one of the event screens or it can be made to happen automatically whenever an event screen is displayed, courtesy of the new screen Show Action (see below). Examples of how you might use this feature:
Show ActionIt is now possible to add a 'Show action' to any RightBooth event screen. Your chosen action will then occur each time the associated screen is shown during the playing event. Using this action it becomes possible to synchronise the activities mentioned above, for example: - turning on lights when the 'Get ready' screen is shown - turning lights off when the 'Thank you' screen is shown. - running another program with the Start screen is shown. RightBooth is DPI AwareWhat does this mean?
Basically, RightBooth now detects how your Windows display is configured and will change its user interface to suit. This means that RightBooth should now be consistent on any display size and at any display scale combination that you have chosen in your Windows Display Settings. |
AuthorNigel Pearce Archives
July 2024
|
|


 RSS Feed
