RIGHTBOOTH
  • Home
  • Products
  • Try
  • Help
    • Video Settings
    • Webcams
    • Other Equipment
    • Blog
    • How To
    • Training Videos
    • FAQ
    • User Manual
    • Release Notes
    • Terms of use
    • Contact
  • Feedback
    • Comments
    • User stories >
      • Mike Ridge
      • Tony Kay
      • Dave Bladen
      • Steven D Mills
      • Sue Crossland
      • Luke Dalby
      • McMaster University
      • Hangloose
      • Paul Waterhouse
      • Raf Sauvillers
    • User Videos
    • User Equipment
    • Organisations
  • About

Sending Printer Copies to Multiple Printers

22/9/2017

0 Comments

 
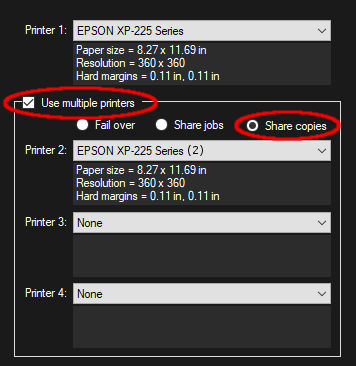
With RightBooth it is possible to specify the number of copies that each user will receive when they choose to print their photos.  You can set this value anywhere from 1 to 99, although we don't recommend you print more than 2 or 3 copies per user. You can even give the user the option of choosing how many copies they would like to print.

In the following example, RightBooth has been set up to take one photo, then print 2 copies of it to a single printer using a full page layout...
Picture
Now this printing process can take a lot of time, especially if your printer is not particularly fast, and this can lead to a backlog of users waiting around for their print outs to appear.

To help reduce this delay, we now show you how to set up RightBooth to send individual print copies to multiple printers simultaneously.
Note: this feature was added in RightBooth version 6.1.29.
First, (and I guess this maybe goes without saying !), you need to obtain two printers, attach them both to your computer and make sure they are working and identified with different printer names in your Windows Printer Settings panel.  Your printers can be of different makes and models, but for consistency of output we recommend you use the same make and model.
​
RightBooth can work with up to four printers, but here we will simply be using two printers to split the two photo copies (shown above) between them.
  • Run RightBooth and click the Settings button
  • Choose the Photo and Print tab
  • Set the Printer 1 and Printer 2 settings to reference your two printers.  In our example we are using two Epson Xp-225 printers.
  • Tick the Use multiple printers option
  • Tick the Share copies option  (introduced in RightBooth version 6.1.29).
  • Play the event again and get users taking and printing photos.
Picture

​Now each time photo printing is performed, one copy of the print layout will be sent to each printer and they will be printed at the same time, effectively halving the print wait time for each user, as follows:
Picture
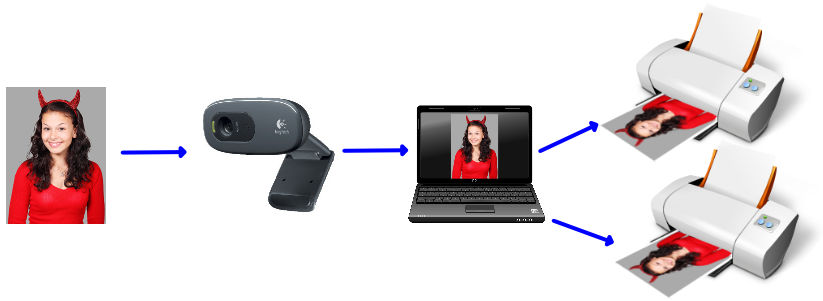
This idea can obviously be extended up to four printers.  So in the above example with four printers attached, if the first user's two copies are still being printed when the next user wants to print photos, then subsequent photos would be sent to printers 3 and 4, without the next user having to wait for printers 1 and 2 to finish.

This process will continue on a round robin basis using all printers in equal measure, effectively load balancing the printing time across them all.
0 Comments

Creating MPEG 4 Videos (MP4) with RightBooth

17/9/2017

0 Comments

 
Last updated: Jan 2021

MPEG4 (or MP4) is perhaps the most popular format for video files these days, being the format of choice for many applications, web sites and web services.  This article explains how to create videos in the MP4 format using RightBooth.
Set up RightBooth for MP4
​
  • From the RightBooth main screen, click Settings
  • In the RightBooth Miscellaneous Settings, click the option MP4
Picture
Now each time you record a video using RightBooth, the recorded file will be automatically converted to MP4 after the recording has finished.
Affecting the Conversion

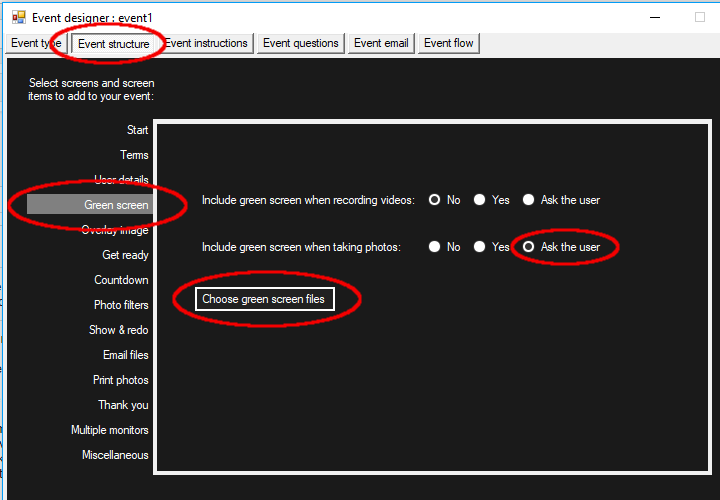
Clicking the Conversion settings button (shown in the screenshot above) will reveal the Conversion settings panel.
Here you can change the size of the converted file, the frame rate and the conversion quality.

Experiment with these settings until you obtain the best conversion for your requirements.  These settings are particularly useful if you need to reduce the size of your video recordings such that they become small enough to be emailed to event users with the RightBooth email feature.
0 Comments

Letting Users Choose a Greenscreen Background Image

5/9/2017

3 Comments

 
Updated: Jan 2021

By using a greenscreen backdrop you can provide background image replacement when users record videos and take photos.
Note: Before you read this article,  please read this article for details on how to set up your system and environment to give you the best results from Rightbooth's greenscreen feature.
This feature is available for webcams (video recording and photo capture) and for DSLR cameras (photo capture).
Here's how to include a screen in your event that will let users choose a background image for their photos:
  • From the RightBooth main screen, click the Design button
  • In Event Designer, click the Event structure tab.
  • Select the Green screen heading
  • Set the option: Include greenscreen when taking photos: 'Ask the user'
  • Click the Choose green screen files button....
Picture
  • On the next panel click the Add images button and then select some files from the RightBooth media library. In the example below we have chosen 6 background images...
Picture
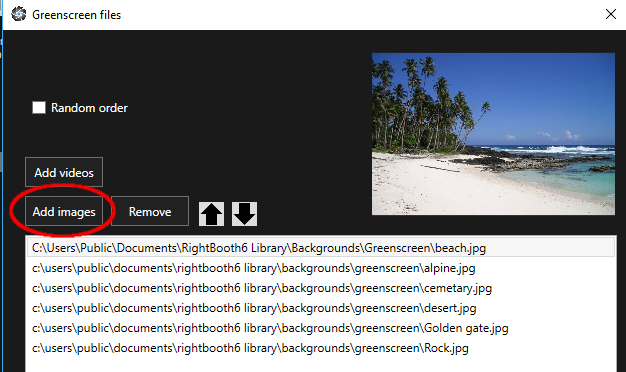
Now return to the RightBooth main screen, click the Edit button to visit the Screen Editor.
Here you will now find the 'Choose greenscreen' screen will be shown listed on the Screen Editor toolbox.
You can then select this screen to see your chosen images arranged in a horizontal grid item from which users can select from during the event.
​And on this screen you can apply your own design and layout as required...
Picture
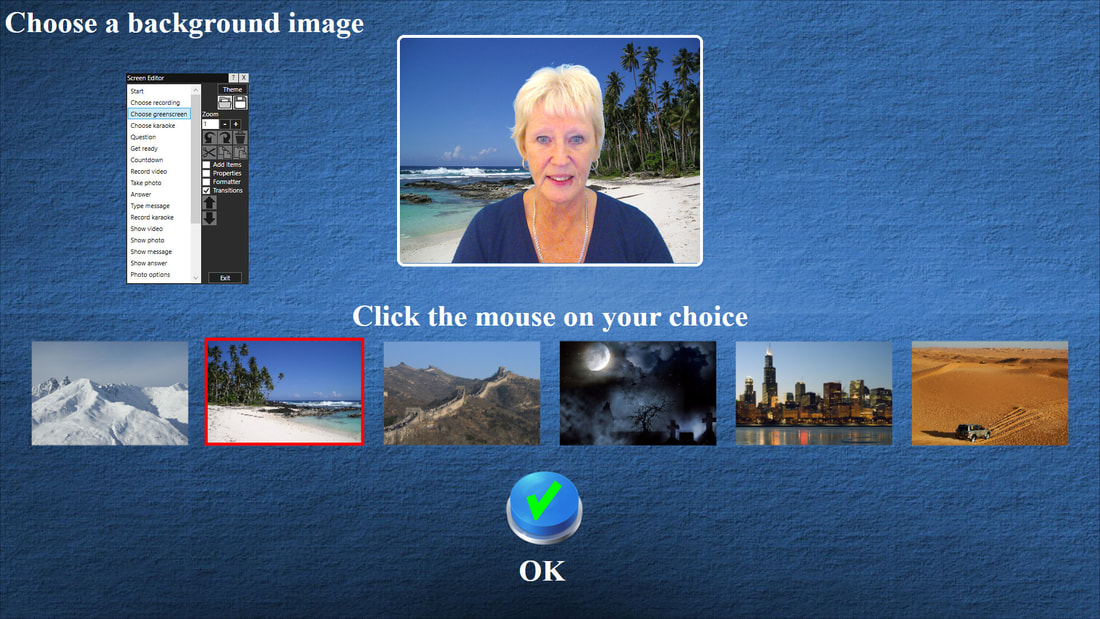
Note that you can double click on the image grid on this screen to alter the background images that it contains and you can also use the Image grid properties panel to change the layout of the images within the grid, for example arranging them vertically or in 2 rows of 3 columns, etc.
3 Comments

The Camera Shutter Sound and Camera Flash Effect

1/9/2017

0 Comments

 
Updated: Jan 2021

RightBooth provides you with a couple of effects that you can use when photos are being captured from either a webcam or a DSLR camera.

​Camera Shutter Sound
  • Open your event in RightBooth
  • Click the Edit button to take you to the Screen Editor
  • On the Screen Editor toolbox, select the 'Take photo' screen from the screen list
  • On the Screen Editor toolbox, click the 'Properties' check box to show the screen properties
  • Tick the Audio checkbox and make sure that the camera.wav audio file is selected (as shown in the screen shot).  If the file is not shown, click the File button to choose the camera audio file from the RightBooth Media Library.
Picture
Now each time the Take photo screen is shown when the event is playing, the camera shutter sound audio file will play.

​Camera Flash Effect
  • From the RightBooth main window, click the Design button to take you to the Event designer.
  • Click the Event structure tab.
  • Select the Take photo section
  • Tick the Include 'screen flash' effect checkbox as shown in the screen shot...
Picture
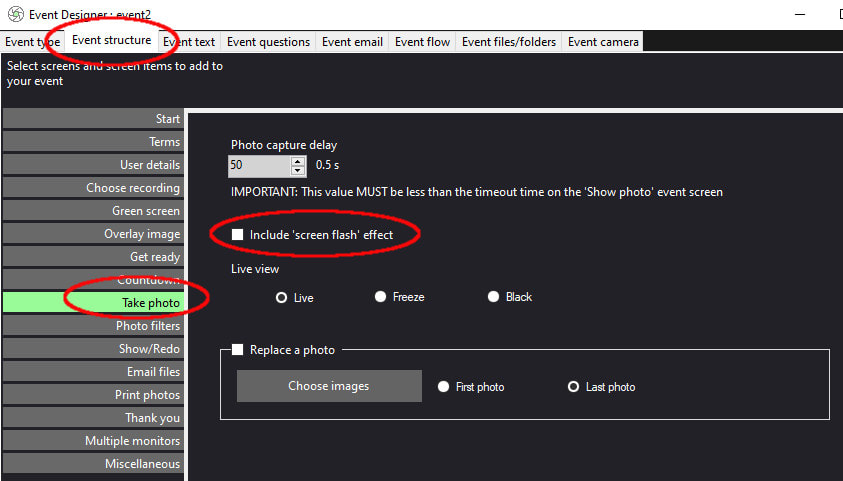
Now each time the Take photo screen is shown when the event is playing, the screen will briefly flash white to simulate a camera flash bulb being fired.
0 Comments

    Author

    Nigel Pearce

    View my profile on LinkedIn

    RSS Feed

    Archives

    March 2023
    February 2023
    January 2023
    December 2022
    November 2022
    October 2022
    September 2022
    August 2022
    July 2022
    June 2022
    May 2022
    April 2022
    March 2022
    February 2022
    January 2022
    December 2021
    November 2021
    October 2021
    September 2021
    August 2021
    July 2021
    June 2021
    May 2021
    April 2021
    March 2021
    February 2021
    January 2021
    December 2020
    November 2020
    October 2020
    September 2020
    July 2020
    June 2020
    May 2020
    April 2020
    March 2020
    February 2020
    January 2020
    December 2019
    November 2019
    October 2019
    September 2019
    August 2019
    July 2019
    June 2019
    May 2019
    April 2019
    March 2019
    February 2019
    January 2019
    November 2018
    October 2018
    September 2018
    August 2018
    July 2018
    June 2018
    May 2018
    April 2018
    March 2018
    February 2018
    January 2018
    December 2017
    November 2017
    October 2017
    September 2017
    August 2017
    July 2017
    June 2017
    May 2017
    April 2017
    March 2017
    February 2017
    December 2016
    November 2016
    October 2016
    September 2016
    August 2016
    July 2016
    June 2016
    May 2016
    April 2016
    March 2016
    February 2016
    January 2016
    December 2015
    November 2015
    October 2015
    September 2015
    August 2015
    July 2015
    June 2015
    May 2015
    April 2015
    March 2015
    February 2015
    January 2015
    November 2014
    October 2014
    September 2014
    August 2014
    July 2014
    June 2014
    May 2014
    April 2014
    March 2014
    February 2014
    January 2014
    December 2013
    November 2013
    October 2013

RightBooth logo
RIGHTBOOTH
​© 2013 - 2023 Aire Valley Software
News
​
Tutorials
​
FAQ
About
​
Contact
​
Terms of use and ​Privacy Policy
  • Home
  • Products
  • Try
  • Help
    • Video Settings
    • Webcams
    • Other Equipment
    • Blog
    • How To
    • Training Videos
    • FAQ
    • User Manual
    • Release Notes
    • Terms of use
    • Contact
  • Feedback
    • Comments
    • User stories >
      • Mike Ridge
      • Tony Kay
      • Dave Bladen
      • Steven D Mills
      • Sue Crossland
      • Luke Dalby
      • McMaster University
      • Hangloose
      • Paul Waterhouse
      • Raf Sauvillers
    • User Videos
    • User Equipment
    • Organisations
  • About