
|
Scenario You are running a product launch event and you are planning to use RightBooth to gather video feedback from your event attendees. You also would like to collect details of each of your users, this article explains how. Including User Details in your Event
You can now choose what user details you would like to collect. Select from any or all of the following options:
You can also choose to make any or all of these data items optional. By making an item optional, this will allow the user the option of not having to enter details for the item. By default, all items are not optional, meaning the user will be forced to enter details before being allowed to continue with the event. In this example we have chosen to to include the First name and Email address items, with the First name being optional... 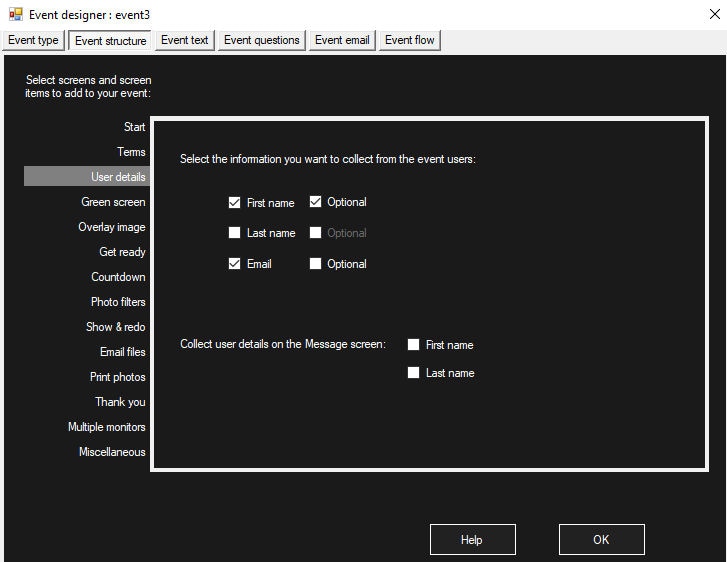 Design your User Data event screen When you have made your choices, click the OK button to return to the RightBooth main window, then click the Edit button to visit the Screen Designer. You will now see the User details screen in the Screen list on the Screen Editor toolbox (circled in red in the image below). Click this to select the User details screen. You can then use all the RightBooth design tools to edit your User details screen as required. The screen contains a text entry box for each of your chosen items and also has an on-screen keyboard to allow users to enter their details if you are using a touchscreen. If you are not using a touchscreen you can simply remove the on-screen keyboard from the User details screen. Note that in our example we have added an additional red text label showing that the Email text field is Required... 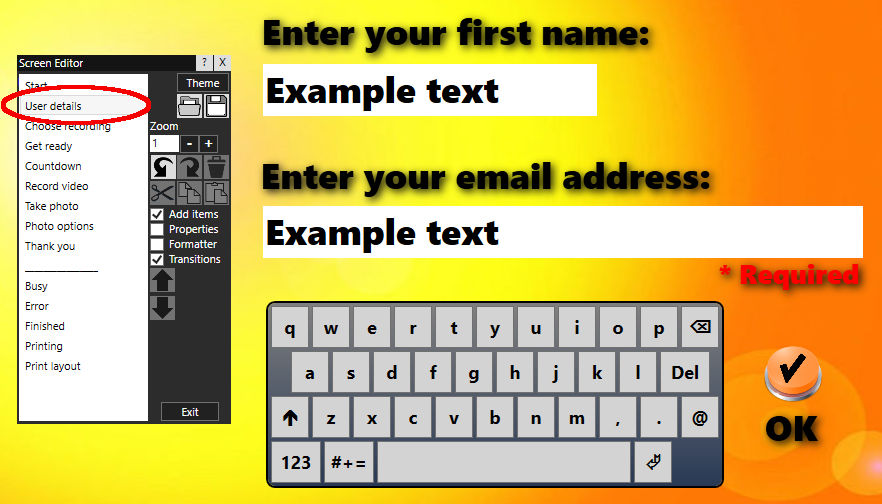 Collecting and Viewing User Details Now when you play your event, each user will be asked to provide their First name and Email address before they can use the system. All the user details are recorded and saved in the text file: UserDetails.txt, which you will find in the event with the recorded videos and photos. For more information on viewing the UserDetails.txt file, see this article.
0 Comments
Updated: Jan 2021 So what exactly are properties? Properties are values that you can apply to items such as text labels, images and videos on your event screens. These values define how each item looks and behaves when it appears during the event. This article gives you a brief overview of some of the properties that can be applied to your screen items. To access an item's properties...
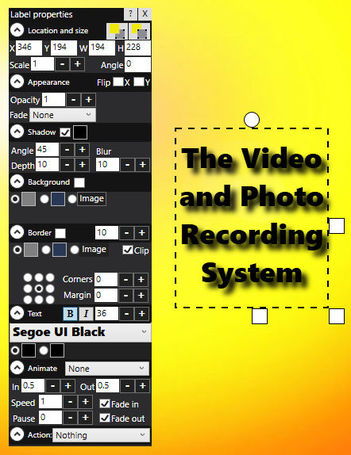
Location and size These properties let you specify the position, size and angle of the item on the screen. For example, by entering 45 into the Angle property, the text will be shown at 45 degrees. Note that if you use the mouse to move and size the item, the properties panel will update the X, Y, W and H properties accordingly. The two buttons containing the grey and yellow squares let you move the item in front or behind other items on the screen.
Shadow These properties let you apply a shadow effect to the item. In our example you can see that the Shadow property is ticked giving the the text a shadow. To the right of the Shadow tick box is a black square. This is the colour of the shadow. You can click this square to change the colour of the shadow. In our example the shadow Angle is 45 degrees, dropping it down to the right by a Depth of 10 pixels, with a Blur effect of 10. Experiment with these properties to see how you can customise the shadow, Background and Border Here you can add a background and a Border to the item. The background can be a single colour, a two colour gradient or an image. The Border can also be a single colour, a gradient or an image. You can also define the border thickness, margin and corner radius. In the following example we have selected a two colour vertical gradient background with a single colour border, 10 pixels thick with 20 pixel radius corners... 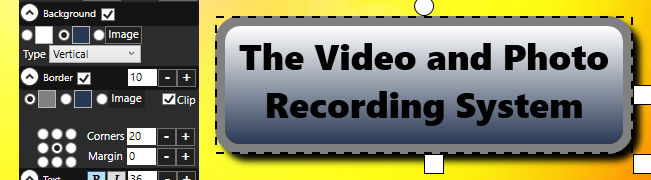 Text Here you can define the text font style. In our example we've select the Segoe UI Black font, Bold, 36 pt. You can also choose a solid font colour, or a gradient color fill that is applied to all text characters. In our example we've set the text colour to solid black. Animate With a text item you can set the Animate property. You can choose to set the text item to a Blink or Fade animation. Action Use this property to give the text item an action that will happen if you click on the text when the event is playing. You can choose from a number of Page Navigation actions, including:
Remember that each item on the screen can have it's own property values and you can also change the properties of the screen background.
In this article we have looked specifically at text label properties, and many of these properties are available to other item types, such as images and videos. But other items also have properties that are specific to them, so we encourage you to investigate the Properties panel when clicking on other items in the event. And don't forget to read the RightBooth manual for full details on all the Properties available. Updated: Jan 2021 The Scenario You have installed your equipment at a wedding reception to allow guests to record video messages. The bride has given you instructions that the system should not be used past 9 pm, but you're not going to be there to manually stop the system. This is where you can make use of RightBooth's Stop event rules to get the system to automatically shut down at a specified time.
In the screen shot below, you can see that we have set the stop time to 21:00 on the 10th May 2017... 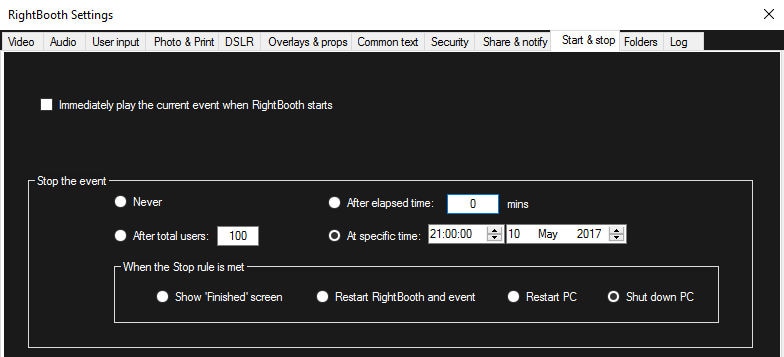 Now at 9pm, RightBooth will stop the event playing and will then shut down the computer.
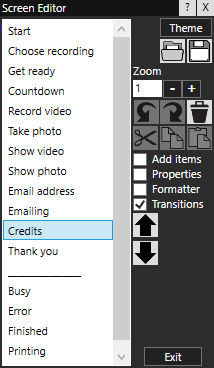
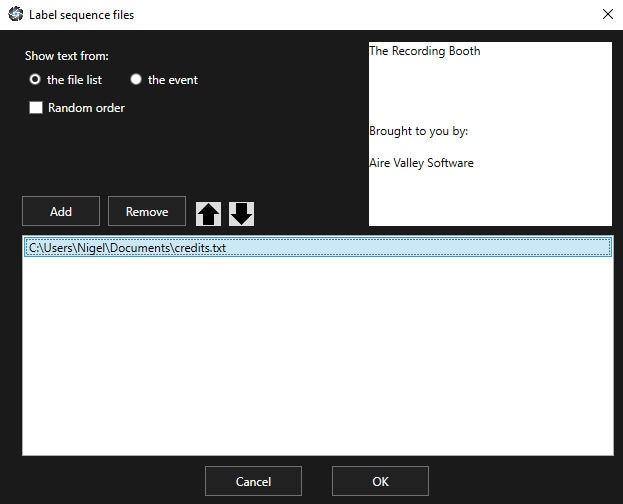
And don't worry, if someone is recording a video at 9pm, RightBooth will wait until they have finished before switching off. Updated: Jan 2021 Would you like to show a scrolling credits screen at the end of your event, similar to those seen at the end of a great movie? This article explains how you can design a professional looking scrolling credits screen that will be displayed to each of your event users, something like this... Step 1 - Write your credits
Step 2 - Add a credits screen to your RightBooth event
Step 3 - Add content to your Credits screen
Note: The Videos in the Media Library have all been optimised for speed and designed to loop seemlessly,
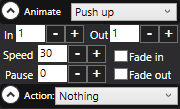
Step 4 - Set the credit animation propertiesYour label sequence item will now be showing your credits. You need to edit its animation properties:
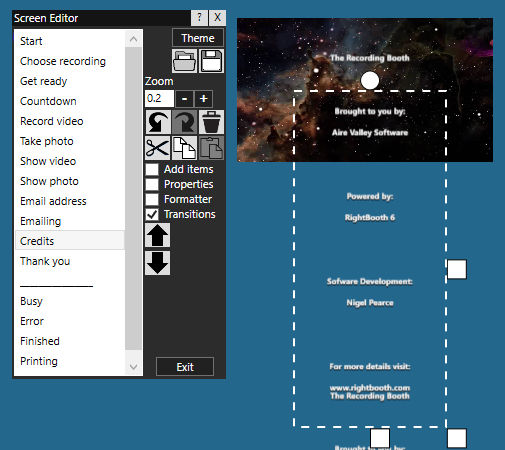
Step 5 - Size and position the creditsThis step is a little tricky to get right, but keep going until you achieve the desired affect.
You will need to experiment with both the vertical position and the height of the label sequence item until you get the desired effect shown in our example video.
Remember that the label sequence item's Clip property must be turned off. This will allow the push animation to keep displaying the text contents up past the top edge of the label sequence item. Note that the credits will keep on scrolling until your credits screen times out. Job Done. Watch out Speilberg (or is it Lucas?), we're coming to take over :-) Some of you have come across this issue,.. when you use your webcam, the video feed is displayed upside down on your screen. This problem is not specific to RightBooth, it can affect Skype and many other webcam applications on your computer. Although this is not a common issue, the problem seems to be more prevalent with integrated webcams found on Asus laptops and seems to happen mainly on more recent versions of Windows 10. You only need to enter the following search keyboards into Google to see the extent of this problem: asus webcam upside down windows 10 So what is causing this and what can you do about it? Well it seems that there isn't any one specific cause for the issue, some users are pointing the finger at Microsoft, others are pointing the finger at the webcam manufacturers and possible outdated device drivers. Take a look here at what people are saying and doing to try and fix this problem: https://answers.microsoft.com/en-us/insider/forum/insider_wintp-insider_devices/asus-t100ha-with-windows-10-camera-upside-down/33fbe12d-a018-419c-815a-394d6bdb3c3f https://www.drivereasy.com/knowledge/how-to-fix-video-upside-down-issue-on-asus-laptop/ https://www.tenforums.com/drivers-hardware/15578-asus-webcam-driver.html RightBooth 6.0.37 Can Provide a SolutionWe would always advise you to try and resolve hardware specific issues by contacting the supplier or manufacturer of the webcam, but if you cannot find a solution this way, we can at least provide you with a software 'fix' for when you are using your webcam in RightBooth 6. RightBooth version 6.0.37 has introduced a new Video Setting: 'Mirror Y'. This setting will allow you to flip the video input feed directly at the source input, and this effectively provides you with a correction to the problem mentioned above. To use this setting:
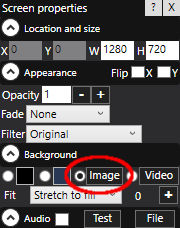
Your upside down video will now be resolved while you are using RightBooth. Updated: Jan 2021 RightBooth provides unrivalled design and animation capabilities that allow you to get as creative as you need. The video clip (below) is a desktop video capture that shows an animated RightBooth event start screen comprising two rotated, overlapping image sequence items, each showing a set of photos. The photos have been set to animate on and off the screen using a combination of a push and a fade animation, and this article explains how you can achieve the same effect in your events. How to...
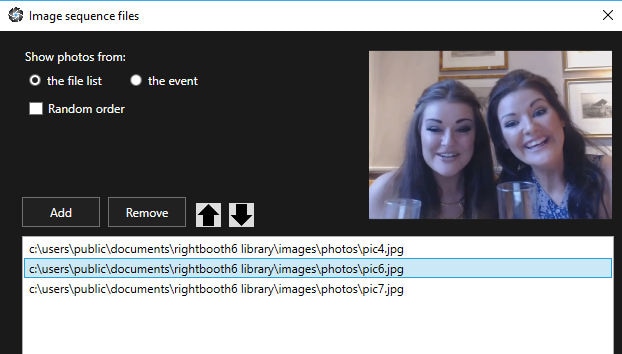
In our example we have chosen 3 images from the Media Library, but you can select images from other folders on your computer. You can also select 'Show photos from the event' to cause photos taken during the event to be shown. You may also want to select Random order to cause the images to be shown in a different order each time the start screen is shown. Next, add a second image sequence item to the Start screen and add a different set of photos into it.
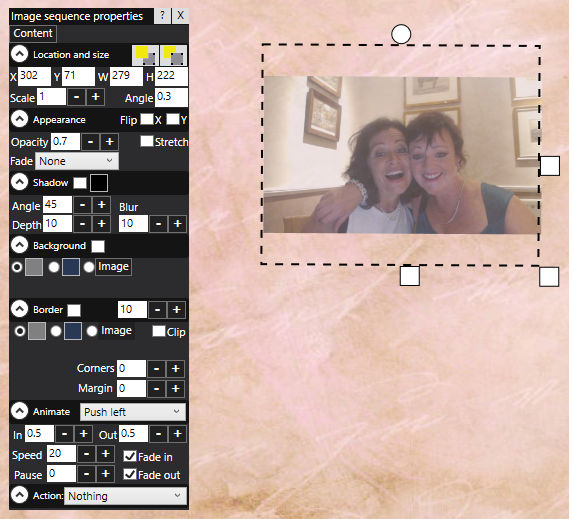
You will now have 2 image sequence items animating on the screen. The final step is to re-size the two items to make them larger and to also rotate them both slightly. To do this, it helps if you reduce the zoom factor of the screen view while you make your changes/ In the screenshot below you can see that we've reduced the Screen Editor zoom factor to 0.6 (circled in red) to allow resizing the items and moving them slightly off the edge of the screen and to also allow for rotating and overlapping the two items... 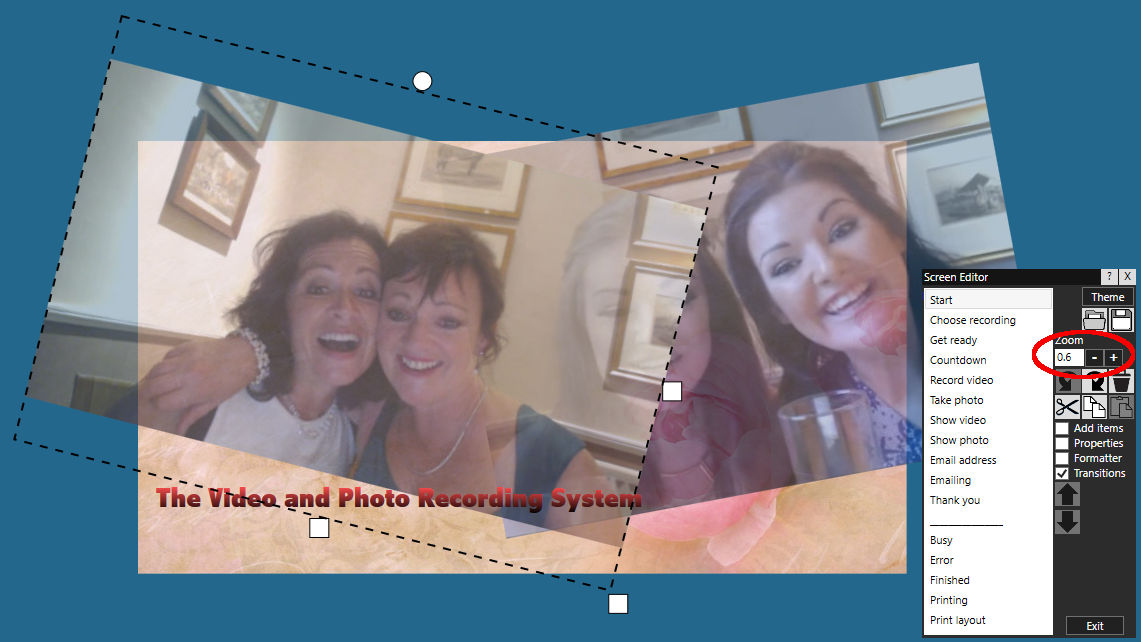 Job done !! You've just created an amazing effect for your Start screen, and it's one that's guaranteed to attract your users! Want to create something even more amazing?...Repeat everything above, but this time instead of using Image sequence items, use Video sequence items
Updated: Feb 2021
We have been asked on a number of occasions how to reset all the settings in RightBooth. To reset RightBooth's settings:
Note: If you don't see the 'Reset settings' button, make sure you upgrade RightBooth to the latest version. Updated: Feb 2021 When you run the RightBooth uninstaller, the software is uninstalled but there are lots of other files left behind, such as the RightBooth Media Library and the RightBooth Settings. This means that if you re-install RightBooth again, it will simply use the previous files and it may not achieve the result you were expecting. So this article explains how to fully remove RightBooth from your computer. 1) Remove the RightBooth Product CodeBefore you uninstall RightBooth, you should remove any product code that you may have previously entered into the software. To do this:
2) Remove the RightBooth Application
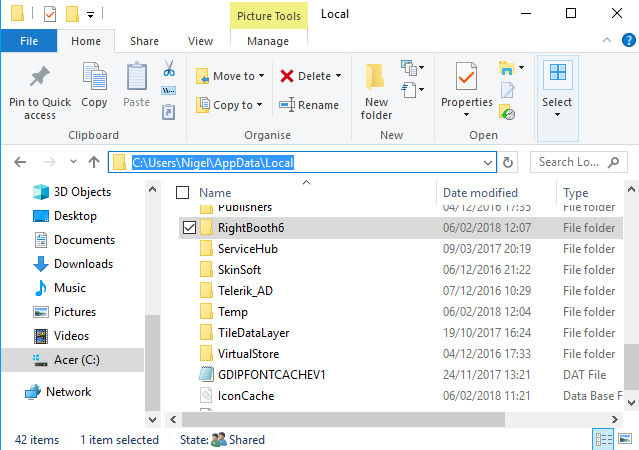
3) Remove the RightBooth Program Data FolderRunning the RightBooth uninstaller will not remove the program data files that are created by RightBooth while it was in use, (such as the RightBooth Settings file). These files are all saved in the currently logged on user's local application data folder.
4) Remove the RightBooth Media LibraryRunning the RightBooth uninstaller may not fully remove the RightBooth Media Library folder. The Media Library is located here: C:\Users\Public\Documents\RightBooth7 Library and you can remove this as follows:
5) Remove Your RightBooth Event FilesYou may wish to also remove all the event files, video files and photo files that you have created using RightBooth. These files are usually all stored in your Documents folder within the sub-folder RightBooth7 Remove this folder follows:
6) Remove the RightBooth Temporary FolderRightBooth also creates temporary files in your Windows Temp folder. These files can usually be found in the Temp folder for the currently logged on user. Example location:
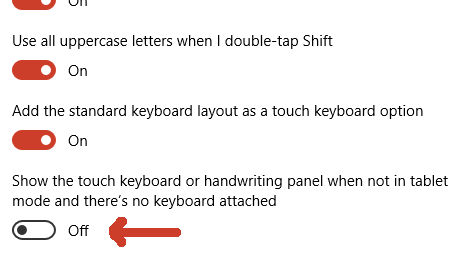
C:\Users\Nigel\AppData\Local\Temp\RightBooth Again, simply use Windows Explorer to delete the temporary RightBooth folder, or better still, run the Windows Disk Clean Up utility by typing 'Disk Clean Up' into your Start search text box, then using the utility to delete all Temporary files from your computer. RightBooth has its own inbuilt touch keyboard item that you can add to any of your event screens. This keyboard can be shown to your users whenever they need to enter text into the event using a touchscreen, for example when they are required to enter their email address. RightBooth’s inbuilt touch keyboard is designed specifically for entering US and UK English characters, but what if you want to allow your users to enter characters in another language? If you are using Windows 10 you are in luck. There is a Windows setting for this very purpose and you can enable it as follows...
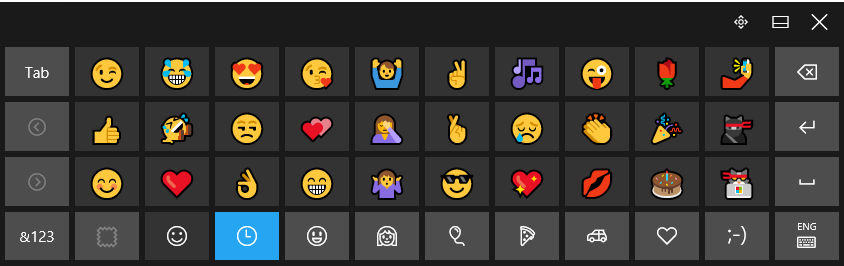
Now when you play a RightBooth event, if you touch into any text box on any event screen, the Windows Touch Keyboard will automatically appear when you need it and it will disappear when you don’t. And the other important point is that the Windows Touch Keyboard will be displayed in the language of the Windows Operating System, so for example, if you are running Windows 10 in Russian, you will be presented with a Russian Touch Keyboard. Easy... 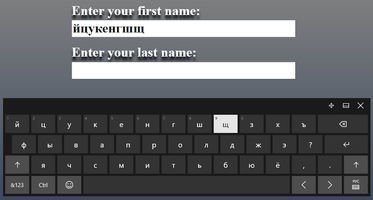 Added BenefitsThe Windows Touch Keyboard lets you easily add smileys and also use handwriting recognition to enter text into RightBooth....
RightBooth events are designed to play in full screen mode and by using the RightBooth Security settings you can prevent users from being able to leave the event screen or gain access to other Windows applications.
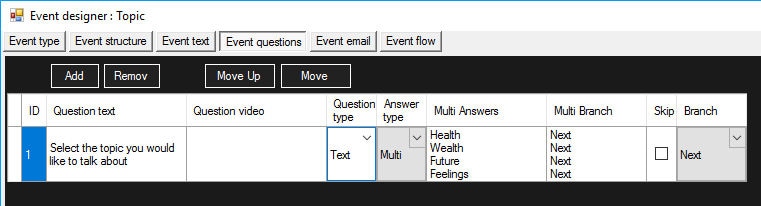
This allows you to create a kiosk style interface, that locks the user into RightBooth and prevents them accessing other areas of the Windows operating system. For example you can use the Security settings to hide the Windows Task bar and to stop various keystroke combinations from being entered using the keyboard, such as Alt-Tab to prevent switching to other apps. Touchscreen Swipe Gestures One of the more recent features in Windows is the ability to use swipe gestures on touchscreens in order to gain access to various parts of the Windows interface. For example, by using one finger to swipe in from the right hand edge of the screen you will gain access to the Windows 10 Action Centre. If you are running your RightBooth event on a Windows 10 touchscreen enabled system, you probably want to prevent the use of touchscreen gestures. This is something that RightBooth cannot prevent internally, but it is certainly possible to prevent by using other methods. Take a look at this article for details on how to turn off touchscreen swipe gestures in Windows 10... https://www.tenforums.com/tutorials/48507-enable-disable-edge-swipe-screen-windows-10-a.html The article describes two methods by which you can turn off swipe gestures and we have found Method 2 (which involves adding a new registry key) is the most reliable. Please note that if you use Method 2, swipe gestures will not be prevented until you restart your computer. We would be interested to know if it works for you ! The Scenario One of our users wanted to force people to answer a simple multiple choice question and then get them to record a video. The multiple choice question was required to give the user the option of which topic they would prefer to speak about during their video recording. The example topics were: health, wealth, future and feelings. The solution is achieved using 2 event files and RightBooth's event flow features. Event flow allows you to design multiple event files that have different functions and then make them run in a particular sequence, giving your users the impression that they are running a single event. In this article we will use RightBooth's event flow features to answer the scenario. Create two event files
Design the 'topic' event file
Design the video event file
You are now ready to start the event. Open the topic event file again and start playing the topic event. Here is what will happen...
|
AuthorNigel Pearce 
Archives
July 2024
|
||||||||||||||||||||||||||||


 RSS Feed

|
|