
|
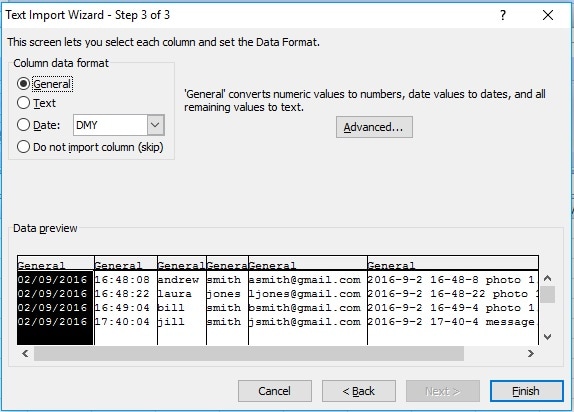
When you run an event, RightBooth will automatically save any user details into the file UserDetails.txt. This file can be found along with all the videos, photos and messages in your event file folder within Documents\RightBooth7\Events\Your Event Filename. The user details file will hold user names, email addresses, dates and times of use, names of the files recorded by each user and also answers to any questions users have provided during the event. All this information is formatted in the text file as CSV. CSV stands for Comma Separated Variables which is a fancy way of saying that each piece of information in the file is separated by commas, and this makes it easy to load into spreadsheet applications such as Excel. This is a typical userdetails file with commas between each data item on each line... 02/09/2016,16:48:08,andrew,smith,[email protected],2016-9-2 16-48-8 photo 1.png 02/09/2016,16:48:22,laura,jones,[email protected],2016-9-2 16-48-22 photo 1.png 02/09/2016,16:49:04,bill,smith,[email protected],2016-9-2 16-49-4 photo 1.png 02/09/2016,17:40:04,jill,smith,[email protected],2016-9-2 17-40-4 message.txt Now we'll explain the process of loading this data into Excel.
The End Result Excel will now load the user details into a new spreadsheet for you to continue working. In this example, column A is the date, B is the time, C is the user's first name, D is the user's last name, E is the user's email addresses, F is the filename created by the user. Other columns will appear with user's answers to questions if you run a question event. 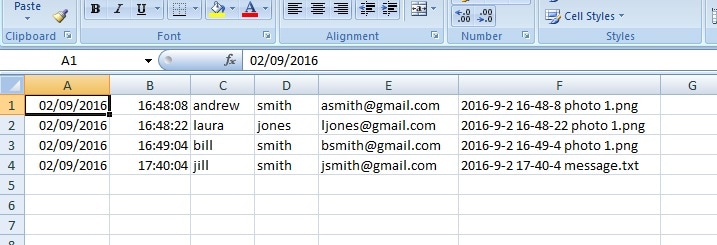
0 Comments
Updated: November 2021
This is step by step guide to setting up your printer for use in RightBooth. 1) - Connect your printer to your computer and check it is working. This step possibly goes without saying but I'm saying it anyway. RightBooth will only allow you to print photos if you have a fully working printer switched on and attached to your computer (usually via a USB cable). So before running RightBooth, please make sure your printer is on, has ink, is not jammed and can print without problems. Also it is best to make sure that you have the latest software for your printer installed on your computer. Please refer to your printer documentation for details. 2) - Run RightBooth and from the main screen click Settings. In Settings click the Printers tab. If everything is working OK on your printer, it will be listed in the Printer 1 combo box. Select your printer from the list. 3) - Printers have default settings such as a default paper size and print quality. When you have chosen your printer, RightBooth will show you the default paper size width and height underneath the printer name. Make a note of these values as you will need them later. 4) - Open the event file in which you want to add photo printing. Go to the Event Designer. Click the Event Type tab and make sure Photos is ticked. 5) - Next click the Event Structure tab and select the Print Photos tab. On this panel, choose either Yes or Ask the user. This will cause photo printing to be included in your event. 6) - Go to the Screen Editor. In the screen list on the Editor Toolbox, select the Print Layout screen. This will show you a view of your printer paper onto which you can design your photo print layout. But before starting your design you need to make sure you are working with the correct paper size for your printer. 7) - On the toolbox, tick the Properties check box to show the printer paper properties. Click the Printer paper size drop down and choose the paper size that matches the values you noted in step 3 above. For example if your default printer paper size is A4, choose A4 from this list. You can also choose the Design size. This is the preferred size of your current print layout design, and it should not be confused with the paper size. Normally you would make the design size the same as the paper size, but this is optional. If you set the design size to be different from your paper size, then when the layout is printed, RightBooth will size the layout so that it has a best fit for the paper. Note that in the Paper and Design drop downs, RightBooth will show you a list of commonly available paper sizes, but if you find your paper size is not listed you will need to choose the last option in the list: Custom, and then add your previously noted paper width and height values into the W and H text boxes. For example, the DNP DS-RX1 printer has a default paper size of 6.15 x 4.13 inches. This size is not in the RightBooth paper list, so in this example you would enter 6.15 into the W box and 4.13 into the H box. That's it ! You are now ready to design your print layout on the correct paper size for your printer. For details on how to design your print layout, read this article: http://www.rightbooth.com/blog/creating-photo-print-layouts-in-rightbooth |
AuthorNigel Pearce 
Archives
July 2024
|
 RSS Feed

|
|