RIGHTBOOTH
  • Home
  • Products
  • Try
  • Help
    • Video Settings
    • Webcams
    • Other Equipment
    • Blog
    • How To
    • Training Videos
    • FAQ
    • User Manual
    • Release Notes
    • Terms of use
    • Contact
  • Feedback
    • Comments
    • User stories >
      • Mike Ridge
      • Tony Kay
      • Dave Bladen
      • Steven D Mills
      • Sue Crossland
      • Luke Dalby
      • McMaster University
      • Hangloose
      • Paul Waterhouse
      • Raf Sauvillers
    • User Videos
    • User Equipment
    • Organisations
  • About

Uploading Videos and Photos to the Cloud

23/10/2017

5 Comments

 
Picture
Picture
Updated: Feb 2021

​RightBooth can integrate seamlessly with your favourite cloud storage account to allow videos, photos, messages and print layouts to be copied to your cloud storage account while the event is taking place.

Here's how:

1 Get yourself a cloud storage account
There are numerous providers of cloud storage, including Dropbox, Google Drive and Box.  For a great explanation on some of the best providers, read this:  https://www.moneysavingexpert.com/shopping/free-online-storage

Most cloud storage providers work in the same way when it comes to uploading files from your PC or laptop.  They allow you to designate a local folder on your computer which will then be synchronised with your cloud storage account. This basically means that whenever a new file is added into your local folder, it will be automatically uploaded to your cloud folder.

Once you have chosen your account provider, install their software and set up your local synchronisation folder.
Full details on how to do this are available from your chosen cloud storage provider.

2 Connect RightBooth to your Local Cloud Storage Folder
  • Run RightBooth
  • Go to RightBooth Settings
  • Click on the Folders/Files tab
  • In the section 'Copy files to other drives and folders', click the Add button 
  • Use the Select Folder dialog to choose your local cloud storage folder.  This folder will then be added to the Folder table.
3 Choose the type of files to copy to the cloud
Staying in the RightBooth Folders settings, use the check boxes (alongside the cloud folder in the Folder table) to decide which type of event files will be copied to the cloud folder.
Now make sure your computer is connected to the Internet and play the event.
And each time a user captures photos, the selected files will be:
  • automatically copied to your local cloud storage, then:
  • automatically uploaded to your remote cloud storage folder.

File uploads will happen 'behind the scenes' while RightBooth plays the event, and if you make your cloud folder accessible to your users they will be able to immediately view and access all the files on their own devices as soon as they are uploaded during the event.
5 Comments

RightBooth And The Windows 10 Fall Creators Update

22/10/2017

0 Comments

 
Picture
Microsoft released the latest update to their Windows 10 operating system (known as the Fall Creators Update) on October 17th.  You can read all about its new features here.

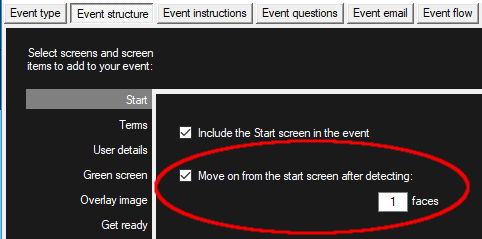
Microsoft have also released an update to their development platform Visual Studio, version 15.4.

In the past week we've rebuilt RightBooth using VS 15.4, and we have also fully tested it on the Windows 10 Fall Creators Update.

And we're pleased to say that everything continues to work well ! 

So make sure you get your hands on RightBooth version 6.1.33
0 Comments

Automatically Capturing Photos and Videos

11/10/2017

0 Comments

 
Updated: Jan 2021

If you would like to capture photos (or videos) of users without requiring them to interact with your computer equipment in any way (i.e without them having to use the mouse, keyboard or touchscreen), this article explains how.
Using Face Detection on the Start Screen
One of the features available in RightBooth is the ability for the software to look for a specified number faces within the webcam feed on the events' Start screen.  Once the required number of faces have been detected, RightBooth will automatically progress onto showing the next screen in the event.  By using this feature we can completely automate the process of capturing photos as follows:
  • In RightBooth, create a new event.
  • Click the Design button on the main screen.
  • In the Event Type tab, un-tick: Video and tick: Photo(s).
  • Set the Photo count to 1​.
  • In the Event structure tab, Start section, tick: Move on from start screen after detecting and enter '1' for the number of faces to detect as shown in the following screen shot:
Picture
  • In the Choose recording section, un-tick: Include the 'Choose recording' screen
  • In the Show & redo section, tick: Photos and un-tick: Allow user to redo photos
  • In the Thank you section un-tick: Include the Thank you screen
  • Return to the RightBooth main window and save the event.

Congratulations. You have created an automatic photo capture event !

Now play the event and each time anyone places their face in front of the camera, RightBooth will automatically take photos of that user until they move away from the camera.

If you would rather automatically record videos, in the Event Designer set the event type to record videos rather than take photos.

Also, try setting the number of faces to detect to 2.  RightBooth will now only take photos (or record videos) when two or more people are in front of the camera.
If you would like to try a ready made photo capture event, download the following AutoBooth event file, then open and play it in RightBooth:
autobooth.rbe
File Size: 60 kb
File Type: rbe
Download File

0 Comments

Creating Photo Sequence Videos and Time Lapse Videos

1/10/2017

0 Comments

 
Updated: Jan 2021

RightBooth lets you create a video of all the photos captured during the event.  ( a photo sequence video ). To do this:
  • From the RightBooth main screen, click the 'Tasks' button
  • In Tasks, select the tab: Create Video from Photos
  • Click the 'Create' button to create an MP4 video that will display all the photos from the event one after another

By default, each photo in the video will be shown for 4 seconds.  You can change this display time along with a few other settings by clicking the Settings button where you can also select the video size and quality of the resulting video.

This is also a great way to create a time lapse video from the set of photos captured using RightBooth.

For example, setting the photo display time to 0.04 seconds will cause 25 photos to be shown per second in the resulting video.

Read this article to learn how you can use RightBooth to automatically capture time lapse photos
0 Comments

    Author

    Nigel Pearce

    View my profile on LinkedIn

    RSS Feed

    Archives

    March 2023
    February 2023
    January 2023
    December 2022
    November 2022
    October 2022
    September 2022
    August 2022
    July 2022
    June 2022
    May 2022
    April 2022
    March 2022
    February 2022
    January 2022
    December 2021
    November 2021
    October 2021
    September 2021
    August 2021
    July 2021
    June 2021
    May 2021
    April 2021
    March 2021
    February 2021
    January 2021
    December 2020
    November 2020
    October 2020
    September 2020
    July 2020
    June 2020
    May 2020
    April 2020
    March 2020
    February 2020
    January 2020
    December 2019
    November 2019
    October 2019
    September 2019
    August 2019
    July 2019
    June 2019
    May 2019
    April 2019
    March 2019
    February 2019
    January 2019
    November 2018
    October 2018
    September 2018
    August 2018
    July 2018
    June 2018
    May 2018
    April 2018
    March 2018
    February 2018
    January 2018
    December 2017
    November 2017
    October 2017
    September 2017
    August 2017
    July 2017
    June 2017
    May 2017
    April 2017
    March 2017
    February 2017
    December 2016
    November 2016
    October 2016
    September 2016
    August 2016
    July 2016
    June 2016
    May 2016
    April 2016
    March 2016
    February 2016
    January 2016
    December 2015
    November 2015
    October 2015
    September 2015
    August 2015
    July 2015
    June 2015
    May 2015
    April 2015
    March 2015
    February 2015
    January 2015
    November 2014
    October 2014
    September 2014
    August 2014
    July 2014
    June 2014
    May 2014
    April 2014
    March 2014
    February 2014
    January 2014
    December 2013
    November 2013
    October 2013

RightBooth logo
RIGHTBOOTH
​© 2013 - 2023 Aire Valley Software
News
​
Tutorials
​
FAQ
About
​
Contact
​
Terms of use and ​Privacy Policy
  • Home
  • Products
  • Try
  • Help
    • Video Settings
    • Webcams
    • Other Equipment
    • Blog
    • How To
    • Training Videos
    • FAQ
    • User Manual
    • Release Notes
    • Terms of use
    • Contact
  • Feedback
    • Comments
    • User stories >
      • Mike Ridge
      • Tony Kay
      • Dave Bladen
      • Steven D Mills
      • Sue Crossland
      • Luke Dalby
      • McMaster University
      • Hangloose
      • Paul Waterhouse
      • Raf Sauvillers
    • User Videos
    • User Equipment
    • Organisations
  • About