RIGHTBOOTH
  • Home
  • Products
  • Try
  • Help
    • Video Settings
    • Webcams
    • Other Equipment
    • Blog
    • How To
    • Training Videos
    • FAQ
    • User Manual
    • Release Notes
    • Terms of use
    • Contact
  • Feedback
    • Comments
    • User stories >
      • Mike Ridge
      • Tony Kay
      • Dave Bladen
      • Steven D Mills
      • Sue Crossland
      • Luke Dalby
      • McMaster University
      • Hangloose
      • Paul Waterhouse
      • Raf Sauvillers
    • User Videos
    • User Equipment
    • Organisations
  • About

Thanking your event users with a Video message

30/4/2016

0 Comments

 
Updated: Jan 2021

So you are running an event at your social gathering and you would like to thank each of your guests (after they have used the system) by playing them a video message.  In this article we explain how to set this up.

Record your video
The easiest way to record your 'Thank you' video is to use RightBooth itself of course!
So, sit down, think about what you would like to say to your guests, then run the event and record your video.
Your video will be saved in the current event folder (defined in Settings), so using Windows Explorer find your recorded video file and then we suggest you move it to the Videos folder on your system, and rename it in the process to something like thankyou.wmv

Add your video to the event
To add your 'Thank you' video:
  • In RightBooth, open your event.
  • Go to Event Structure tab in the Event Designer and make sure the 'Thank you' screen option is ticked.
  • Then visit the Screen Editor and on the Toolbox select the Thank you screen from the screen list.
  • Open the Add items toolbox and click the Video button to add a new blank video item to the screen.
  • Double click the video item, then browse for your previously recorded 'Thank you' video file.
  • Size and position your video on the screen.
​
Changing the Screen Timeout
You now have your video on the Thank you screen, so each time the screen is shown your 'Thank you' video will play.
However, the default display time for the Thank you screen is set to 4 seconds, so your video will only play for 4 seconds before RightBooth automatically returns to the Start screen.  To fix this...
​
  • In the Screen Editor, on the Thank you screen, open the Screen Properties Toolbox.
  • On the Timeout section,  change the Timeout property to 'On video item'
Now during the event whenever the Thank you screen is shown it will remain showing until your video has finished playing, after which RightBooth will return to the Start screen.
0 Comments

Using multiple printers in your events

27/4/2016

0 Comments

 
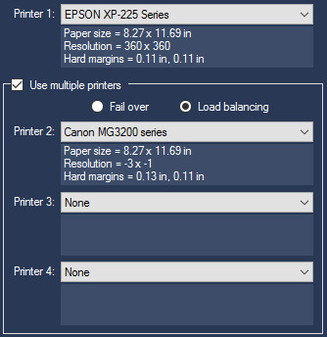
Updated: Jan 2021

RightBooth provides support for using up to four printers during your events.  This article explains why you might find this feature useful, with the example of having two printers attached to the computer.

Reducing Printing Delays
Depending on the capabilities of your printer and your chosen printer settings you may find the speed at which your photo prints are produced is not sufficient to keep pace with the number of event users, and therefore you may start to incur a growing backlog of printouts as the event continues.
To solve this problem, you can split the photo printing task between your multiple printers as follows:

  • Visit RightBooth Settings
  • Select the Printers tab
  • On the Printer settings section, tick the Use multiple printers option.
  • On the Printer 2 combo box, select your second printer from the list. In the example opposite our second printer is the Canon MG3200
  • Select the option: Share jobs (previously named Load balancing)​
Picture
Now each time a user prints photos, RightBooth will alternate the printing between the two printers, allowing printouts to happen simultaneously on both and therefore halving the time required to process any backlog.  Of course you can add Printer 3 and Printer 4 to this set up if you have enough printers of course :-)
Overcoming Printer Problems
You may prefer to have other printers attached to act as backups that are only used if other attached printers malfunction in some way.  To do this, follow the steps listed above, but select the option: Fail over.

Now during the event, all photo printouts will normally be sent to Printer 1, but if RightBooth detects a problem on Printer 1 it will then switch to using Printer 2.  Again, you can choose to add Printer 3 and 4 to this set up.

With Fail over, RightBooth will check for the following printer problems before each print out is generated:
​
  • printer turned off or power failure
  • low toner or no toner
  • printer memory problem
  • no paper
  • paper jam
  • printer lid or door open
  • paper bin full
  • print job blocked
  • user intervention required

Notes
  • RightBooth will also employ Fail over checking if you are using the Share jobs option.

  • Unfortunately it is not possible for RightBooth to detect low ink cartridge conditions on colour printers because printer manufacturers do not provide this capability in a way that can be reliably monitored.
0 Comments

Adding audio prompts to events

24/4/2016

1 Comment

 
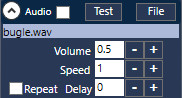
Updated: Feb 2021

RightBooth allows you to add an audio file to each screen in the event.  During the event, the audio file will play each time the screen is displayed.  This can be useful if you want to help guide your users through the system or simply to play some music at various places within the event flow.

Adding Audio to Event Screens
Let's say you want to play some music on the Start screen.
  • Go to the Screen Editor and select the Start screen on the Toolbox
  • Show the Screen Properties toolbox
  • On the Audio section of the Properties toolbox, click the File button.
  • Browse your computer and choose the audio file you require to play
  • On the example opposite we've selected the file bugle.wav

Now run the event and you'll hear the bugle audio play each time the Start screen is shown.
Picture
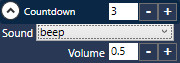
On the Audio Properties you'll notice that you can also alter the audio volume and audio speed.
You can also make the audio file play again (Repeat), after it completes and also provide the amount of time (the Delay) before the audio repeats.

Remember...  Each screen can have a different audio prompt.  So for example if you have an audio file that say's 'Thank you for using our system', you could add that to the event Thank you screen.

Adding Audio to Countdown Items
Another place where you can add audio prompts is on a Countdown item.
  • Go to the Screen Editor and select the Countdown screen on the Toolbox
  • Click on the countdown item to select it.
  • Show the Countdown Properties toolbox
  • On the Coundown section of the Properties toolbox, click the Sound combo box and choose a sound file
  • On the example opposite we've selected the file beep
Your chosen sound will now play each time the Countdown item changes its value.
Picture
1 Comment

Creating Multiple Choice Question and Answer Events

22/4/2016

0 Comments

 
Updated: Jan 2021

RightBooth allows you to creating multiple choice questions and in this article we describe how to make use of this feature.

Before reading, we suggest you familiarise yourself with creating question and answer events here:
How to create question and answer events

Defining multiple choice questions

Multiple choice questions can be created using the Answer Type 'Multi' which is available in the Question Designer table.  To define a multi choice question, add a new question to the question table, enter your question text and set the Answer type to 'Multi' as follows:
Picture

​In our example we are asking how old the user is, so we need to enter some choices.  Clicking in the Multi Answers cell of the Question grid will reveal the Multi Answers edit panel, where you can add up to 10 answers to the question as follows:
Picture

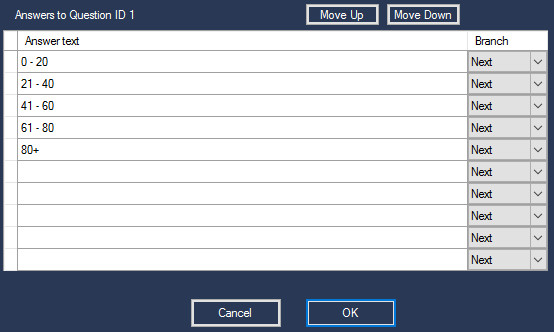
When you have added the answers, returning to the Question grid will show them listed alongside the question as follows:
Picture

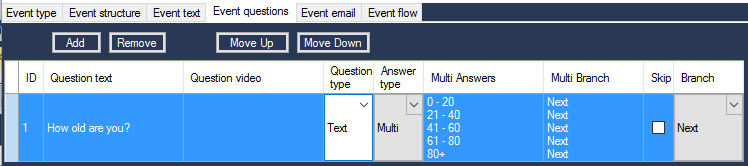
​Notice that each answer can have a Multi Branch value.  By default this is set to 'Next' for each answer, meaning that the next question in the table will be shown after the user selects an answer to the current question.  We will cover branching in more detail in another article.

You can obviously create as many multi answer questions as you need in the question grid, but here we will simply concentrate on our single question.

Designing multiple choice questions

In the Screen Editor, your multi choice question screen will initially be automatically arranged as follows:
Picture
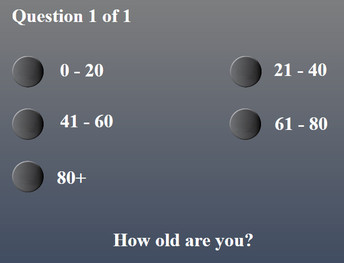
Each answer is shown together with an associated button.  You are free to move, size and edit all items on the screen as required and you can alter the text and the button styles.  Here we've aligned all the answers in a single column and re-positioned the question label.
Picture
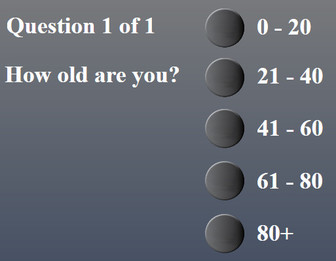
When the event is running and the question is shown, the user can click or touch any answer text item or associated button item in order to answer the question,  they will then be shown the next question, or the next screen in the event if all questions have been answered.

User answers will all be recorded in the file userdetails.txt which you will find in the folder that you have chosen for saving event recordings.  This is specified in the Folders/Files section of the RightBooth Settings.
0 Comments

    Author

    Nigel Pearce

    View my profile on LinkedIn

    RSS Feed

    Archives

    March 2023
    February 2023
    January 2023
    December 2022
    November 2022
    October 2022
    September 2022
    August 2022
    July 2022
    June 2022
    May 2022
    April 2022
    March 2022
    February 2022
    January 2022
    December 2021
    November 2021
    October 2021
    September 2021
    August 2021
    July 2021
    June 2021
    May 2021
    April 2021
    March 2021
    February 2021
    January 2021
    December 2020
    November 2020
    October 2020
    September 2020
    July 2020
    June 2020
    May 2020
    April 2020
    March 2020
    February 2020
    January 2020
    December 2019
    November 2019
    October 2019
    September 2019
    August 2019
    July 2019
    June 2019
    May 2019
    April 2019
    March 2019
    February 2019
    January 2019
    November 2018
    October 2018
    September 2018
    August 2018
    July 2018
    June 2018
    May 2018
    April 2018
    March 2018
    February 2018
    January 2018
    December 2017
    November 2017
    October 2017
    September 2017
    August 2017
    July 2017
    June 2017
    May 2017
    April 2017
    March 2017
    February 2017
    December 2016
    November 2016
    October 2016
    September 2016
    August 2016
    July 2016
    June 2016
    May 2016
    April 2016
    March 2016
    February 2016
    January 2016
    December 2015
    November 2015
    October 2015
    September 2015
    August 2015
    July 2015
    June 2015
    May 2015
    April 2015
    March 2015
    February 2015
    January 2015
    November 2014
    October 2014
    September 2014
    August 2014
    July 2014
    June 2014
    May 2014
    April 2014
    March 2014
    February 2014
    January 2014
    December 2013
    November 2013
    October 2013

RightBooth logo
RIGHTBOOTH
​© 2013 - 2023 Aire Valley Software
News
​
Tutorials
​
FAQ
About
​
Contact
​
Terms of use and ​Privacy Policy
  • Home
  • Products
  • Try
  • Help
    • Video Settings
    • Webcams
    • Other Equipment
    • Blog
    • How To
    • Training Videos
    • FAQ
    • User Manual
    • Release Notes
    • Terms of use
    • Contact
  • Feedback
    • Comments
    • User stories >
      • Mike Ridge
      • Tony Kay
      • Dave Bladen
      • Steven D Mills
      • Sue Crossland
      • Luke Dalby
      • McMaster University
      • Hangloose
      • Paul Waterhouse
      • Raf Sauvillers
    • User Videos
    • User Equipment
    • Organisations
  • About