
|
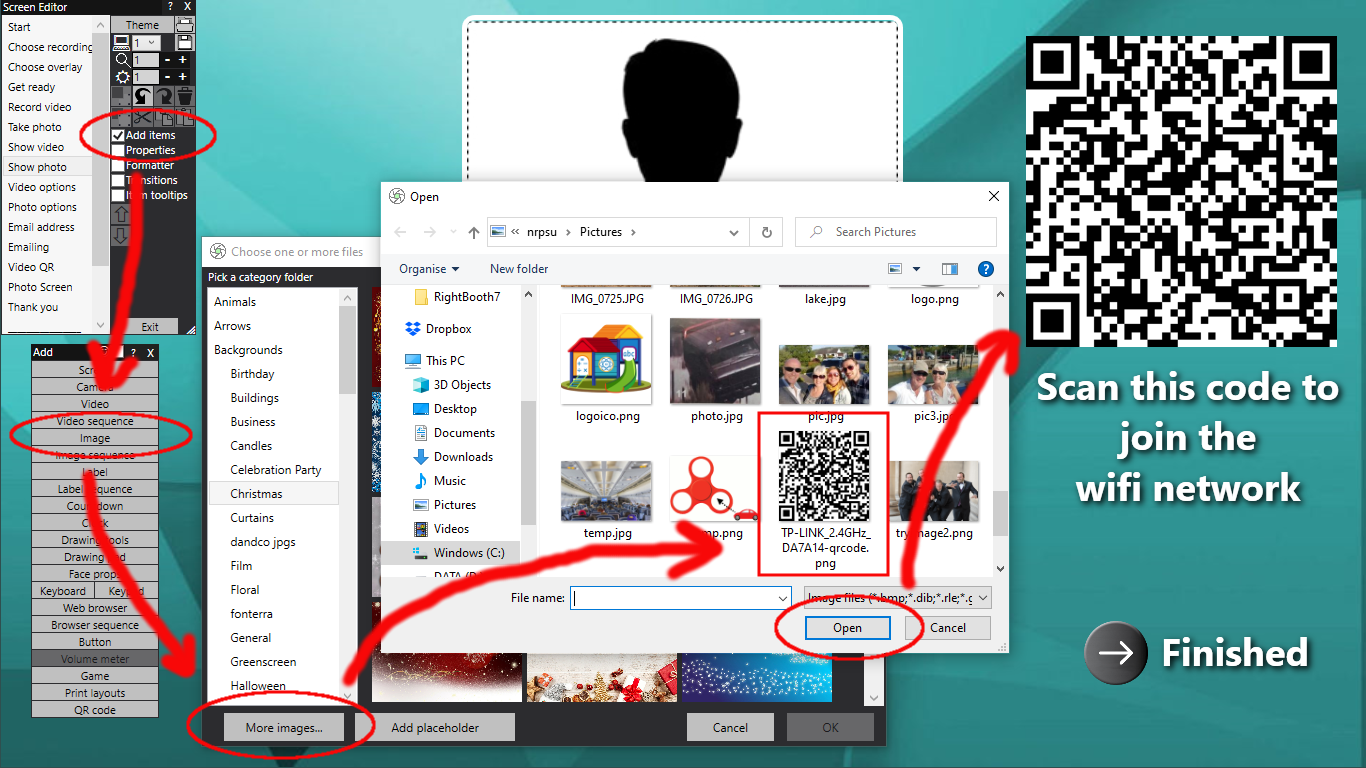
In addition to standard text, QR codes have evolved to encode text that has special meanings to QR code scanner apps. When a QR code scanner detects a special encoding it can then instruct your device (e.g. mobile phone) to perform an associated action or run an associated app. Examples of special QR codes include Skype codes, email codes, URLs and WhatsApp messages. In this article we are going to consider WiFi QR codes and how to add them onto your RightBooth event screens. Then, when scanned, the code will allow your event users to connect to a WiFi network of your choice without them having to manually select the network or enter the required WiFi password. Step 1 - Create a WiFi QR Code Image RightBooth has a feature that lets you show QR codes on your event screens but it currently doesn't provide the ability to generate WiFi QR codes. However, there are a number of apps online that can generate WiFi QR code images for you free of charge. The one I am using for this article is the JS WiFi Code Generator which can be found here: https://qifi.org/ At this website, simply enter the SSID, Encryption method and Key (password) for your WiFi router. In this example, I am creating a WiFi QR code for my TP-Link N600 router which uses the WPA2 encryption method: 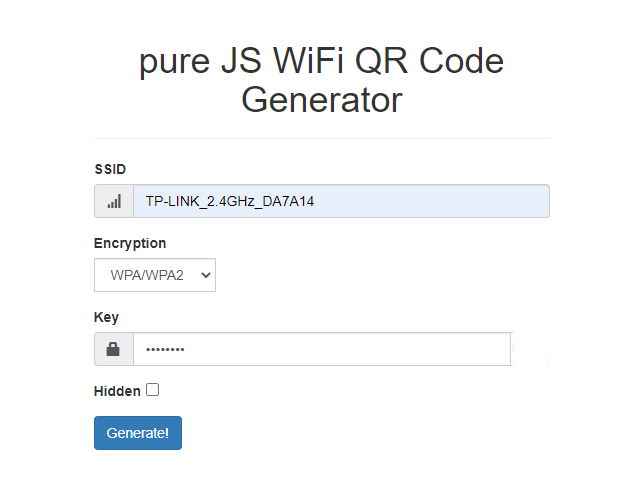 When you have entered your WiFi details, click the 'Generate' button, then click 'Export' to download the generated QR image to your PC... 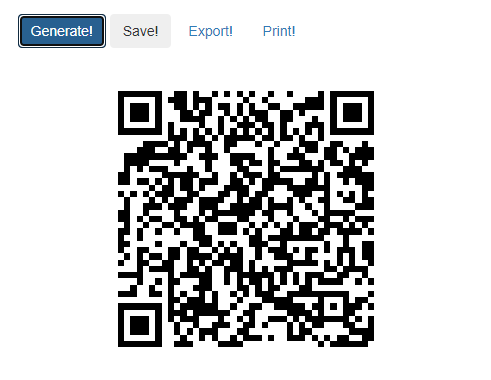 By default your browser will download your QR code image into your Downloads folder, so make sure you move it to somewhere more permanent such as your Pictures folder. Step 2 - Add the QR Code Image onto your RightBooth Event screen
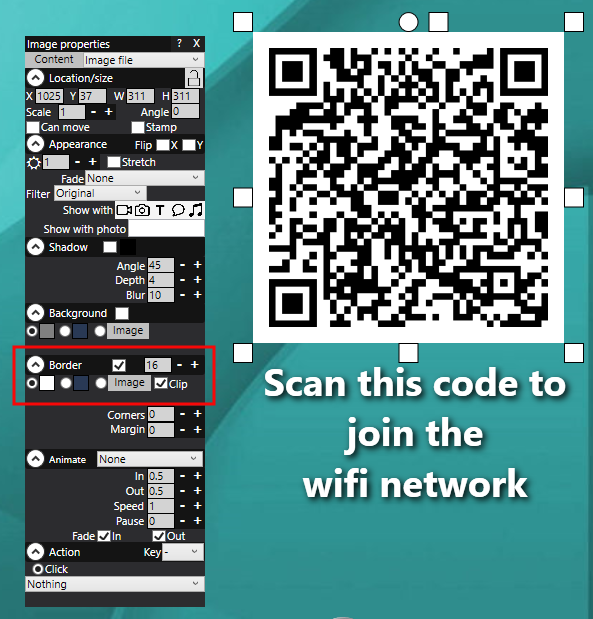
 Step 3 - Add a white border to the QR code image This is required to help improve the ability for QR code scanner apps to detect the QR code.
 Job done!
Now when the QR code appears on your event screen, users can scan the code using the QR code scanner on their WiFi enabled device (e.g. mobile phone) to join your WiFi network.
2 Comments
So you want your RightBooth users to enter one or more coins into a coin acceptor before they are allowed to use your event. What you need to do is to find a coin acceptor that can be used to send a keyboard keypress into Windows. Then you can alter your RightBooth event so that it cannot be used until coins have been inserted into the coin acceptor. Option 1 Coin acceptor with a micro switch connected to a StealthSwitch 3 or a U-HID There are many companies providing arcade style coin mechanisms that generate pulses on a micro switch output, such as can be found here: https://www.arcadeworlduk.com/categories/Arcade-Parts/Coin-Mechs/ Obtain a StealthSwitch 3 here: StealthSwitch 3 or a U-HID board. Connect the StealthSwitch to the PC using a USB cable. Then wire the coin acceptor to the StealthSwitch and test that the coin acceptor can control the StealthSwitch input. For information on how to do this, see the section: Connecting the coin acceptor to the StealthSwitch 3 on this website Other Options If you are feeling more adventurous, you could experiment with solutions like this: www.casino-software.de/cash-interface2_e.htm#keystroke or this: jukeblaster.com/coinkit.html Modifying RightBooth to accept the keyboard key Once you have your coin acceptor working and connected to the PC, here is the change you need to make in RightBooth:
 Now when you play the event, RightBooth will wait at the Start screen until a coin is inserted into the coin acceptor. You can design the Start screen so that it prompts your users to enter a coin (or coins) in order to use the system.
Once coins have been entered, RightBooth will receive the specified key input and will then progress onto the next screen in your event, allowing the user to access the rest of your event features. Also, at the end of each user session, RightBooth will return to showing the Start screen, waiting for the next user to enter coins into the coin acceptor. With this setup, you can set RightBooth to be used by touchscreen (or mouse) so that once your users have successfully progressed past the Start screen, they can then fully interact with all the other screens in your event. Please note: If you run into difficulties with your chosen coin acceptor or StealthSwitch you will need to contact the supplier for help. As far as RightBooth is concerned, it will be simply waiting at the Start screen for the keypress to be generated. Updated: April 2022 Training video explaining:
|
AuthorNigel Pearce 
Archives
July 2024
|
 RSS Feed

|
|