|
New features and fixes in this release:
0 Comments
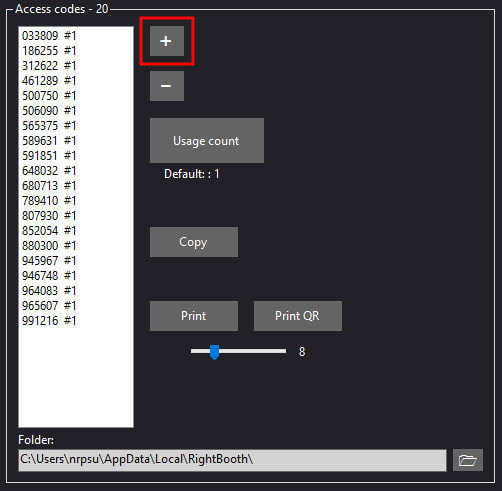
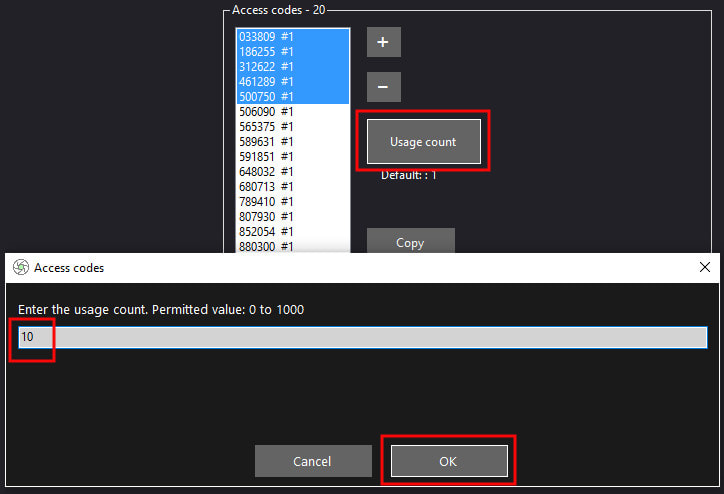
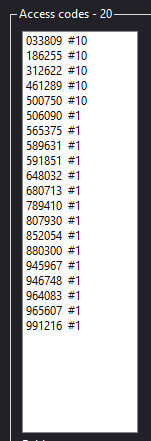
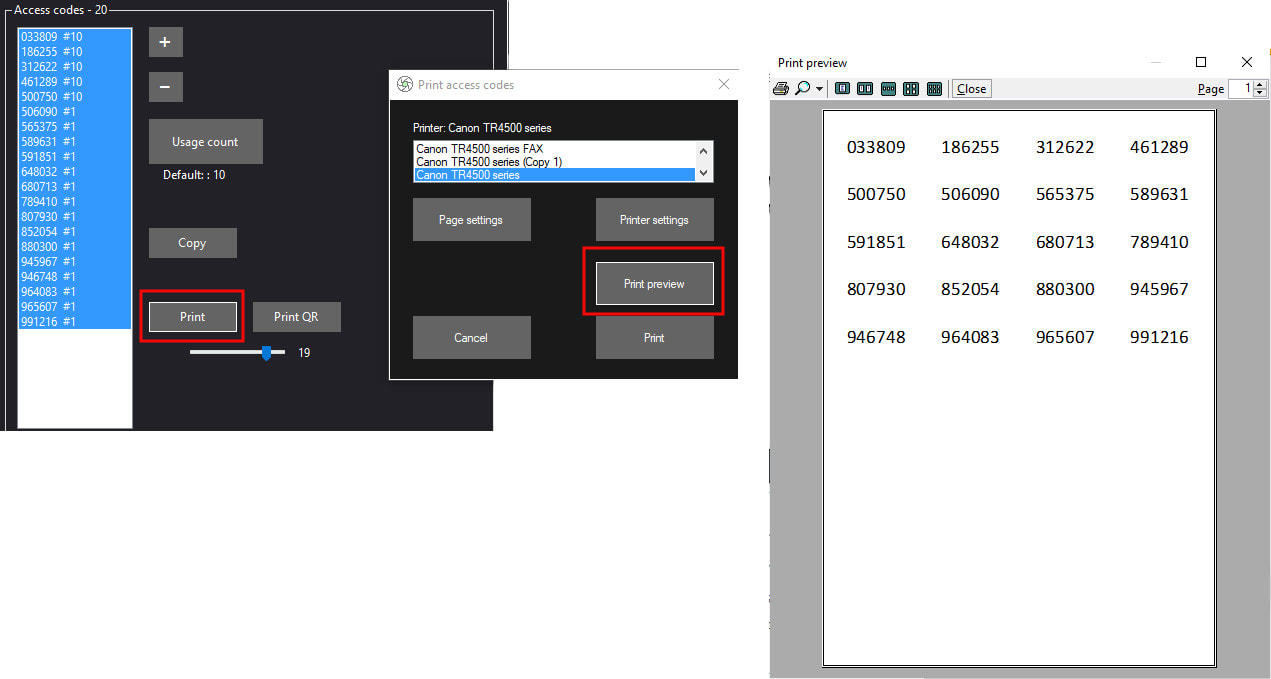
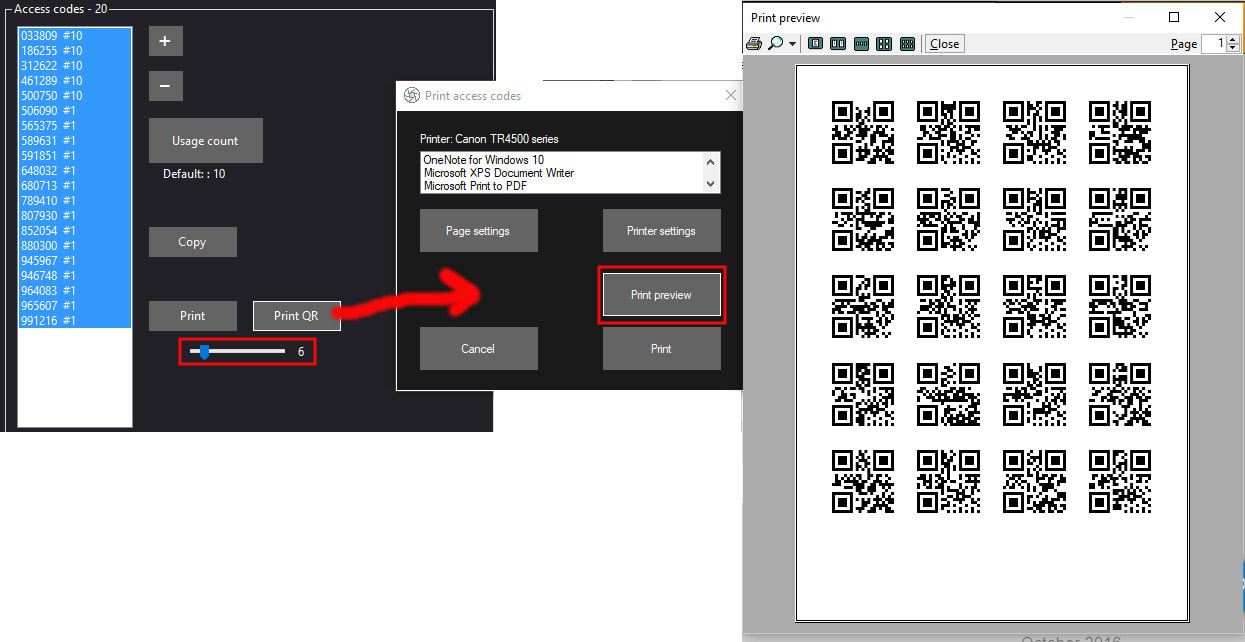
Updated: October 2023 Note: The complete functionality described in this article is available in RightBooth version 7.12.0 (or newer). RightBooth provides an 'Access code' feature which can prevent unauthorised use of your events by requiring guests to enter a 6 digit access code or by showing a QR code to a webcam camera. If the access code is recognised by RightBooth, then the guest will be allowed to use the event. Create Your Access Codes Access code can be created in RightBooth Settings --> Security --> Access codes. Click the '+' button to create a quantity of unique access codes. Here you can see we have created 20 codes: Notice that each code in the list is followed by #1. This is the code Usage count, signifying that the code can only be used one time to access an event. You can increase the usage count of one or more codes by selecting the codes in the list, then clicking the 'Usage count' button and entering a value. Here we are changing the usage count of the first few codes to 10: Providing Access Codes to Guests The idea is to provide each guest with a printed access code that they can take with them to use at the event booth (or booths). So before the event starts, print out your codes. There are two options: Print numeric codes or Print QR codes. To print codes, first select the codes in the list, then click the 'Print' or 'Print QR' button. Here we are printing all 20 access codes. Notice that the print layout provides white space around each code to facilitate easy cutting: Alternatively, the codes can be printed as QR codes. The slider can be used to alter the font size and/or QR code size: Now, print your codes and cut them up, ready for handing out to your guests. Setting up your event for Access Code input
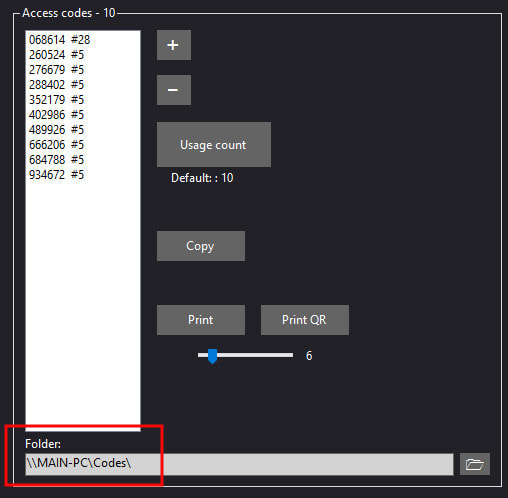
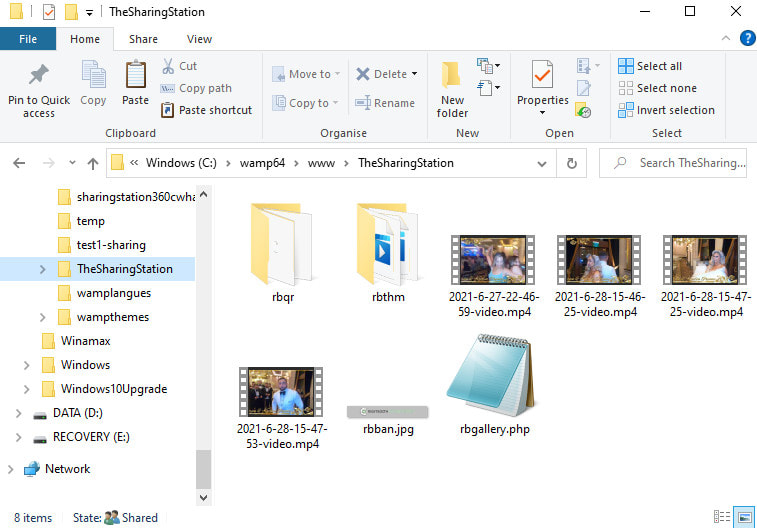
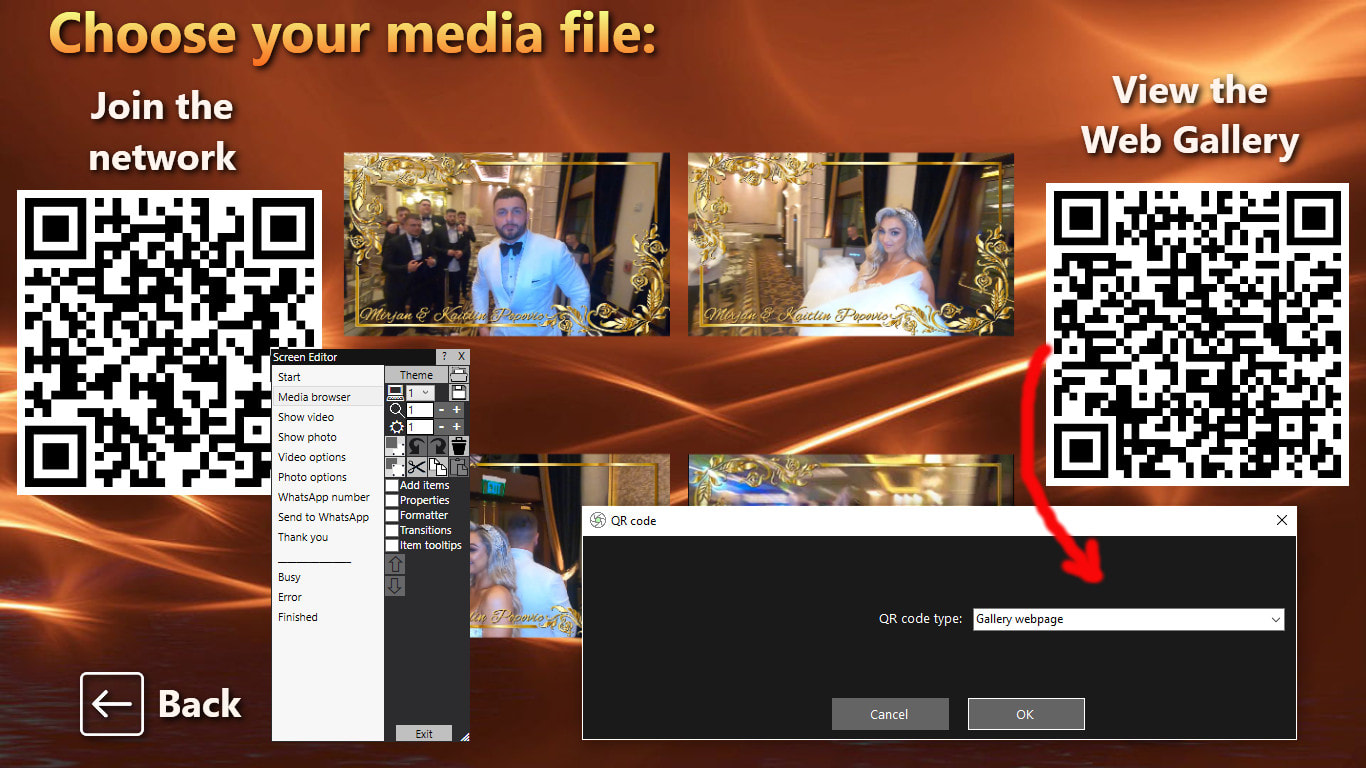
Your event is now ready to accept access codes ! This video demonstrates both access code methods in use: Each time a guest uses their access code, the Usage count associated with the code will be reduced by 1 and the access code file will be updated with the new value. When the Usage count for any code drops to 0, that code can no longer be used. However, you can always increase the 'Usage count' feature (as described previously) to add more counts to expired code(s). Using The Same Access Code At Multiple Locations You might have more than one booth in operation at your venue and would like your guests to use the same access code at each booth. To do this, make sure your booths are networked together and can all access the same location on the network that contains your access code file. In RightBooth Settings --> Security --> Access codes choose a network folder for saving the access code file, then in RightBooth on each booth, make sure it is using the same access code folder. In this example we are using a code file that is located in the shared folder: \Codes of the MAIN-PC: Using QR Access Codes Hands Free If you would prefer your users not to have to interact with the screen, in the Screen Editor, simply add a camera item live view to the Start screen and then play the event. Users can now approach the screen and hold up their QR code in front of the camera lens. RightBooth will then automatically scan the QR code and will progress onto the next screen in the event if the QR code is valid. Please note that this hands free access feature will work with a live feed from a webcam or from a DSLR camera. Note: The Web Gallery feature is available in RightBooth version 7.12.0 (or newer). With a RightBooth Sharing Station event, you can provide your guests with a touchscreen (or mouse) driven interactive system that displays all videos and photos taken during the event. Guests can then interact with the system and download their chosen file(s) onto their mobile phones (via your local WampServer web server and router), using QR code scanning. For more information on how to create and use a sharing station event see here. However, providing a sharing station event can cause bottlenecks as guests queue up, waiting for their turn to use the sharing station. A solution to this problem is to provide your guests with a way to access a Web Gallery of the videos and photos directly on their phones, so that they can browse and download files independently (and away from) your sharing station. This article shows you how to provide this feature. The Web Gallery When you run a sharing station event, RightBooth will automatically create and maintain a Web Gallery web page structure, which is placed in the sharing station event's local web server folder. As an example, let's assume you are running a sharing station event named 'TheSharingStation'. This event will maintain the videos, photos and web gallery in the following folder: c:\wamp64\www\TheSharingStation\ The main web page for the Web Gallery is named: rbgallery.php and it is automatically created and maintained by RightBooth. This file contains php script that can be processed correctly by the WampServer local web server. The Web Gallery automatically maintains thumbnail files for each video and photo in the folder: c:\wamp64\www\TheSharingStation\rbthm\ The Web Gallery also maintains a separate download web page for each video and photo in the folder: c:\wamp64\www\SharingStation\rbqr\. Note: This folder also holds a copy of all the event videos and photos. The reason for this is to prevent file access conflicts between guests who are using the sharing station and guests who are downloading files using the Web Gallery. Here is an example screenshot of our SharingStation1 folder structure, containing four event videos, the two sub folders, the web banner file: rbban.jpg and the file: rbgallery.php: Accessing the Web Gallery Note that the Web Gallery can only be accessed from mobile phones when the computer is running a local web server which is made accessible over a private router. Details here. The simplest way for guests to use the Web Gallery on their phones is to show them a QR code that they can scan to gain direct access. To do this: on any of your sharing station event screens, add a QR code item and set its QR code type to 'Web gallery'. In this screenshot you can see we have provided two QR codes on the Media browser event screen, one to join the network and the other to allow direct access the Web Gallery: Tip: You might want to print a large copy of the two QR codes and display them around your venue location. To help with this, in the RightBooth Screen Editor, right click on a QR code and choose 'Save image' from the popup menu. The QR code can then be saved as an image file on your computer and used for printing purposes. Modifying the Web Gallery In RightBooth Settings --> Social media --> Local web server, you will find a panel of settings that allow you to change certain aspects of the Web Gallery and web download pages. You can also Test the Web Gallery in your browser as long as WampServer is also running. Also in RightBooth Settings --> Social media --> Media size there is a Thumbnails section where you can set the size and quality of the video and photo thumbnail jpeg files that will be used in the Web Gallery. Setting smaller sizes and lower quality will improve the Web Gallery rendering speed. Now play the event
While the event is playing, RightBooth will maintain the Web Gallery, allowing guests to have independent access to videos and photos from their mobile devices. |
AuthorNigel Pearce Archives
July 2024
|
|



 RSS Feed
