RIGHTBOOTH
  • Home
  • Products
  • Try
  • Help
    • Video Settings
    • Webcams
    • Other Equipment
    • Blog
    • How To
    • Training Videos
    • FAQ
    • User Manual
    • Release Notes
    • Terms of use
    • Contact
  • Feedback
    • Comments
    • User stories >
      • Mike Ridge
      • Tony Kay
      • Dave Bladen
      • Steven D Mills
      • Sue Crossland
      • Luke Dalby
      • McMaster University
      • Hangloose
      • Paul Waterhouse
      • Raf Sauvillers
    • User Videos
    • User Equipment
    • Organisations
  • About

Multiple Monitors and Webcams

28/11/2019

0 Comments

 
Latest RightBooth video tutorial:
0 Comments

Using a Volume Meter

4/11/2019

2 Comments

 
When recording videos with a webcam you might want to encourage your users not to shout into the mic by providing visual feedback on the current audio input level during the recording.  This is where the volume meter item comes in handy.
  • Run RightBooth
  • Go to the Screen Editor
  • Select the 'Record video' screen
  • Click the Add items checkbox.
  • From the Add items toolbox, click 'Volume meter' to add the volume meter item to the screen.
  • Size and position the volume meter item as required and use the Properties toolbox to alter its design and colours...
Picture
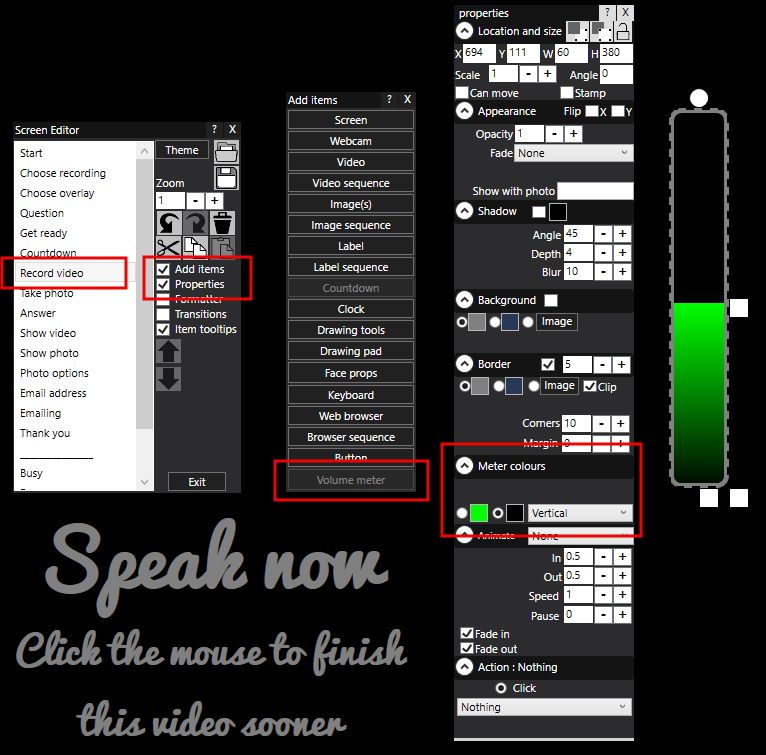
Now play the event and when you record videos the volume meter will show you the current audio input level.  This video shows how the meter provides constant feedback, using my drill to provide a consistent noise !  :-) ...
2 Comments

Creating a Flash Light Solution for Webcams and DSLR Cameras

3/11/2019

0 Comments

 
DISCLAIMER:  Please be advised that the hardware configuration and wiring information presented in this article has not been reviewed by qualified people with the expertise required to provide you with complete, accurate or reliable information. Therefore we (Aire Valley Software) cannot guarantee the validity of the information found here and we do not guarantee expressly or implicitly, nor take on any legal responsibility about the correctness, the exhaustiveness or the usefulness of the information. For these reasons we cannot be held liable for any problems that may arise as a result of acting upon this information.
You should ALWAYS seek the advice of a qualified professional electrician.

Article
COB LED lights produce excellent light and these can be used to greatly improve the quality of your webcam (and DSLR camera) photo capture quality, especially when the room's ambient lighting conditions are not great.

This article shows you how to design your own low cost 'flash setup' using COB LED lights  situated near your webcam which point towards your users and are automatically controlled by RightBooth’s USB relay switch action command.

Step 1 - Items list
Obtain the following items:
  • 12V COB LED Lights 
  • 12V Dimmer switch 
  • 5V/12V USB HID Relay 
  • USB A-B Male Cable  
  • 12V 2A Power adapter  
  • Wire   
  • Webcam (any).

Step 2 - Build
Connect the items together as follows,  you don't need a soldering iron :-)...
Picture
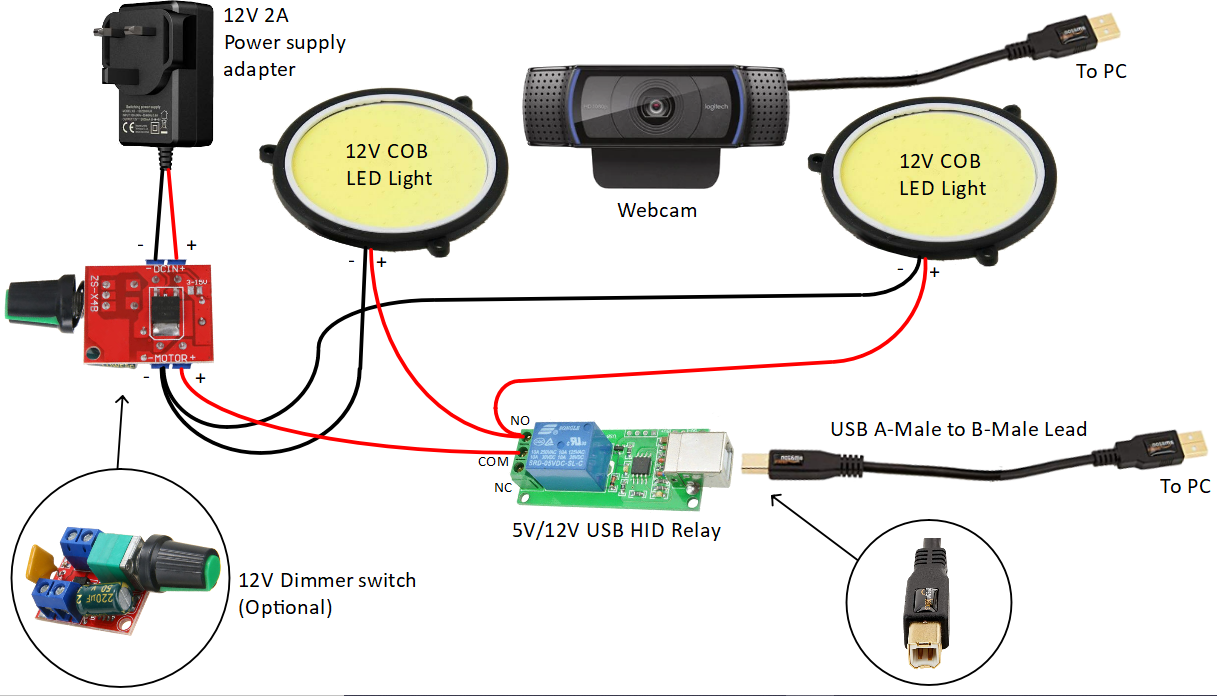
Note that in this setup the single switch USB relay takes its power from the PC via the USB port.  1 and 2 way relays can take power from the USB but if you are using a 4 way relay (or larger) you will need an additional 12V adapter to power it.
Step 3 Testing
Make sure your flash setup is powered, and the webcam and relay are both connected to USB ports on your PC.
  • Run RightBooth
  • Go to RightBooth Settings --> Start & Stop
  • Tick the setting: ‘ Start USB HID relay boards’
  • Check that your flash setup is working correctly by entering the following command into the relay test textbox and pressing the ‘Test’ button:  1 W 1000 0
Picture
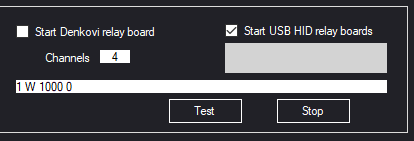
If your flash setup is wired up correctly, then each time you press the Test button, the COB lights will turn on for 1 second, then turn off.  You can use the knob on the dimmer to set the brightness of the lights to your preferred level.

Step 4 Use the flash lights in your events
  • Run RightBooth.
  • Open your event file.
  • Go to the Event Designer --> Event structure --> Take photo.
  • If not already set, change the photo capture delay to 50  (i.e. 0.5 seconds)...
Picture
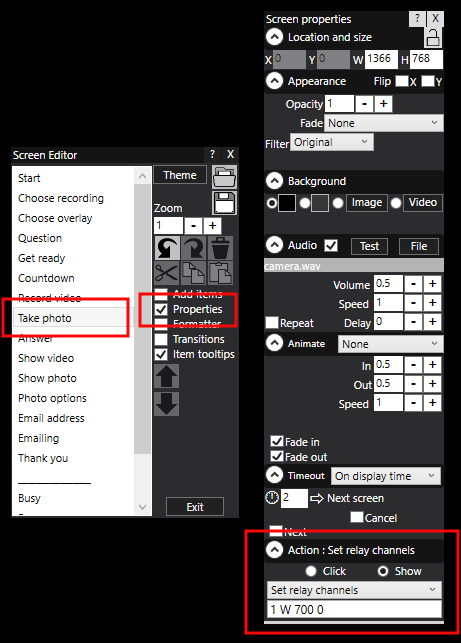
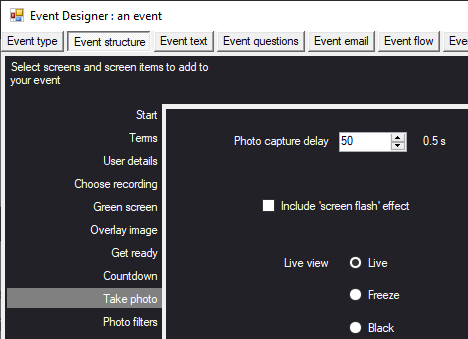
​This is the amount of time that RightBooth will wait before taking a photo on the ‘Take photo’ event screen.
​
  • Return to the RightBooth main window and go to the Screen Editor.
  • Select the ‘Take photo’ screen.
  • Click Properties to view the Screen properties.
  • In the Action section, select ‘Show’
  • Choose the action: ‘Set relay channels’.
  • In the action text box, enter ‘1 W 700 0’...
Picture
Save your event.  Job done !

The Result
When you play your event, each time the ‘Take photo’ screen is shown, your COB lights will be switched on before each photo is taken and will then switch off immediately after.

Note:  You may want to play around with the timings.  In this article the lights are turned on, then 0.5 seconds later the photo is taken, then 0.2 seconds later the lights are turned off. 

Tip:  To ensure that the lights are definitely on when the photo is taken, try pointing the webcam at the lights, while you tweak the capture timings, and if the captured photo is showing complete white out, then you know you've got it right !
0 Comments

    Author

    Nigel Pearce

    View my profile on LinkedIn

    RSS Feed

    Archives

    March 2023
    February 2023
    January 2023
    December 2022
    November 2022
    October 2022
    September 2022
    August 2022
    July 2022
    June 2022
    May 2022
    April 2022
    March 2022
    February 2022
    January 2022
    December 2021
    November 2021
    October 2021
    September 2021
    August 2021
    July 2021
    June 2021
    May 2021
    April 2021
    March 2021
    February 2021
    January 2021
    December 2020
    November 2020
    October 2020
    September 2020
    July 2020
    June 2020
    May 2020
    April 2020
    March 2020
    February 2020
    January 2020
    December 2019
    November 2019
    October 2019
    September 2019
    August 2019
    July 2019
    June 2019
    May 2019
    April 2019
    March 2019
    February 2019
    January 2019
    November 2018
    October 2018
    September 2018
    August 2018
    July 2018
    June 2018
    May 2018
    April 2018
    March 2018
    February 2018
    January 2018
    December 2017
    November 2017
    October 2017
    September 2017
    August 2017
    July 2017
    June 2017
    May 2017
    April 2017
    March 2017
    February 2017
    December 2016
    November 2016
    October 2016
    September 2016
    August 2016
    July 2016
    June 2016
    May 2016
    April 2016
    March 2016
    February 2016
    January 2016
    December 2015
    November 2015
    October 2015
    September 2015
    August 2015
    July 2015
    June 2015
    May 2015
    April 2015
    March 2015
    February 2015
    January 2015
    November 2014
    October 2014
    September 2014
    August 2014
    July 2014
    June 2014
    May 2014
    April 2014
    March 2014
    February 2014
    January 2014
    December 2013
    November 2013
    October 2013

RightBooth logo
RIGHTBOOTH
​© 2013 - 2023 Aire Valley Software
News
​
Tutorials
​
FAQ
About
​
Contact
​
Terms of use and ​Privacy Policy
  • Home
  • Products
  • Try
  • Help
    • Video Settings
    • Webcams
    • Other Equipment
    • Blog
    • How To
    • Training Videos
    • FAQ
    • User Manual
    • Release Notes
    • Terms of use
    • Contact
  • Feedback
    • Comments
    • User stories >
      • Mike Ridge
      • Tony Kay
      • Dave Bladen
      • Steven D Mills
      • Sue Crossland
      • Luke Dalby
      • McMaster University
      • Hangloose
      • Paul Waterhouse
      • Raf Sauvillers
    • User Videos
    • User Equipment
    • Organisations
  • About