|
Showing how to:
4 Comments
Updated: October 2023 A number of questions were recently posted on the RightBooth Facebook forum. Here are the questions, together with the answers: - How to take one photo and print at 10x15cm? - How to make and use your own print layouts? Watch video: - How to sign and draw on a photo? Watch video: - How to give the user a choice of green screen backgrounds? Watch video: - How to make a menu for games? - How to add games other than those in the RightBooth Media Library? Watch video: - Are there any 'printing' animations or 'countdown' animations?
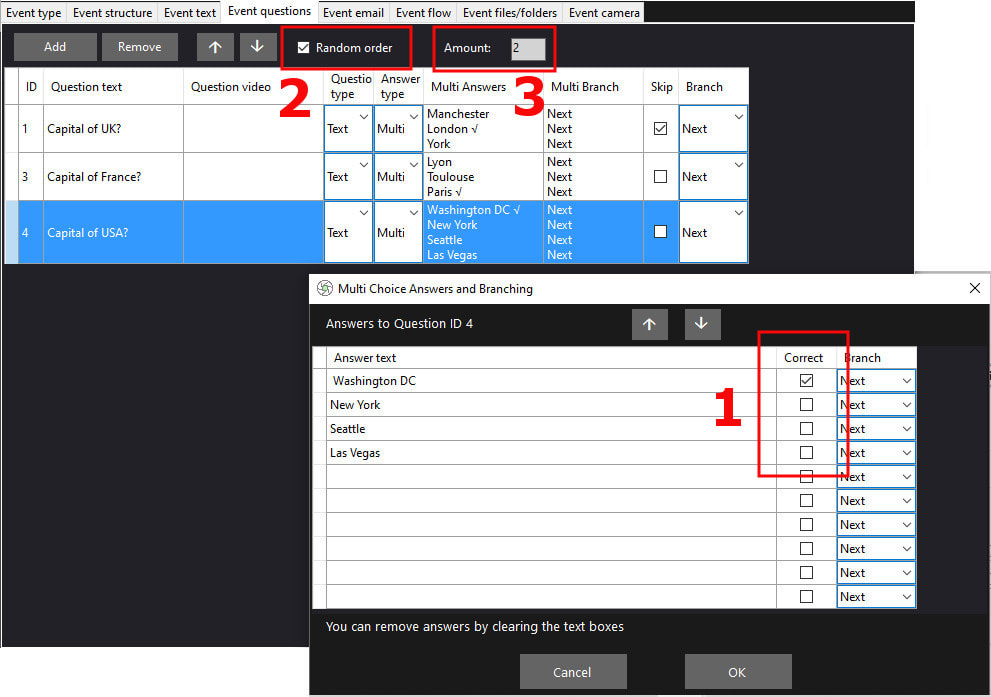
The RightBooth Media Library comes with a limited number of video animations that can be included on your event screens. They are all installed in the following folder: C:\Users\Public\Documents\RightBooth7 Library\Videos RightBooth is able to play many video file types including MP4, AVI and WMV files, so it will be able to play most files that can be obtained from any of the companies who specialise in creating video animations for mirror booths and photo booths, such as: Mirror Booth Animations Simply search the Internet for 'animations for mirror booths' - Is there a way to share photos to Instagram, Facebook or WhatsApp? RightBooth can currently send files by email, upload files to websites via SFTP, copy files to network folders and upload files to cloud storage services such as Google Drive and DropBox. You can also send files to WhatsApp accounts. Sharing files onto other social media sites is currently not available but we continue to research this feature. However, it can be achieved using tools like IFTTT and Zapier that can automate the transfer of files uploaded by RightBooth to cloud storage drives, then onto social media accounts. Further information is available in the RightBooth User Manual. RightBooth version 7.5.25 introduces the following new features that can help improve the quality and variety of your quiz and survey events. 1 - Scoring Questions When entering answers on the Multi Choice Answer table, you can now choose to make any question a scoring question by ticking the appropriate check box under the new ‘Correct’ column. Note that specifying a correct answer is optional. In this example screenshot you can see that the answer 'Washing D.C.' has been set as the correct answer to the multi choice question: 'Capital of USA?'... 2 - Random question order You can now optionally randomise the order that the questions are presented to each user. In the above screenshot you can see that the Random order check box has been ticked so each user will be shown the questions in a different order. 3 - Question Amount
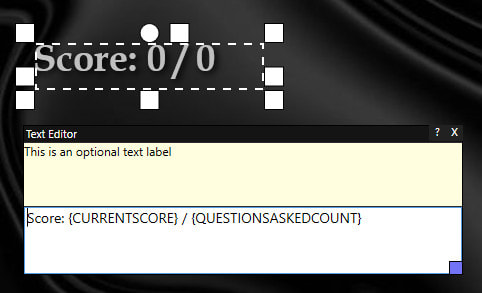
You can now specify the number of questions you would like each user to be shown. This value can be particularly useful in combination with the 'Random order' setting where you want to show a different sub-set of questions to each user. In the above screenshot each user will be shown 2 of the 3 questions randomly selected from the table. Note: Entering ‘0’ causes the Amount value to be ignored, meaning all users will be shown all the question in the table. 4 - Show the Question Score to Users Two new text variables are now available for use in any label item content. {CURRENTSCORE} - This will show the current score for the current user. The current score is the total number of multi choice questions that the user has answered correctly (see above). {QUESTIONSASKEDCOUNT} - This will show the current number of questions that the user has answered. In this screenshot we have added a new text item to each of the Question screens and used the two new text variables in the label content to show the user their current score, which will then be updated on-the-fly as users progress through their questions... |
AuthorNigel Pearce Archives
July 2024
|
|


 RSS Feed
