RIGHTBOOTH
  • Home
  • Products
  • Try
  • Help
    • Video Settings
    • Webcams
    • Other Equipment
    • Blog
    • How To
    • Training Videos
    • FAQ
    • User Manual
    • Release Notes
    • Terms of use
    • Contact
  • Feedback
    • Comments
    • User stories >
      • Mike Ridge
      • Tony Kay
      • Dave Bladen
      • Steven D Mills
      • Sue Crossland
      • Luke Dalby
      • McMaster University
      • Hangloose
      • Paul Waterhouse
      • Raf Sauvillers
    • User Videos
    • User Equipment
    • Organisations
  • About

Getting users to take photos and then record a video

28/7/2016

1 Comment

 
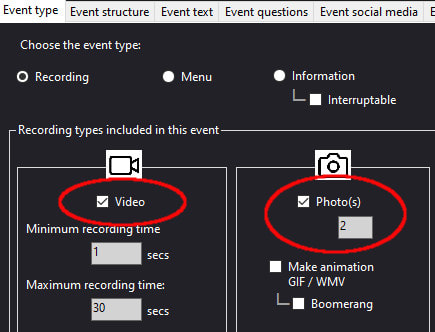
Updated: Oct 2022

When you create a RightBooth event you can design it so that your users have a choice of either recording a video or taking some photos, but what if you want to force your users to do both without giving them a choice?  This article explains two solutions for this.
Solution 1 - Use the Workflow Sequence
  • Run RightBooth
  • Go to the Event Designer
  • In the Event type tab,  tick the 'Video' and 'Photo' checkboxes to include both the recording types in your event. In this example we have also chosen to take 2 photos:
Picture
  • Then in the section 'Workflow for multiple recording types' section, select: Recording types shown in sequence'
  • In the list, select the 'Video' item and click the down arrow to move it below the 'Photo(s)' item:
Picture
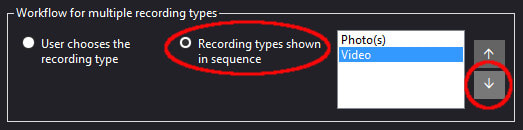
Next, select the Event structure tab, then select the 'Choose recording' section and un-tick the option: 'Include the Choose recording' screen.  Note: The 'Choose recording' event screen is not required when you are forcing users to perform a sequence of recording types:
Picture
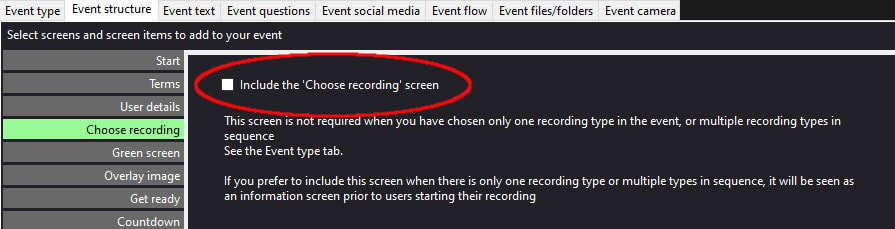
Now save and play the event.
Each user will then be required to take 2 photos, followed by recording a video.
​
Solution 2 - Use Event Flow
Event flow allows you to design multiple event files that have different functions and then make them run in a particular sequence, giving your users the impression that they are running a single event.  In this solution we will use RightBooth's event flow features to solve the problem (posed above) by using two event files and linking them together.

Create Two Event Files
  • Run RightBooth
  • From the main screen, click the New button to create a new event
  • Then click Save As to save this event file with the name photos
  • Now click the New button to create a second new event
  • Click Save As again and save this event file with the name videos

Design the photos event file

Open the photos event file and set the following event design properties...
  • Event Design --> Event Type --> Tick Photo(s) and untick Video
  • Event Design --> Event structure -->  Untick the Thankyou screen
  • Event Design --> Event flow -->  On completion, start...  Select next event then click Browse and choose your videos event file.

Save the photos event file.

Design the video event file

Now open the videos event file and set the following...
  • Event Design --> Event Type --> Tick Video and untick Photo(s)
  • Event Design --> Event structure --> Untick the Start screen
  • Event Design --> Event flow --> On completion, start...  Select next event then click Browse and choose your photos event file.
  • Event Design --> Event flow --> On cancel, start...  Select next event then click Browse and choose your photos event file.
  • Event Design --> Event flow --> On timeout, start...  Select next event then click Browse and choose the photos event file.

Save the videos event file.

How Solution 2 works

You are now ready to test the event flow.  Open the photos event file again and play the event.
Here is what will happen...
  • The user will be presented with the Start screen
  • The user will then be asked to take 2 photos 
  • After the photos have been taken, RightBooth will automatically open the videos event file.
  • The user will then be asked to record a video
  • When the video recording is complete, the Thank you screen will be displayed
  • RightBooth will then automatically open the photos event file again (at the Start screen) ready to repeat this process for the next user.
1 Comment

Using the Drawing Tools

12/7/2016

0 Comments

 
Picture
Updated: Jan 2021

​​The Drawing Tools allow you to draw and write directly over the on-screen live video window (displayed by the webcam item).  You can also use the tools to draw on photos taken during the event. This feature is useful if you want your users to be able to write their name, a message or a drawing onto the video recordings and photos.

Adding the Drawing Tools to an Event

​The Drawing Tools can be added to any screen in the event, but they are only relevant on screens that contain one or more camera items or a recently taken photo, such as the Start screen, the Record Video screen or the Show Photo screen.
  • If drawing tools are added to screens that appear prior to the Record Video screen (such as the Start screen or the Choices screen)  then you can draw over the live camera item before you start a video recording. The drawings will then remain over the video during the actual recording and they will be captured into the video file.  This applies to webcam video recording only.
  • If drawing tools are added to screens that appear prior to the Take Photo screen (such as the Start screen or the Choices screen)  then you can draw over the live camera feed before you capture photos. The drawings will then be captured into the photo files.  Applies to webcam and DSLR photos.
  • If the drawing tools are added to the Record Video screen then you can draw over the live camera feed while a webcam video recording is being made.  The drawings will then be captured to the video file in real time throughout the recording.
  • If the drawing tools are added to the Show Photo screen then you can draw on the most recently taken photo.  The drawings will then be added and saved into the photo image and photo file.

To add the drawing tools:
  • Visit the Screen Editor and select a screen from the Screen List.  Then show the Add Items toolbox and click the Drawing Tools button to add the tools to your chosen screen.
  • Please note that when the drawing tools are added to a screen, the Flip X and Y properties of the camera item(s) are automatically turned off and cannot be turned on.
  • You can use the Drawing Tool properties to alter the layout of the tools and their colour.

Using the Drawing Tools

When the event is running,  the drawing tools will appear on each screen you have added them.  The user can then select a tool, a width and a colour to draw on the camera item.  Users can also undo and clear the drawings they make.

All drawings added to the camera item will then be saved into the recorded webcam video files or the captured photo files.  Drawings added to the photo image will also be saved in the image file.

At the end of each video recording or photo capture, any drawings will be automatically removed from the camera item, allowing the next user to start drawing on the clear camera item.
​
The drawing tools are only active while the event is running. When you are designing your screens you can move and size the tools to the required place on the screen design but you cannot draw over the camera item until you actually run the live event.

The Drawing Pad Item

The Drawing Pad item can be added to any of your event screens and the Drawing tools can be used to write and draw on it.
The Drawing Pad item will save it's contents to the current event folder.
You can also include the Drawing Pad Item in your Photo Print layout design, allowing you to print out any drawings entered by each user.
0 Comments

    Author

    Nigel Pearce

    View my profile on LinkedIn

    RSS Feed

    Archives

    March 2023
    February 2023
    January 2023
    December 2022
    November 2022
    October 2022
    September 2022
    August 2022
    July 2022
    June 2022
    May 2022
    April 2022
    March 2022
    February 2022
    January 2022
    December 2021
    November 2021
    October 2021
    September 2021
    August 2021
    July 2021
    June 2021
    May 2021
    April 2021
    March 2021
    February 2021
    January 2021
    December 2020
    November 2020
    October 2020
    September 2020
    July 2020
    June 2020
    May 2020
    April 2020
    March 2020
    February 2020
    January 2020
    December 2019
    November 2019
    October 2019
    September 2019
    August 2019
    July 2019
    June 2019
    May 2019
    April 2019
    March 2019
    February 2019
    January 2019
    November 2018
    October 2018
    September 2018
    August 2018
    July 2018
    June 2018
    May 2018
    April 2018
    March 2018
    February 2018
    January 2018
    December 2017
    November 2017
    October 2017
    September 2017
    August 2017
    July 2017
    June 2017
    May 2017
    April 2017
    March 2017
    February 2017
    December 2016
    November 2016
    October 2016
    September 2016
    August 2016
    July 2016
    June 2016
    May 2016
    April 2016
    March 2016
    February 2016
    January 2016
    December 2015
    November 2015
    October 2015
    September 2015
    August 2015
    July 2015
    June 2015
    May 2015
    April 2015
    March 2015
    February 2015
    January 2015
    November 2014
    October 2014
    September 2014
    August 2014
    July 2014
    June 2014
    May 2014
    April 2014
    March 2014
    February 2014
    January 2014
    December 2013
    November 2013
    October 2013

RightBooth logo
RIGHTBOOTH
​© 2013 - 2023 Aire Valley Software
News
​
Tutorials
​
FAQ
About
​
Contact
​
Terms of use and ​Privacy Policy
  • Home
  • Products
  • Try
  • Help
    • Video Settings
    • Webcams
    • Other Equipment
    • Blog
    • How To
    • Training Videos
    • FAQ
    • User Manual
    • Release Notes
    • Terms of use
    • Contact
  • Feedback
    • Comments
    • User stories >
      • Mike Ridge
      • Tony Kay
      • Dave Bladen
      • Steven D Mills
      • Sue Crossland
      • Luke Dalby
      • McMaster University
      • Hangloose
      • Paul Waterhouse
      • Raf Sauvillers
    • User Videos
    • User Equipment
    • Organisations
  • About