
|
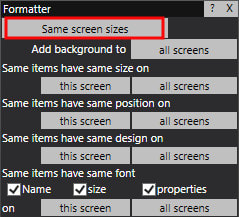
Updated: May 2024 How do you make global changes to all screens in an event? This is where the Formatter Toolbox comes in handy. We'll explain how to use the Formatter by way of answering some of the questions we've been asked on the subject. My event screen does not completely fill the monitor screen. Can I alter the size of the event screen to correct this?
I've altered the background on one of the event screens. Is there an easy way to add the same background to all the other screens?
I've changed the size and position of the camera item on the Start screen. How do a change it to be the same size and position on all the other screens in the event?'
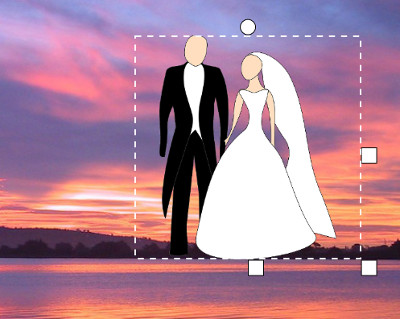
Using this approach you can select any item on any screen, and then use the Formatter to apply its size, position and design to all items of the same type, on all the other screens in the event, So as another example, if you design a button item on one screen to have a particular image, icon, and shadow, you can then use the Formatter to quickly and easily make all the buttons in the event have the same design. I've changed the font name and font size of a button text prompt on the Choices screen. How do I make the same changes to all the other text prompts?
We hope you can see that the Formatter Tool helps with design productivity when you need to make global changes to your event screens and screen items.
0 Comments
Updated: Jan 2021 Imagine you have a conference or an exhibition where you want to ask the male attendees a different set of questions to the females. So what you really need is to be able to present your RightBooth users with a menu of two choices, one for Male and one for Female. You then need to show the appropriate questions depending upon the menu choice made by the user. Here we explain how to achieve this by way of an example. Step 1 Create a new event file and add all the questions required for the male users into this event. Save the event, naming it MensQuestions. Step 2 Create a second event file, this time for the women. Add the women's questions into this second event and save it as WomensQuestions. Step 3 Create a third event file. This file will allow us to provide the menu. To do this:
 Step 4 Design your menu screen. Go to the Screen Editor and choose the Menu screen from the Screen List on the Toolbox. Size and position the menu buttons and alter the menu text accordingly. Notice in the screenshot below, we've also altered the button image for each choice. You could also add images and other text to this screen if required: 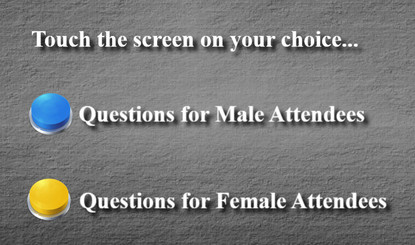 Step 5 Decide whether to keep the Start screen within your menu file. If not, remove it as follows:
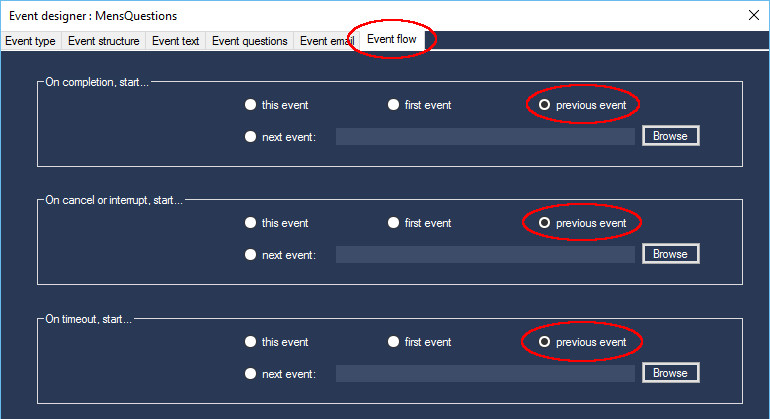
Save this menu event file with a name of your choice. In the first screenshot above you can see we've named the file: MenWomenMenu. Step 6 We now need to modify the Event Flow in the MenQuestions and WomenQuestions event files. Open each file in turn and do the following:
 Job Done !
Now simply open and run the MenWomenMenu event and everything will work as required. When a menu item is selected it will open the associated event file to present the selected questions, and when the chosen event completes, times out, or the user cancels the event, RightBooth will then open the previous event, in other words it will return to showing the menu again. This is a fairly simple example, but by using the approach described in this article we hope you can see how you can create sophisticated and flexible events, involving numerous event files connected together with menus and event flow rules.
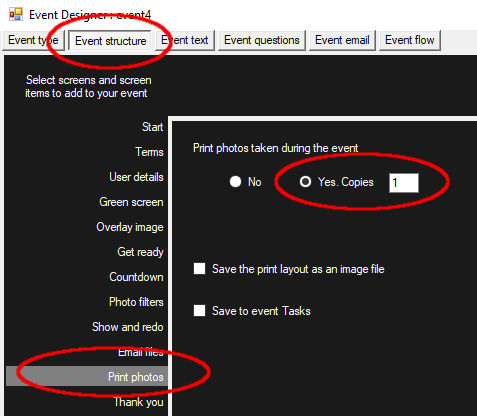
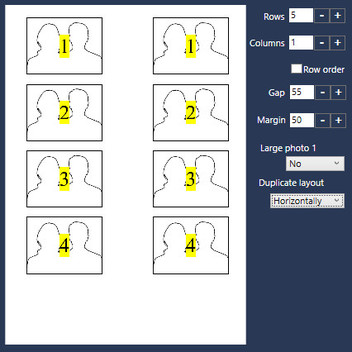
3 - Designing The Print Layout Screen Now that you have enabled your event for photo printing, you will be able to design the Print Layout screen. From the RightBooth main screen, click the Edit button to take you to the Screen Editor. In the Screen Editor you will see that the Print layout screen is listed on the Screen Editor Toolbox. Click on the Print Layout. This will then show you the initial print layout with 4 photo place holder images positioned on a blank page. Each placeholder is numbered to show you where each of the 4 photos will be placed. Note: If all the placeholders are not showing on the page, use the Photo Layout Arranger (see section 4 below). Your layout will be initially set to be the size of your chosen printer paper. If needed you can alter the paper size by clicking on the Properties check box on the Screen Editor toolbox to show the Print layout properties toolbox. You can change the design size size from the drop down selector or by entering the paper dimensions in the W and H text boxes to match your actual printer paper size (in inches). You can also rotate the paper layout to allow you to design for either Portrait or Landscape printing by ticking the 'Swap' checkbox on the Print layout properties toolbox. You can now move, size and rotate the photo place holders on the layout to suit your design. Alternatively you can use the Photo Layout Arranger (see next section).
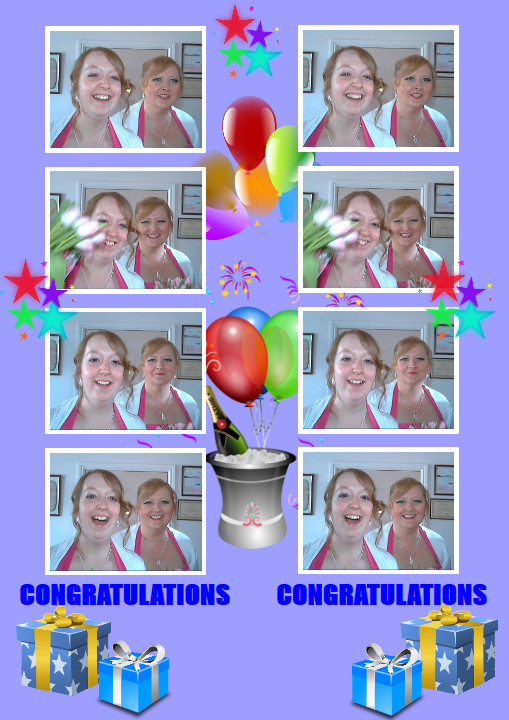
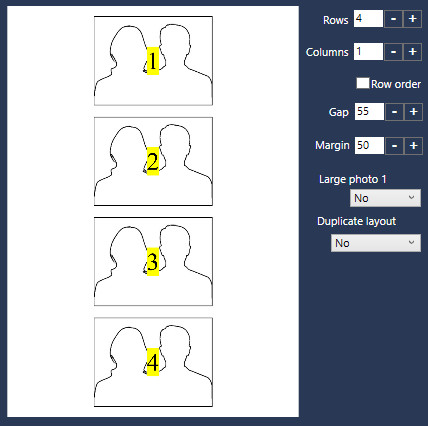
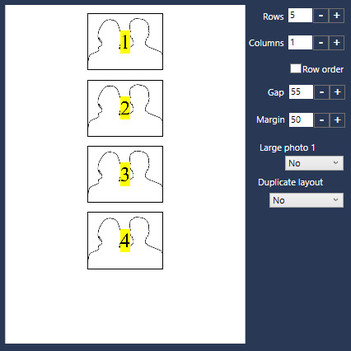
We have then added a Gap of 55 pixels between each place holder to space them apart. We've also added a Margin of 50 pixels to keep all photos in from the edges of the page.
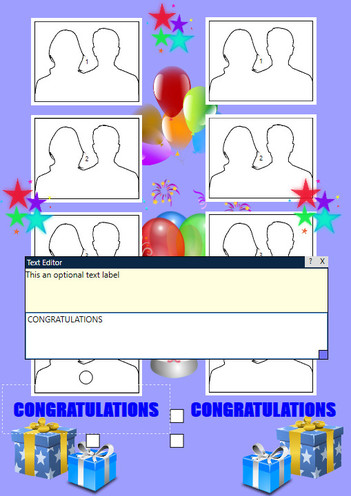
Notice that we've placed some of the image items behind the photo place holders (the balloons) and others in front of the photos (the stars). You can do this using the layering buttons on the Item Properties toolbox. When you are happy with your print layout, make sure you return to the RightBooth main screen and save your event file. Your print layout will also be saved in your event file. Now when you run the event, after each user takes their four photos, the photos will be automatically placed in the print layout and then printed.
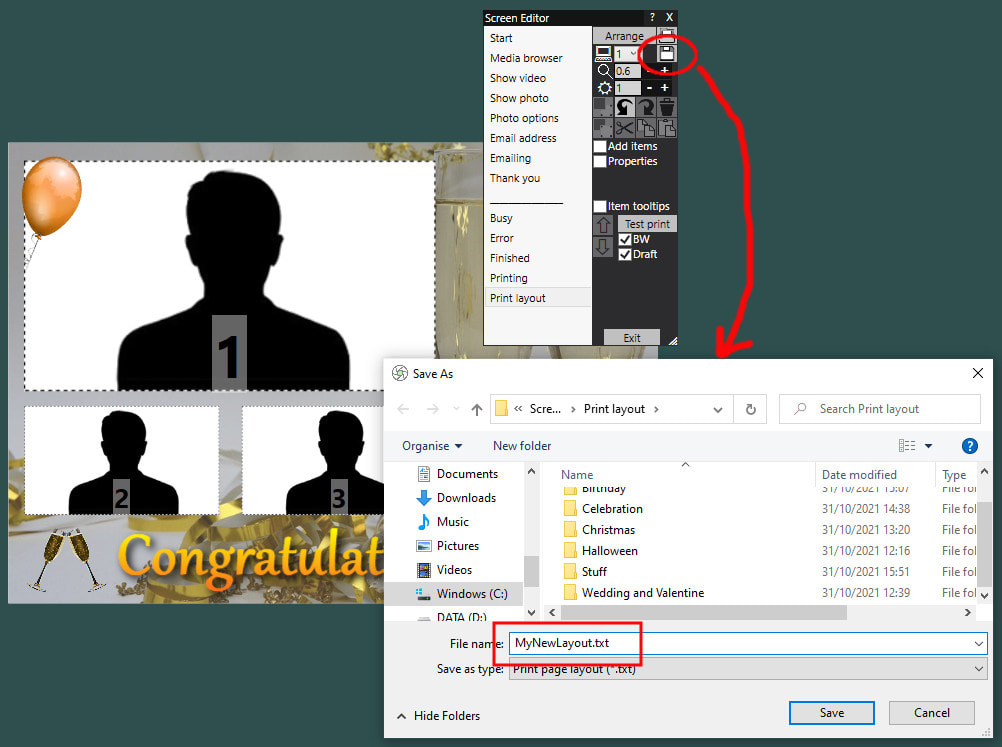 You can then pick and choose from your saved layouts later by clicking the Open button at the top of the Screen Toolbox to browse the Media Library for a layout.
In this article we have described how to achieve just one layout. Try experimenting with the Photo Layout Arranger Tool to see what other arrangements you can achieve with your photos. And don't forget, if the Arranger tool doesn't give you what you need, just manually move, size and rotate the photo placeholders on the screen to achieve your desired layout. We hope you can see that the Print Layout Designer provides a powerful set of features that let you create the perfect print layout for your photo events.
Add the Background In the Screen Editor, choose a screen from the screen list and then add a suitable background image as follows:
Updated May 2024 Note: The Screen pairing feature (below) is available in RightBooth v7.15.3 or later You can use 1 instance of RightBooth to show event screens on up to 4 different monitors attached to the same computer. In this arrangement, only one of the monitors can take user input and the others will be displaying non-interactive event screens Note: You can also run multiple instances of RightBooth to allow you to simultaneously play and interact with multiple events on different monitors connected to the same computer. If you prefer to do this, check the following for information:
Alternatively, read on to see how you can use 1 instance of RightBooth with up to 4 monitors.  Multiple monitor event screens will appear as non-interactive screens and will be shown while the main monitor 1 event is playing on the primary monitor. This can be useful if you want to show information screens, advertising screens, web sites or screens containing videos and photos that are being recorded by users on the Primary monitor. For example, your primary monitor might be housed inside a booth (or kiosk) with a second monitor outside the booth (or in a separate room) in order to attract passers-by to the system. To make use of the RightBooth multi monitor features, Windows must be configured to provide an extended desktop. Details on how to do this are outside the scope of this Blog but full details can be found in your Windows Display Settings. When you have your additional monitors attached to your computer and configured as an extended desktop, you then can turn on and access the RightBooth multi monitor features for a particular event. Here we will show an example of using a second monitor. To do this in RightBooth:
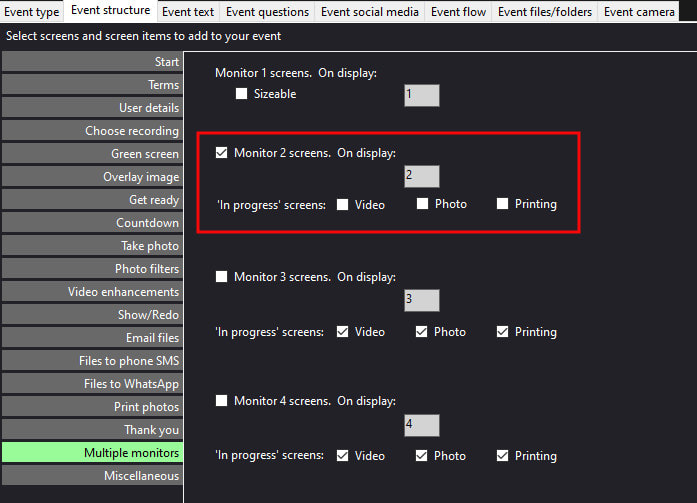 Notice in the above screenshot, I have also unticked all the Monitor 2 'In progress 'screens (see below).
In progress screens A number of 'In progress' event screens are included by default on the second monitor: Video, Photo and Printing These screens will automatically be displayed on the second monitor (and will interrupt the second monitor event screen flow) whenever a video is being recorded, a photo is being taken or printing is occurring. If you do not want these screens to be included on the second monitor, then you can untick the appropriate checkboxes described earlier. Note: The 'Video In progress' screen can be useful in helping to reduce the graphics activity of your computer during webcam video recordings. You can also consider adding a webcam item to the 'In progress' screens. The webcam item will show a duplicate feed of the webcam camera, allowing Monitor 2 viewers to watch each video being recorded and photos being captured on Monitor 1. Adding Sequence Items You may choose to add video, image and sequence items to Monitor 2 screens. During the Monitor 2 slideshow, these items can be designed to show sequences of previously recorded videos, photos and messages, allowing passers-by to watch recordings made earlier by other users. Note: The above example for Monitor 2 can be repeated for monitors 3 and 4. Multicasting Multicasting is a feature that lets you replicate any screen from the Primary monitor onto one or more of the other monitors attached to your computer. For example, when users are taking photos on the primary monitor you might want to display the 'Show photo' event screen on the other monitors. To do this:
In the following example, we have a system configured with 2 monitors and we are multi-casting the 'Show photo' screen onto monitor 2: 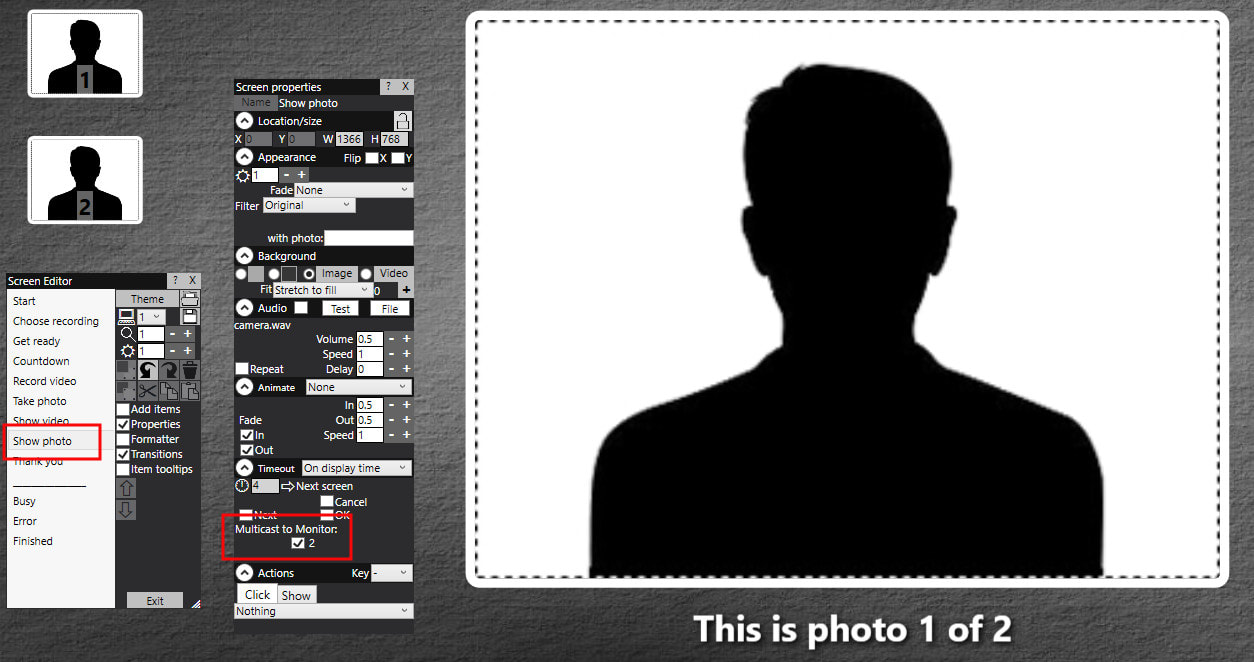 And here is a video showing what happens with this multicast setup: Showing a sequence of event screens on multiple monitors By default, any event screen added to a multiple monitor event screen list will be shown independently of any event screen that appears on Monitor 1. This allows you to show a series of event screens on the multiple monitors that can act as a slideshow. In this example we have 3 event screens on Monitor 2. Each event screen is set to be displayed for 30 seconds. After Start 2 times out, Advert 2 will be displayed, followed by Advert 3, then returning to Start 2. While the event is playing, this will happen continuously and independently from the activity on Monitor 1:  Showing paired screens on multiple monitors Note: This feature is available in RightBooth version 7.15.3 (or later). You can use screen pairing to cause event screens to appear on another monitor at the same time as event screens that appear on Monitor 1. Screen pairing differs from Multicasting (above) because it allows you to show different content (on other monitors) that is synchronised with the screen content on Monitor 1. In this example we want to show paired screens on Monitor 2, so we tick the option: 'Screens paired with Monitor 1' 
Now when you play the event, each time a screen appears on Monitor 1, any matching screen name on Monitor 2 will also be shown at the same time.
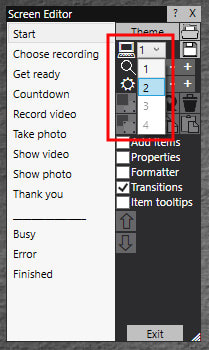
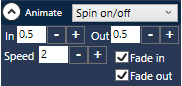
How to Add a Screen Transition In the Screen Editor, select the screen on which you would like to apply a transition. Show the Screen Properties panel. On this panel, the Animate properties let you:
Points to Note
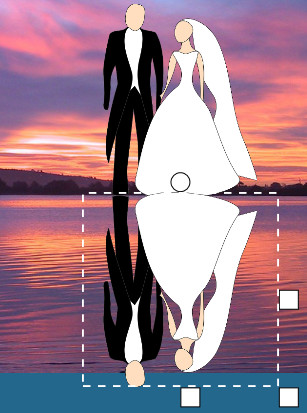
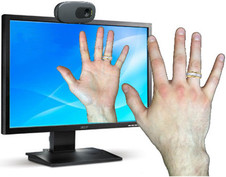
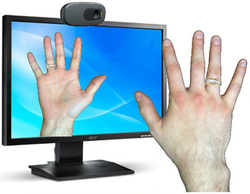
Updated: Feb 2021 What is camera mirroring? This is the ability to flip the camera view in the horizontal direction, so that when you stand in front of the camera you will see a flipped reflection of yourself on screen. These two images show a mirrored webcam and a non mirrored webcam:
Why is mirroring useful? Mirroring helps when you want to position yourself within the camera view, so if you move to the left, your reflection on screen also moves to the left, and vice versa. Is there a downside to mirroring? Mirroring replicates what happens when you stand in front of a real mirror. Everything is flipped including written words you might hold up in front of the camera. And obviously, on the screen you don't look like others see you in real life, you're flipped ! What about the recorded videos and photos. Are they also flipped? No. Webcam mirroring only happens on screen. The actual recorded videos and photos captured by RightBooth will always be saved the correct way round, in other words they are captured exactly as the camera 'sees' you. And any words held up to the camera will be readable in the recorded files.
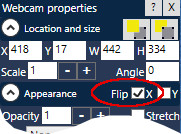
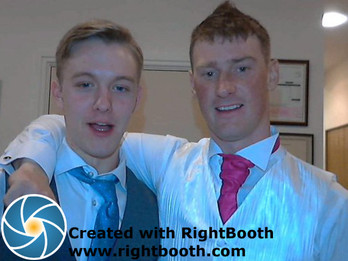
I've turned mirroring off but the camera is still mirrored on other screens That's right. Each camera item has it's own Flip X property. The reason is that you might want to have selective mirroring only on camera items on particular screens in the event. For example, on the screens leading up to the start of a video recording you may want to turn on mirroring to help users with positioning. But during the actual recording you may want users to see a true reflection of themselves and their surroundings on screen. So the choice is yours. Please also read this related article Updated: Jan 2021 A number of users have asked whether it is possible to add a company logo, strap line or message to all the videos and photos that are captured during the event. This can be useful if you want to advertise something, promote yourself, or your company, or simply stamp a message or an image from the event hosts onto all the recordings. RightBooth provides a logo feature to give you this ability and here we explain how to set it all up. Create your logo A logo is nothing more than an image file containing your logo design. The image file can contain anything you like, including text, and it can be any size and shape. However, you should bear in mind that the logo will be automatically resized by RightBooth and placed over the recorded videos and captured photos, so there really is no point in making your image any bigger than the size of your video and photo capture sizes. You can create your logo in any graphics design package, such as PhotoShop or a free package such as The Gimp We recommend you save your logo file in the PNG format. Here is an example image containing the RightBooth logo and two strap lines. It is a single PNG image with a transparent background:  Adding your logo onto videos and photos In RightBooth, open the event file in which you'd like to include your logo.
Final Points
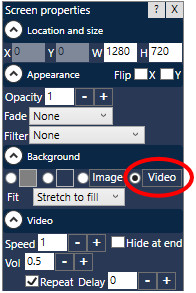
Updated: Jan 2021 RightBooth includes powerful features for playing video files in your events. Video BackgroundsYou can add a video that can be played on the background of any of the screens in your event. First, access the Screen Editor and choose the screen on which you want the video to play.
You can add a video item on any screen in your event. A video item is a container for playing a video file at any place, size and angle on the screen. First, access the Screen Editor and choose the screen on which you want to add a video item.
Video Sequence ItemsA video sequence item is similar to a video item, the main difference being that it can play a sequence of videos, one after another.
On the Add items panel, click the Video sequence button to add a new video sequence item to the current screen. Again, the new video sequence item will prompt you to double click it to add content, so double click the item to take you to the Video sequence files panel. Here you can create a list of videos that will play in the sequence item. On this panel there is also the option to show videos from the event. If you select this, the video sequence item will play a sequence of videos that have been previously recorded during the event. This can be very useful when placed on the Start screen, or when placed on a second monitor screen, to act as an attractor for other users. A quick mention here about Animation properties. On the Properties panel you can add an animation to a video sequence item. This will cause a transition animation to occur between successive video items in the list. Again, we suggest you experiment with animation properties, but keep checking the Blog as we'll add a post about transitions and animations soon. Announcing the release of RightBooth 5.
It's been 8 months in development and totally re-designed with powerful new features, an amazing screen editor, stunning graphics effects, green screen, overlays, animations, screen transitions, video fades and rotates, image blending, integrated emailing, a great karaoke video feature, information events, menus, second monitor support... Actually there is so much more to it so why not check it out for yourself? The complete feature list is here. Looking forward to hearing from our users and evaluators.
|
AuthorNigel Pearce 
Archives
July 2024
|


 RSS Feed

|
|