RIGHTBOOTH
  • Home
  • Products
  • Try
  • Help
    • Video Settings
    • Webcams
    • Other Equipment
    • Blog
    • How To
    • Training Videos
    • FAQ
    • User Manual
    • Release Notes
    • Terms of use
    • Contact
  • Feedback
    • Comments
    • User stories >
      • Mike Ridge
      • Tony Kay
      • Dave Bladen
      • Steven D Mills
      • Sue Crossland
      • Luke Dalby
      • McMaster University
      • Hangloose
      • Paul Waterhouse
      • Raf Sauvillers
    • User Videos
    • User Equipment
    • Organisations
  • About

Turning lights on and off at the start and end of each video recording or photo capture sequence

19/7/2018

0 Comments

 
UPDATE - 27th Mar 2021
In addition to the RightBooth features described below, we also now offer a separate app: The Relay Controller App  This app can be used to control the power to equipment at various times of day, days of week and on specific dates using a schedule that you design to run over long periods of time.  Full details here

DISCLAIMER:
  Please be advised that the hardware configuration and wiring information presented in this article has not been reviewed by qualified people with the expertise required to provide you with complete, accurate or reliable information. Therefore we (Aire Valley Software) cannot guarantee the validity of the information found here and we do not guarantee expressly or implicitly, nor take on any legal responsibility about the correctness, the exhaustiveness or the usefulness of the information. For these reasons we cannot be held liable for any problems that may arise as a result of acting upon this information.
You should ALWAYS seek the advice of a qualified professional electrician.

Article

In RightBooth it is possible to control any electrical device that has the ability to be switched on or off, such as a mains light, a motor or a fan.  This is achieved using most USB HID programmable relay boards or one of the following Denkovi relay boards...

http://denkovi.com/usb-relay-board-four-channels-for-home-automation


http://denkovi.com/usb-eight-channel-relay-board-for-automation

The relay board connects to your computer via a USB cable.  You can connect up to 8 items of switched equipment to the board’s relay connections and then use RightBooth to switch the equipment on and off at various times throughout the event.
1 - Connecting up your equipment

If you are using a HID relay board, simply connect it to a free USB port on your PC.  If you are using a Denkovi board you first need to install the driver software for the Denkovi. Full details on how to do this are available in the RightBooth User Manual.

Then typically you would wire up an external light to the relay board as shown in the diagram below.  Note that the board takes it's power from the computer via the USB connection.

​
Picture
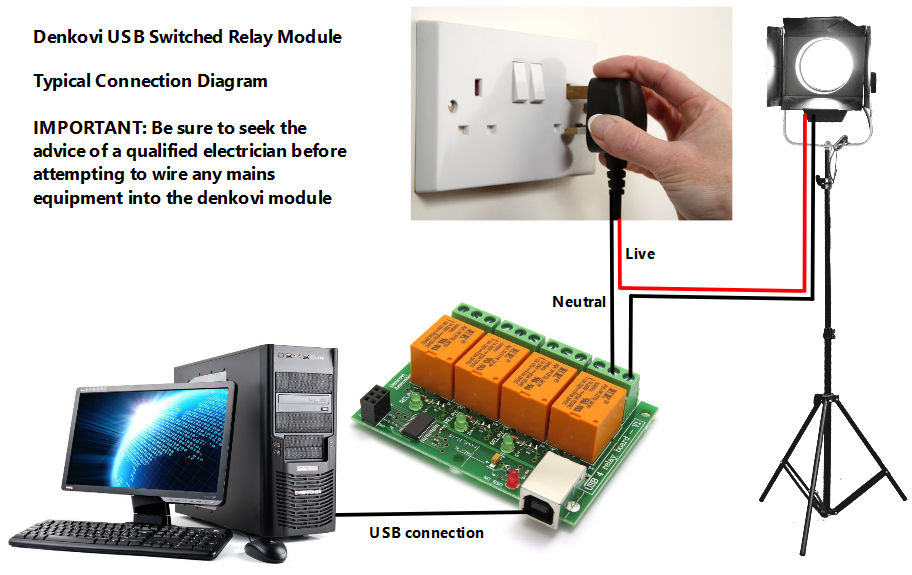
2 - Using the Relay Board in RightBooth

  • Run RightBooth.
  • In RightBooth Settings --> Start/Stop,  either tick the option: 'Start Denkovi relay board' or 'Start USB HID relay board' depending upon your board type.
  • If you are using a Denkovi board, enter the number of channels (switches) on your board into the Channels text box.
  • You can also set a start condition for the switches.  This is done by entering characters into the text box.  In the following examples we will assume you are working with a 4 channel relay board.
  • The default condition is 0000 (all switches are off). Other examples:
    • 1000 - the first switch is turned on. 
    • 1101 - first, second and fourth switches are turned on.

You will have to close RightBooth and re-run it for these initial switch settings to take effect.
Then each time you run RightBooth, the switches will be set to a known starting condition.


3 - Controlling the light during the event 

To control the light you have two options:

1)      You can change the switches whenever a chosen RightBooth event screen is displayed by using the Show action ‘Set switches’  OR

2)      You can add a Click action ‘Set switches’ to any item on any event screen. This will allow your event users to turn the light on and off when they click (or touch) the item.
 
Example 1 - Turn on Switch 1 when the 'Get ready' screen is shown
  • Go to the Get ready event screen in the RightBooth Screen Editor.
  • Show the Screen Properties
  • At the bottom of the properties toolbox, set the Action to 'Show', then select 'Set switches' from the action list.
  • In the Action text box,  enter '1000'  - this assumes you have wired your light to the first switch on the relay board.
 
You could then do the same on the Thank you screen, this time entering '0000' to turn all 4 switches off after the video recording (or photo capture sequence) has finished.

Example 2 – Allow the User to turn on the light
If you want the user to be able to alter switches...


  • Add a button, a text item, or an image item to any RightBooth event screen.
  • Show the item's properties.
  • Set the Action to 'Click', and 'Set switches'. 
  • In the Action text box, set the required switch pattern (as described above).
 
Other Switching Options
The characters you can use for the switch commands are:


  • 0 - turn a switch off
  • 1 - turn a switch on
  • T - toggle a switch to the opposite of its current state
  • U - leave the switch unaltered
 
Here are some examples:


  • 1010 - Turn switches 1 and 3 on. Turn switches 2 and 4 off
  • 1U1U - Turn switches 1 and 3 on. Switches 2 and 4 remain unaltered
  • TT00 - Toggle switches 1 and 2. Turn switches 3 and 4 off
0 Comments

    Author

    Nigel Pearce

    View my profile on LinkedIn

    RSS Feed

    Archives

    March 2023
    February 2023
    January 2023
    December 2022
    November 2022
    October 2022
    September 2022
    August 2022
    July 2022
    June 2022
    May 2022
    April 2022
    March 2022
    February 2022
    January 2022
    December 2021
    November 2021
    October 2021
    September 2021
    August 2021
    July 2021
    June 2021
    May 2021
    April 2021
    March 2021
    February 2021
    January 2021
    December 2020
    November 2020
    October 2020
    September 2020
    July 2020
    June 2020
    May 2020
    April 2020
    March 2020
    February 2020
    January 2020
    December 2019
    November 2019
    October 2019
    September 2019
    August 2019
    July 2019
    June 2019
    May 2019
    April 2019
    March 2019
    February 2019
    January 2019
    November 2018
    October 2018
    September 2018
    August 2018
    July 2018
    June 2018
    May 2018
    April 2018
    March 2018
    February 2018
    January 2018
    December 2017
    November 2017
    October 2017
    September 2017
    August 2017
    July 2017
    June 2017
    May 2017
    April 2017
    March 2017
    February 2017
    December 2016
    November 2016
    October 2016
    September 2016
    August 2016
    July 2016
    June 2016
    May 2016
    April 2016
    March 2016
    February 2016
    January 2016
    December 2015
    November 2015
    October 2015
    September 2015
    August 2015
    July 2015
    June 2015
    May 2015
    April 2015
    March 2015
    February 2015
    January 2015
    November 2014
    October 2014
    September 2014
    August 2014
    July 2014
    June 2014
    May 2014
    April 2014
    March 2014
    February 2014
    January 2014
    December 2013
    November 2013
    October 2013

RightBooth logo
RIGHTBOOTH
​© 2013 - 2023 Aire Valley Software
News
​
Tutorials
​
FAQ
About
​
Contact
​
Terms of use and ​Privacy Policy
  • Home
  • Products
  • Try
  • Help
    • Video Settings
    • Webcams
    • Other Equipment
    • Blog
    • How To
    • Training Videos
    • FAQ
    • User Manual
    • Release Notes
    • Terms of use
    • Contact
  • Feedback
    • Comments
    • User stories >
      • Mike Ridge
      • Tony Kay
      • Dave Bladen
      • Steven D Mills
      • Sue Crossland
      • Luke Dalby
      • McMaster University
      • Hangloose
      • Paul Waterhouse
      • Raf Sauvillers
    • User Videos
    • User Equipment
    • Organisations
  • About