
|
Options for emailing photos to users are to be found in the 'Email files' section within the 'Event structure' tab, which is available in the Event Designer. The options available for emailing photos are: 1 - No emailing  Photos will not be emailed to users. 2 - Forced emailing  After photos are taken, users will be shown the 'Email address' screen to force them to immediately email their photos. They must enter a valid email address to continue, unless you add a Skip button to the 'Email address' screen. 3 - Optional emailing  After photos are taken, users will be shown the 'Photo options' screen to allow them to choose to email their photos. If they choose to email their photos, they will then be shown the 'Email address' screen. You can enter a number into the text box. This is the number of times each user will be shown the 'Email button' on the Photo options screen, in other words it defines the number of times they can email their photos. 4 - Forced emailing followed by Optional emailing  After photos are taken, users will be shown the 'Email address' screen to force them to immediately email their photos. They must enter a valid email address to continue, unless you add a Skip button to the 'Email address' screen. After they have completed the Email address screen, users will then be shown the 'Photo options' screen to allow them to choose to email their photos again. 5 - Send emails after the event  After photos are taken, users will be shown the 'Email address' screen to force them to enter a valid email address to continue, unless you add a Skip button to the 'Email address' screen. When they have entered a valid email address, RightBooth will save the email in the current event folder. You can then send the emails later (e.g. after the event has finished) using the Email feature available in the RightBooth Tasks section. 6 - Automatic emailing If you want to automatically email photos to one or more known email addresses, simply add the email addresses into the 'To' text box in the 'Event email' section of the 'Event Designer'. In this example, RightBooth will automatically email all photos to [email protected] and [email protected]:  IMPORTANT: Note the 'Send to user email address' checkbox in the above screenshot. When this option is ticked (the default), event users will be able to perform emailing (as described in the options 1 to 5 above). But if you untick this option, then only personA and personB will receive emails, and event users will not be shown any emailing options. Handling Emailing Problems
If RightBooth cannot send emails for whatever reason (e.g. no Internet connection), it will inform the user and then save the email files in the current event folder to allow you to email them at a later time within the RightBooth Tasks section.
0 Comments
Stamp Property An item whose Stamp property is ticked (we will refer to this as a Stamp item) will be automatically added (overlaid) onto a captured photo if: a) the Stamp item is positioned over a Camera item on any event screen prior to the photo being taken, or b) the Stamp item is positioned over the photo after it has been taken and is being displayed to the user on any event screen. In the Screen Designer, if Stamp items are placed and positioned over any Camera item on any Event screen that appears before the ‘Take photo’ screen, then these Stamp items will be automatically added to every photo that is captured during the event. This applies to webcam and DSLR camera items. In the Screen Designer, if Stamp items are positioned over any ‘photo placeholder’ item on any event screen that appears after the ‘Take photo’ screen, these Stamp items will be automatically added to every photo captured during the event. Can Move Property Alternatively in the Screen Designer, Stamp items which also have their ‘Can move’ property ticked can be initially placed and positioned away from the Camera item or ‘photo placeholder’ item. Then when the event is playing, users can optionally drag 'Can move' Stamp items over the Camera item (or the photo placeholder) item in order to decorate their photos. All Stamp items that are placed over photos will be added to the photo image file and will also be included in any printing of the photo. Other Uses of Stamp Items
IMPORTANT: If you plan to add Stamp items onto a photo, camera item, drawing pad or print layout item, the item that is accepting the Stamp items MUST be un-rotated on the event screen in the Screen Designer, in other words it must have an Angle of 0 degrees otherwise the Stamp items will not be added in the correct position. Moving, Sizing and Rotating Stamp Items When the user selects a stamp item (either with the mouse or touching it on a touchscreen), two pick-up boxes will be displayed, one for stamp rotation and one for stamp sizing. This video shows how it is possible to move, size and rotate Stamp items into place on a captured photo:
Updated September 2023 There are two of ways to achieve portrait video and photo capture with RightBooth. Option 1 - Rotate the camera 90 degrees This is explained in the following tutorial: The above tutorial discusses using a webcam, but the same principle also applies when using DSLR and GoPro cameras. Option 1 for DSLR and GoPro Cameras Physically rotate and fix your DSLR/GoPro camera at 90 degrees, then in RightBooth Camera DSLR settings (or GoPro Settings) you need to rotate the camera feed 90 degrees by ticking the Rotate 90 checkbox (see image below).
IMPORTANT: Prevent Automatic Camera Orientation Many cameras (GoPro and DSLR). have the option automatically enabled to add orientation metadata to the recorded videos and captured photos. This means that if you hold the camera horizontally it will automatically record landscape videos/photos and if you physically rotate the camera 90 degrees it will include relevant orientation metadata in the captured file to cause the media to be shown rotated. If your camera has this feature, you must disable it to avoid problems in RightBooth. All GoPro cameras On your GoPro camera menu, choose: Preferences --> Touchscreen --> Orientation Then set the Orientation to 'Landscape'. This will cause all videos and photos to be captured in landscape orientation regardless of how the camera is physically rotated. DSLR cameras - Canon M50 Mark II On the camera menu, choose 'Function settings' and set the 'Add rotate info' option to 'Disable: 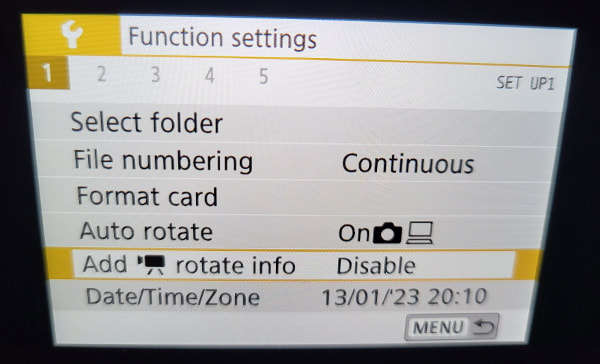 Please note that the option to turn off Orientation varies between camera models. Check your camera documentation for specific information. Example: Using a DSLR to take Portrait photos In the following example I am using a Canon DSLR, physically mounted at 90 degrees and I have set it to capture photos at S1 quality, (2256x1504 pixels), which is an aspect ratio of 1.5:1. I have also turned off the Orientation option on the camera. Now because the camera is not automatically applying Orientation, I can assume that the photos will be captured in Landscape mode, regardless of the physical camera mounting. Also in RightBooth settings I have chosen to reduce the photo size to: W = 1500, H = 1000. This is a 1.5:1 aspect ratio which matches the 2256x1504 aspect ratio of the source photos captured on the camera, Reducing the photo size in RightBooth can help to reduce the memory requirements and improve the overall performance of the app. I have also set the video W and H to be the same as the camera's video recording size: 1920x1080. Finally, I have ticked the Rotate 90 checkbox. This will cause RightBooth to correctly rotate the source videos and photos into portrait mode. It will also ensure that the camera live feed input appears in portrait mode on all the RightBooth event screens... 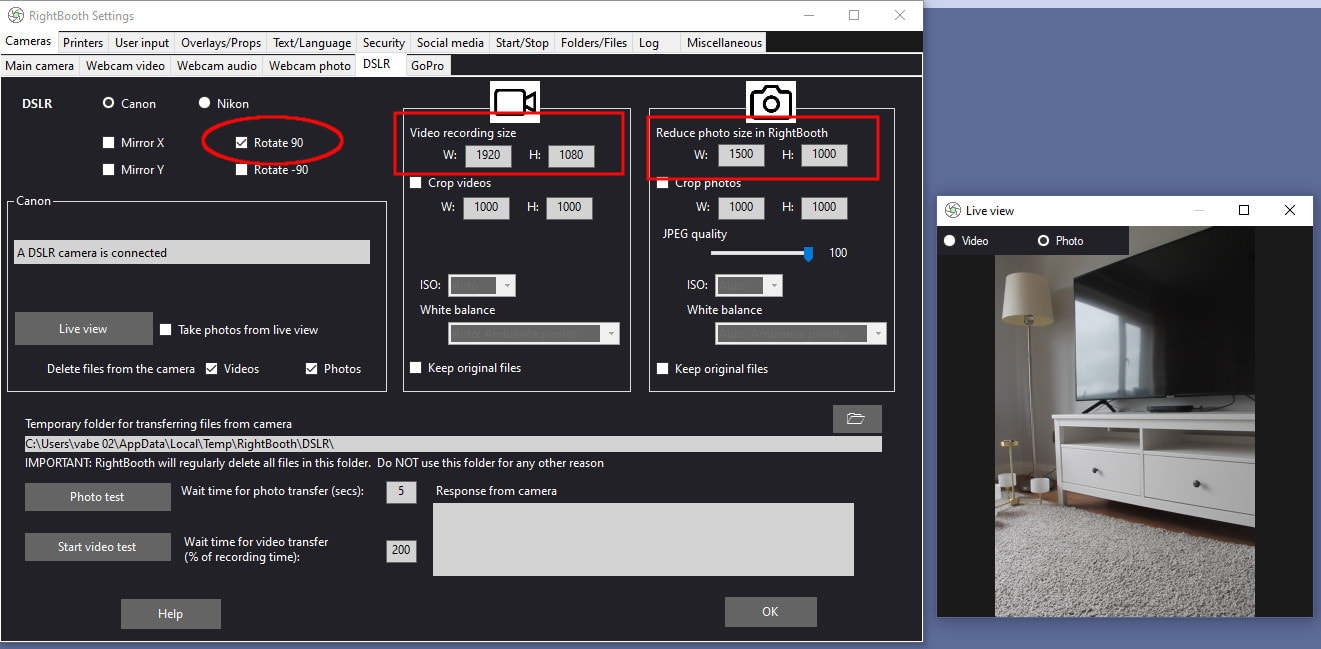 Option 2 - Fix the camera horizontally and crop the input Using this solution RightBooth will crop the landscape camera feed (webcam, DSLR or GoPro), discarding the left and right sections of the input to leave a central portion that is any aspect ratio you require, such as square or portrait. With this solution you un-tick the 'Rotate 90' checkbox. Obviously this solution is not as good as the first solution (above) because you are discarding useful sections of the camera input and you are therefore effectively reducing the resolution in your captured files. In this example I have chosen to crop both DSLR video and photo inputs. I have cropped the video to 604x1080, which is an aspect ratio that is close to a rotated HD input. With photos, I have cropped to 700x1000 which is providing a slightly wider Portrait input, as seen in the live view:  It is worth mentioning here that there are no hard and fast rules on cropping. Simply choose values that produce video and photos aspect ratios that work for you.
Applying Video Enhancements to Portrait videos If you are applying RightBooth Video Enhancement features to your portrait video recordings, make sure that any enhancement files you use also have a portrait aspect ratio, otherwise RightBooth will stretch and possibly distort the assets to fit the portrait video recording size. For example, if you are recording portrait HD videos and you want to add a video overlay to your recorded videos, make sure you use a video file that is sized W=1080 H=1920, or W=720 H=1280, or some other aspect ratio that matches your HD portrait video recording size. The same rule applies when using an image overlay. Example Let's assume you are using a GoPro camera mounted at 90 degrees on a 360 booth spinner arm. You want to make sure the completed videos in RightBooth are Portrait orientation and have an image overlay. To do this: 1. On the GoPro camera menu, set the camera’s Orientation setting to ‘Landscape’. You will find this in ‘Preferences —> Touchscreen —> Orientation. Setting this to ‘Landscape’ will force the GoPro to record videos in Landscape mode, regardless of how it is mounted. 2. You can now mount your camera at any angle on the spinner arm, but your GoPro videos will always be recorded Landscape (1920 x 1080). Now if you mount your GoPro at 90 degrees on the arm you will need to get RB to rotate the videos after it receives them from the GoPro. 3. In RB GoPro settings, make sure the Video recording size is W=1920, H=1080, then tick the option: ‘Rotate 90’. This will cause RB to rotate the GoPro videos from Landscape to Portrait, making them 1080 x 1920. 4. In RB Video enhancements, make sure any chosen overlay image has a width and height that matches the Portrait video size. So your overlay image dimensions must be 1080 x 1920 pixels. RightBooth version 7.0.10 now includes the new actions: 'Next desktop' and 'Previous Desktop' to allow your event users to switch to other Windows virtual desktops that may contain applications you would like them to view or interact with as part of your event design.
Details are available in the latest RightBooth User Manual and there is also a training video available.
Updated: January 2024 Please note that Snap Camera was discontinued and suspended on January 25th 2023. However, the product is currently still available for use. This article explains all. Snap Camera is an app from Snap Inc that allows you to apply lens effects onto live webcams, as found in the popular SnapChat app. These effects can then be made to appear when playing your RightBooth event, allowing your users to select them and apply them to their RightBooth photo captures and video recordings.
Configure Snap Camera Settings Run Snap Camera. In Snap Camera settings:
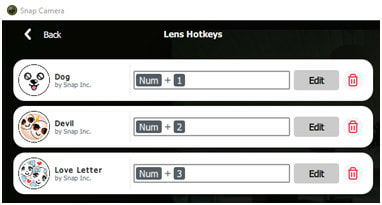
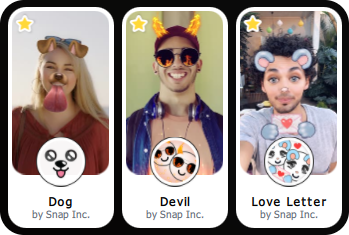
Choose your Snap Camera lenses Now browse the Snap Camera lenses and choose your favourites by clicking the Yellow start icon next to the lens. Then in the Favourites panel set each of your chosen lens Hotkeys to Num + 1, Num + 2, Num + 3, etc. These are the number keys on the numeric keypad on your keyboard. Note that RightBooth can control up to 9 Snap Camera lenses (i.e maximum hotkey Num + 9). Here we have chosen 3 lenses and have defined their hotkeys accordingly:
Keep Snap Camera running and we’ll now turn our attention to getting RightBooth working with Snap Camera. RightBooth Settings for Snap Camera
Adding Snap Camera Interaction to RightBooth Open the RightBooth event in which you would like to use Snap Camera lenses.
Now you can add various Snap Camera actions to any event screen item (such as buttons or images) in order to allow users to show/hide and select any of your defined set of favourite lenses. Available Snap Camera Actions
Note that you can choose to add Snap Camera lens actions on any screen in the event and this gives you a lot of design flexibility. Examples of some of the things you can do:
IMPORTANT RULES TO REMEMBER:
There is a new RightBooth Facebook Group : Everything RightBooth
Feel free to join and take part in discussions regarding all things RightBooth ! And keep watching as we produce training videos over the coming weeks that show how to get the best out of RightBooth 7 |
AuthorNigel Pearce 
Archives
July 2024
|
 RSS Feed

|
|