RIGHTBOOTH
  • Home
  • Products
  • Feedback
    • Comments
    • User stories >
      • Mike Ridge
      • Tony Kay
      • Dave Bladen
      • Sue Crossland
      • Luke Dalby
      • McMaster University
      • Hangloose
      • Paul Waterhouse
      • Raf Sauvillers
    • User Videos
    • User Equipment
    • Organisations
  • Help
    • Features
    • Training Videos
    • How To
    • FAQ
    • Blog
    • User Manual
    • Video Settings
    • Webcams
    • Other Equipment
    • Release Notes
    • Terms of use
    • Contact
    • About
  • Try
  • Buy

Adding Interactive Web Browsing Into Your Events

23/9/2018

0 Comments

 
Updated: Jan 2021

​So let's say you want to allow your event users to optionally browse the web in a well controlled manner.  This article explains a way of implement it in RightBooth.
1 - Add a New Screen to your event
We are going to create a new screen in your event that users can choose to visit by linking it to a  button on the Start screen. The new screen will contain a RightBooth Web browser item, which is a powerful, fully integrated web browser based upon Chromium (the product that Google uses to build its Chrome browser).
  • Run RightBooth
  • Open your event file
  • Click the 'Edit' button on the main RightBooth window to take you to the Event Editor
  • On the Screen Editor Toolbox, click 'Add items'
  • On the 'Add items' toolbox, click 'Screen' and enter a name for the new screen, let's call it: 'Browser' as follows:
Picture
  • Then click the OK button to add the new Browser screen into the event. ​Note that the new screen will appear at the top of the screen list and RightBooth will show you the new empty screen.
  • Click on the 'Browser' screen name to ensure it is highlighted (see image opposite).
  • ​Then click on the Down Arrow button on the Editor Toolbox repeatedly in order to move the Browser screen name down to the bottom of the screen list as shown in the image below:
Picture
Picture
So why place the screen at the bottom of the list?

The reason is that any screens that appear below the line break are screens which are not usually shown during the normal video recording or photo capture sequence.

So this allows the Browser screen to remain hidden unless called upon by the user. Read on...
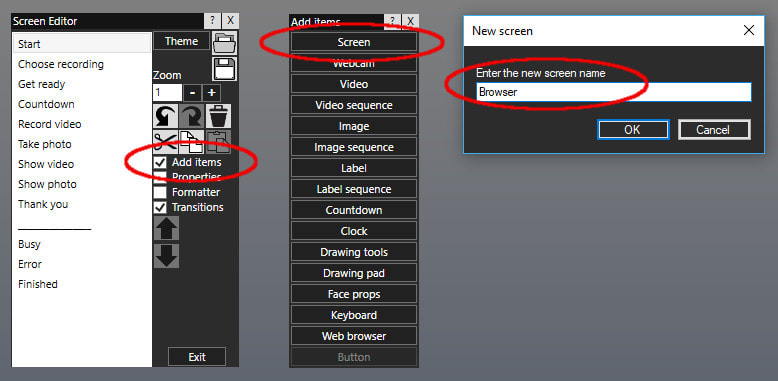
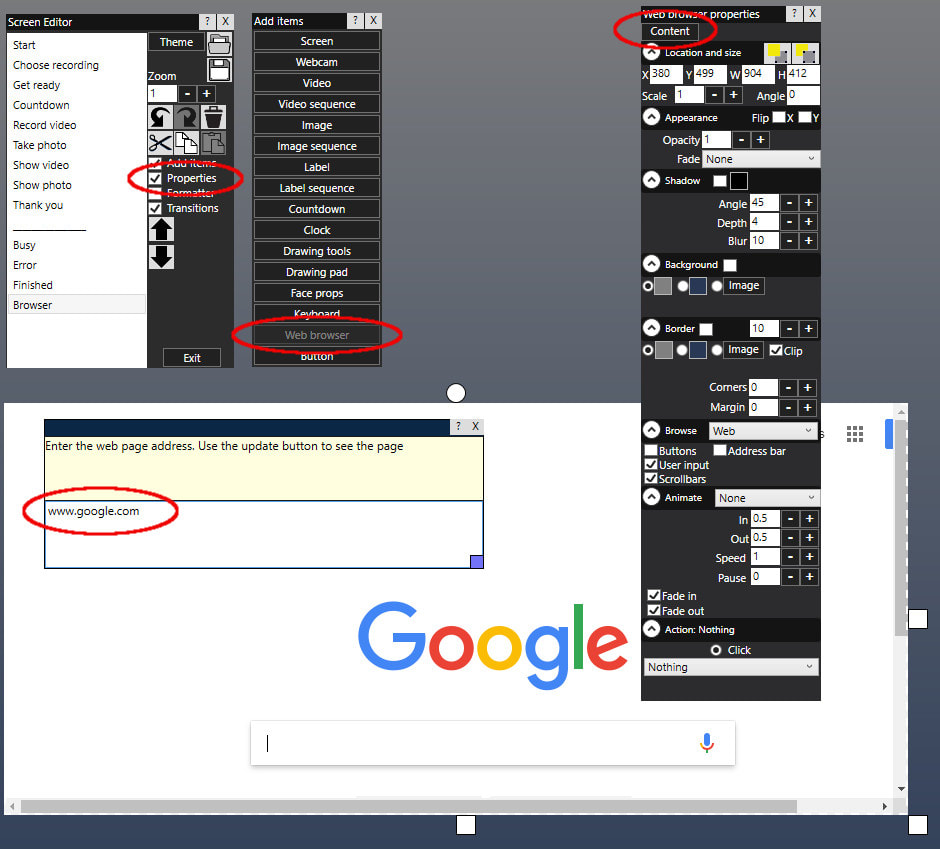
2 Add a Web Browser to the new Browser screen
  • On the Add Items Toolbox, click the Web browser button to add the RightBooth web browser item to the screen.
In our example we would like the web browser to show the Google search page...
  • Make sure the web browser item is selected, then click the 'Properties' check box on the Screen Editor Toolbox
  • On the Web browser properties Toolbox, click the Content button to display the URL editor panel.
  • In the URL editor, type www.google.com.  The web browser item will then show you the Google web page, as shown in the image below.
  • Size and position the web browser item however you like:
Picture
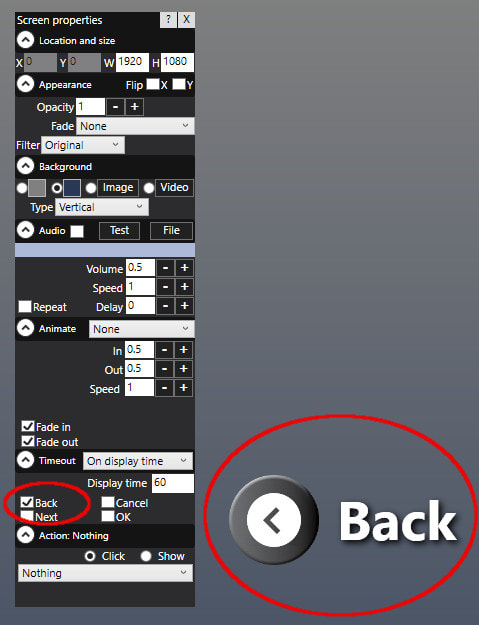
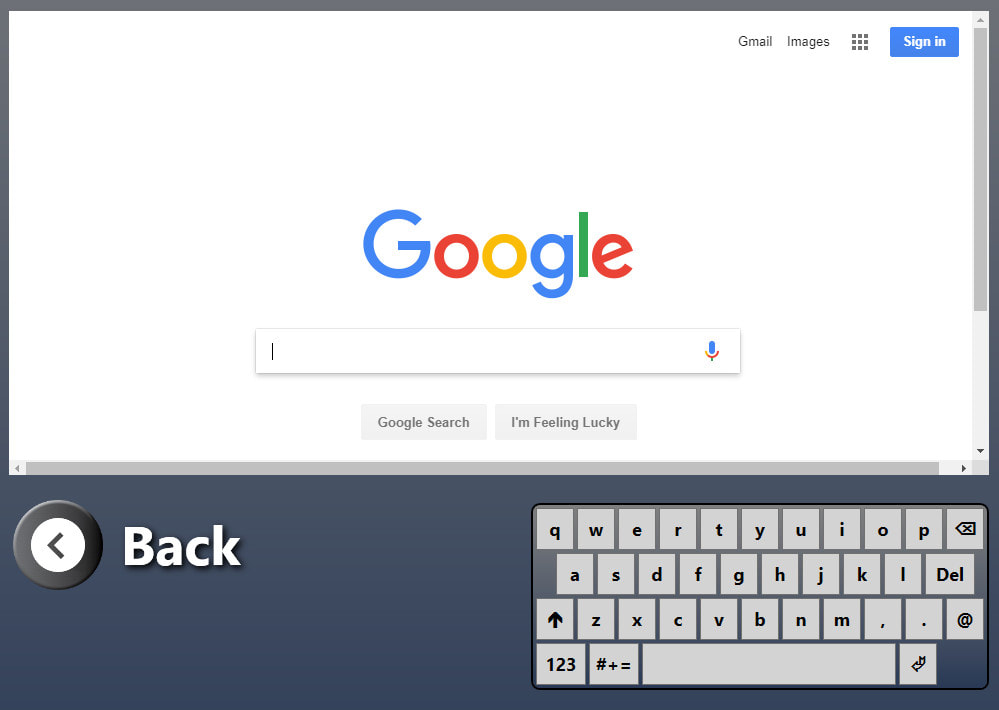
3 Add a Back button and a Keyboard Item to the Browser screen
  • Click anywhere on the screen background to show the Screen properties
  • Tick the 'Back' checkbox to add a Back button (and an associated text item) to the screen:
Picture
  • On the Add items Toolbox, click the Keyboard button to add a keyboard item to the screen.
  • Position and size all items where you want them on the screen, something like this perhaps:
Picture
4 Add a Button on the Start screen
Click 'Start' in the Screen Editor screen list to show the event Start screen.
Click the 'Button' button on the 'Add Items' Toolbox to add a new button to the Start screen.
Click on the new button to select it and to show its Button properties
Click on the Action list (No 1 in the image below) and choose the action 'Show screen'
Click in the Action parameter box (No 2 in the image below) and enter the name of the Browser screen in the Action text box panel...

Picture
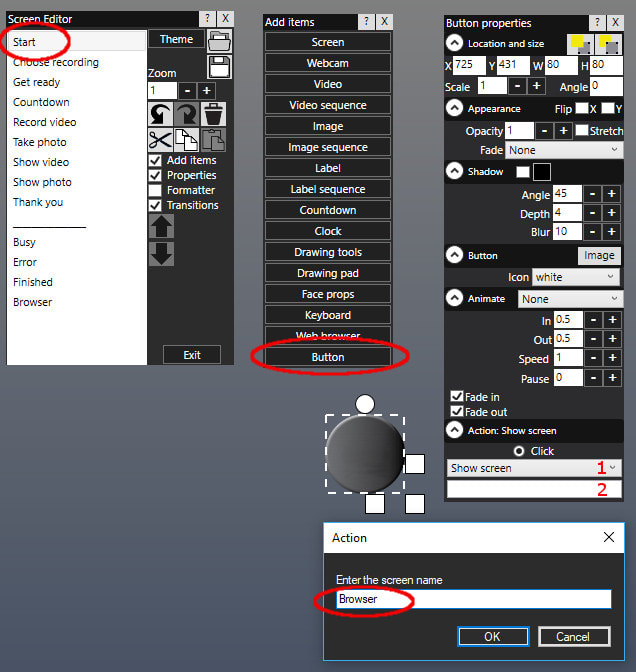
You could also add a Label item to place alongside the button, that states something like:  'Browse the web'

Job Done !

Now when you play this event, your users can choose to click or touch the button on the Start screen to take them to your Browser screen, where they can interact with the web browser and use the on screen keyboard to enter text into any text box within it.

​And when they have finished browsing they can click on the Back button to return to the Start screen.

0 Comments

    Author

    Nigel Pearce

    View my profile on LinkedIn

    RSS Feed

    Archives

    April 2025
    March 2025
    February 2025
    January 2025
    December 2024
    November 2024
    October 2024
    September 2024
    August 2024
    July 2024
    June 2024
    May 2024
    April 2024
    March 2024
    February 2024
    January 2024
    November 2023
    October 2023
    September 2023
    August 2023
    July 2023
    June 2023
    May 2023
    April 2023
    March 2023
    February 2023
    January 2023
    December 2022
    November 2022
    October 2022
    September 2022
    August 2022
    July 2022
    June 2022
    May 2022
    April 2022
    March 2022
    February 2022
    January 2022
    December 2021
    November 2021
    October 2021
    September 2021
    August 2021
    July 2021
    June 2021
    May 2021
    April 2021
    March 2021
    February 2021
    January 2021
    December 2020
    November 2020
    October 2020
    September 2020
    July 2020
    June 2020
    May 2020
    April 2020
    March 2020
    February 2020
    January 2020
    December 2019
    November 2019
    October 2019
    September 2019
    August 2019
    July 2019
    June 2019
    May 2019
    April 2019
    March 2019
    February 2019
    January 2019
    November 2018
    October 2018
    September 2018
    August 2018
    July 2018
    June 2018
    May 2018
    April 2018
    March 2018
    February 2018
    January 2018
    December 2017
    November 2017
    October 2017
    September 2017
    August 2017
    July 2017
    June 2017
    May 2017
    April 2017
    March 2017
    February 2017
    December 2016
    November 2016
    October 2016
    September 2016
    August 2016
    July 2016
    June 2016
    May 2016
    April 2016
    March 2016
    February 2016
    January 2016
    December 2015
    November 2015
    October 2015
    September 2015
    August 2015
    July 2015
    June 2015
    May 2015
    April 2015
    March 2015
    February 2015
    January 2015
    November 2014
    October 2014
    September 2014
    August 2014
    July 2014
    June 2014
    May 2014
    April 2014
    March 2014
    February 2014
    January 2014
    December 2013
    November 2013
    October 2013

RightBooth logo
RIGHTBOOTH
​© 2013 - 2025 Aire Valley Software
News
​
Tutorials
​
FAQ
About
​
Contact
​
Terms of use and ​Privacy Policy
  • Home
  • Products
  • Feedback
    • Comments
    • User stories >
      • Mike Ridge
      • Tony Kay
      • Dave Bladen
      • Sue Crossland
      • Luke Dalby
      • McMaster University
      • Hangloose
      • Paul Waterhouse
      • Raf Sauvillers
    • User Videos
    • User Equipment
    • Organisations
  • Help
    • Features
    • Training Videos
    • How To
    • FAQ
    • Blog
    • User Manual
    • Video Settings
    • Webcams
    • Other Equipment
    • Release Notes
    • Terms of use
    • Contact
    • About
  • Try
  • Buy