|
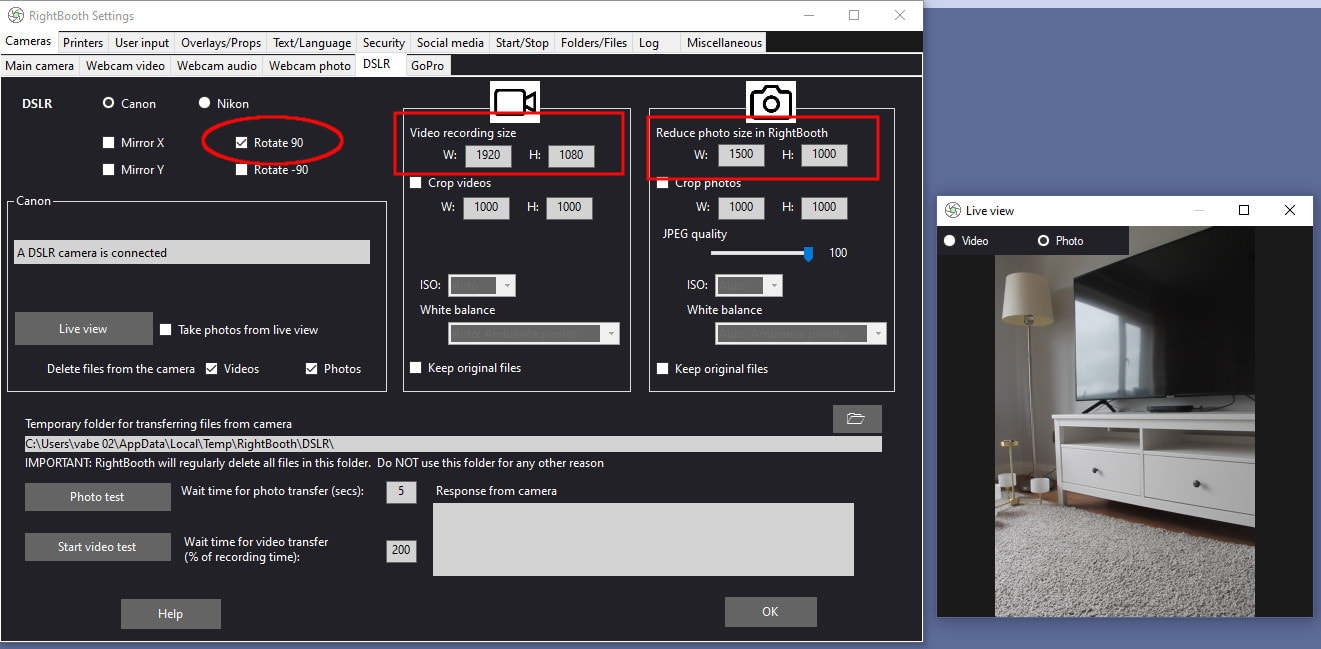
Updated September 2023 There are two of ways to achieve portrait video and photo capture with RightBooth. Option 1 - Rotate the camera 90 degrees This is explained in the following tutorial: The above tutorial discusses using a webcam, but the same principle also applies when using DSLR and GoPro cameras. Option 1 for DSLR and GoPro Cameras Physically rotate and fix your DSLR/GoPro camera at 90 degrees, then in RightBooth Camera DSLR settings (or GoPro Settings) you need to rotate the camera feed 90 degrees by ticking the Rotate 90 checkbox (see image below).
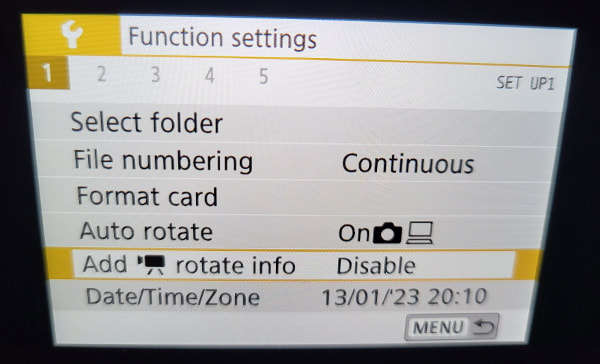
IMPORTANT: Prevent Automatic Camera Orientation Many cameras (GoPro and DSLR). have the option automatically enabled to add orientation metadata to the recorded videos and captured photos. This means that if you hold the camera horizontally it will automatically record landscape videos/photos and if you physically rotate the camera 90 degrees it will include relevant orientation metadata in the captured file to cause the media to be shown rotated. If your camera has this feature, you must disable it to avoid problems in RightBooth. All GoPro cameras On your GoPro camera menu, choose: Preferences --> Touchscreen --> Orientation Then set the Orientation to 'Landscape'. This will cause all videos and photos to be captured in landscape orientation regardless of how the camera is physically rotated. DSLR cameras - Canon M50 Mark II On the camera menu, choose 'Function settings' and set the 'Add rotate info' option to 'Disable: Please note that the option to turn off Orientation varies between camera models. Check your camera documentation for specific information. Example: Using a DSLR to take Portrait photos In the following example I am using a Canon DSLR, physically mounted at 90 degrees and I have set it to capture photos at S1 quality, (2256x1504 pixels), which is an aspect ratio of 1.5:1. I have also turned off the Orientation option on the camera. Now because the camera is not automatically applying Orientation, I can assume that the photos will be captured in Landscape mode, regardless of the physical camera mounting. Also in RightBooth settings I have chosen to reduce the photo size to: W = 1500, H = 1000. This is a 1.5:1 aspect ratio which matches the 2256x1504 aspect ratio of the source photos captured on the camera, Reducing the photo size in RightBooth can help to reduce the memory requirements and improve the overall performance of the app. I have also set the video W and H to be the same as the camera's video recording size: 1920x1080. Finally, I have ticked the Rotate 90 checkbox. This will cause RightBooth to correctly rotate the source videos and photos into portrait mode. It will also ensure that the camera live feed input appears in portrait mode on all the RightBooth event screens... Option 2 - Fix the camera horizontally and crop the input Using this solution RightBooth will crop the landscape camera feed (webcam, DSLR or GoPro), discarding the left and right sections of the input to leave a central portion that is any aspect ratio you require, such as square or portrait. With this solution you un-tick the 'Rotate 90' checkbox. Obviously this solution is not as good as the first solution (above) because you are discarding useful sections of the camera input and you are therefore effectively reducing the resolution in your captured files. In this example I have chosen to crop both DSLR video and photo inputs. I have cropped the video to 604x1080, which is an aspect ratio that is close to a rotated HD input. With photos, I have cropped to 700x1000 which is providing a slightly wider Portrait input, as seen in the live view: It is worth mentioning here that there are no hard and fast rules on cropping. Simply choose values that produce video and photos aspect ratios that work for you.
Applying Video Enhancements to Portrait videos If you are applying RightBooth Video Enhancement features to your portrait video recordings, make sure that any enhancement files you use also have a portrait aspect ratio, otherwise RightBooth will stretch and possibly distort the assets to fit the portrait video recording size. For example, if you are recording portrait HD videos and you want to add a video overlay to your recorded videos, make sure you use a video file that is sized W=1080 H=1920, or W=720 H=1280, or some other aspect ratio that matches your HD portrait video recording size. The same rule applies when using an image overlay. Example Let's assume you are using a GoPro camera mounted at 90 degrees on a 360 booth spinner arm. You want to make sure the completed videos in RightBooth are Portrait orientation and have an image overlay. To do this: 1. On the GoPro camera menu, set the camera’s Orientation setting to ‘Landscape’. You will find this in ‘Preferences —> Touchscreen —> Orientation. Setting this to ‘Landscape’ will force the GoPro to record videos in Landscape mode, regardless of how it is mounted. 2. You can now mount your camera at any angle on the spinner arm, but your GoPro videos will always be recorded Landscape (1920 x 1080). Now if you mount your GoPro at 90 degrees on the arm you will need to get RB to rotate the videos after it receives them from the GoPro. 3. In RB GoPro settings, make sure the Video recording size is W=1920, H=1080, then tick the option: ‘Rotate 90’. This will cause RB to rotate the GoPro videos from Landscape to Portrait, making them 1080 x 1920. 4. In RB Video enhancements, make sure any chosen overlay image has a width and height that matches the Portrait video size. So your overlay image dimensions must be 1080 x 1920 pixels.
0 Comments
Your comment will be posted after it is approved.
Leave a Reply. |
AuthorNigel Pearce Archives
July 2024
|
|


 RSS Feed
