RIGHTBOOTH
  • Home
  • Products
  • Feedback
    • Comments
    • User stories >
      • Mike Ridge
      • Tony Kay
      • Dave Bladen
      • Sue Crossland
      • Luke Dalby
      • McMaster University
      • Hangloose
      • Paul Waterhouse
      • Raf Sauvillers
    • User Videos
    • User Equipment
    • Organisations
  • Help
    • Features
    • Training Videos
    • How To
    • FAQ
    • Blog
    • User Manual
    • Video Settings
    • Webcams
    • Other Equipment
    • Release Notes
    • Terms of use
    • Contact
    • About
  • Try
  • Buy

Introduction to Properties

23/5/2017

0 Comments

 
Updated: Jan 2021
​

So what exactly are properties?


Properties are values that you can apply to items such as text labels, images and videos on your event screens.  These values define how each item looks and behaves when it appears during the event.
This article gives you a brief overview of some of the properties that can be applied to your screen items.

To access an item's properties...
  • Open the event in RightBooth
  • Click the Edit button on the main window to take you to the Screen Editor.
  • Select a screen from the screen list
  • Click on the item of interest to select it
  • Tick the 'Properties' check box on the Editor Toolbox to show the Properties panel for the currently selected item
Let's look at properties for a text label item...

​In the following screen shot we have selected a Label item on an event's Start screen and we are showing the Label properties panel.  

The panel is organised into a number of categories:
​
  • Location and size
  • Appearance
  • Shadow
  • Background
  • Border
  • Text
  • Animate
  • ​Action
Picture
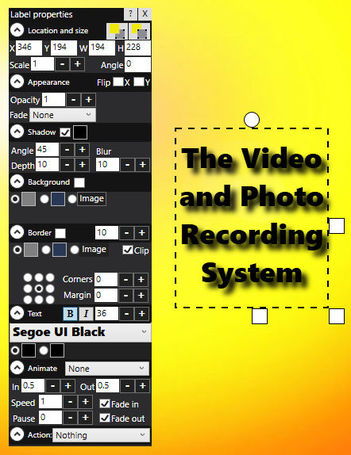
Location and size
These properties let you specify the position, size and angle of the item on the screen.  For example, by entering 45 into the Angle property, the text will be shown at 45 degrees.  Note that if you use the mouse to move and size the item, the properties panel will update the X, Y, W and H properties accordingly.

​The two buttons containing the grey and yellow squares let you move the item in front or behind other items on the screen.
Appearance
Here you can set the Opacity value. It change how much you can see through the item.  A value of 1 means the item is fully visible.  A value of 0 makes the item totally invisible.  A value of 0.5 makes the item half transparent, letting you see whats behind it.
​
You can also flip the item in X and Y, effectively making it mirrored or inverted. You can also apply a Fade mask to the item.  In this example we've added a Fade from the Right edge with a value of 10%
Picture
Shadow
These properties let you apply a shadow effect to the item.  In our example you can see that the Shadow property is ticked giving the the text a shadow.  To the right of the Shadow tick box is a black square.  This is the colour of the shadow.  You can click this square to change the colour of the shadow.
In our example the shadow Angle is 45 degrees, dropping it down to the right by a Depth of 10 pixels, with a Blur effect of 10.  Experiment with these properties to see how you can customise the shadow,
Background and Border
Here you can add a background and a Border to the item.  The background can be a single colour, a two colour gradient or an image.
The Border can also be a single colour, a gradient or an image.  You can also define the border thickness, margin and corner radius.
In the following example we have selected a two colour vertical gradient background with a single colour border, 10 pixels thick with 20 pixel radius corners...
RightBooth
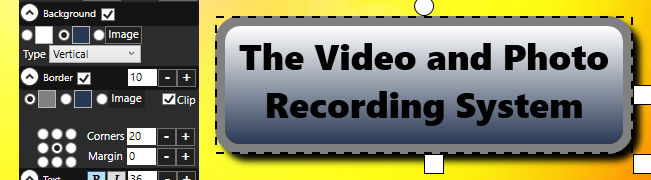
Text
Here you can define the text font style.  In our example we've select the Segoe UI Black font, Bold, 36 pt.
You can also choose a solid font colour, or a gradient color fill that is applied to all text characters.  In our example we've set the text colour to solid black.
​
Animate
With a text item you can set the Animate property.  You can choose to set the text item to a Blink or Fade animation.

Action
Use this property to give the text item an action that will happen if you click on the text when the event is playing.
You can choose from a number of Page Navigation actions, including:
  • Home - return to the event Start screen
  • Next - progress to the next screen in the event
  • Back - return to the previous screen in the event
Remember that each item on the screen can have it's own property values and you can also change the properties of the screen background.

In this article we have looked specifically at text label properties, and many of these properties are available to other item types, such as images and videos.  But other items also have properties that are specific to them, so we encourage you to investigate the Properties panel when clicking on other items in the event.

​And don't forget to read the RightBooth manual for full details on all the Properties available.
0 Comments


Leave a Reply.

    Author

    Nigel Pearce

    View my profile on LinkedIn

    RSS Feed

    Archives

    April 2025
    March 2025
    February 2025
    January 2025
    December 2024
    November 2024
    October 2024
    September 2024
    August 2024
    July 2024
    June 2024
    May 2024
    April 2024
    March 2024
    February 2024
    January 2024
    November 2023
    October 2023
    September 2023
    August 2023
    July 2023
    June 2023
    May 2023
    April 2023
    March 2023
    February 2023
    January 2023
    December 2022
    November 2022
    October 2022
    September 2022
    August 2022
    July 2022
    June 2022
    May 2022
    April 2022
    March 2022
    February 2022
    January 2022
    December 2021
    November 2021
    October 2021
    September 2021
    August 2021
    July 2021
    June 2021
    May 2021
    April 2021
    March 2021
    February 2021
    January 2021
    December 2020
    November 2020
    October 2020
    September 2020
    July 2020
    June 2020
    May 2020
    April 2020
    March 2020
    February 2020
    January 2020
    December 2019
    November 2019
    October 2019
    September 2019
    August 2019
    July 2019
    June 2019
    May 2019
    April 2019
    March 2019
    February 2019
    January 2019
    November 2018
    October 2018
    September 2018
    August 2018
    July 2018
    June 2018
    May 2018
    April 2018
    March 2018
    February 2018
    January 2018
    December 2017
    November 2017
    October 2017
    September 2017
    August 2017
    July 2017
    June 2017
    May 2017
    April 2017
    March 2017
    February 2017
    December 2016
    November 2016
    October 2016
    September 2016
    August 2016
    July 2016
    June 2016
    May 2016
    April 2016
    March 2016
    February 2016
    January 2016
    December 2015
    November 2015
    October 2015
    September 2015
    August 2015
    July 2015
    June 2015
    May 2015
    April 2015
    March 2015
    February 2015
    January 2015
    November 2014
    October 2014
    September 2014
    August 2014
    July 2014
    June 2014
    May 2014
    April 2014
    March 2014
    February 2014
    January 2014
    December 2013
    November 2013
    October 2013

RightBooth logo
RIGHTBOOTH
​© 2013 - 2025 Aire Valley Software
News
​
Tutorials
​
FAQ
About
​
Contact
​
Terms of use and ​Privacy Policy
  • Home
  • Products
  • Feedback
    • Comments
    • User stories >
      • Mike Ridge
      • Tony Kay
      • Dave Bladen
      • Sue Crossland
      • Luke Dalby
      • McMaster University
      • Hangloose
      • Paul Waterhouse
      • Raf Sauvillers
    • User Videos
    • User Equipment
    • Organisations
  • Help
    • Features
    • Training Videos
    • How To
    • FAQ
    • Blog
    • User Manual
    • Video Settings
    • Webcams
    • Other Equipment
    • Release Notes
    • Terms of use
    • Contact
    • About
  • Try
  • Buy