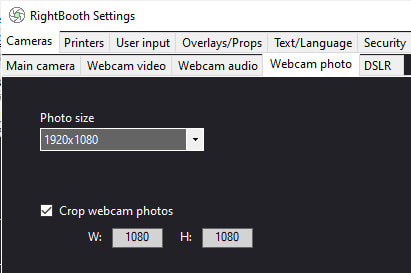
RIGHTBOOTH
  • Home
  • Products
  • Try
  • Help
    • Video Settings
    • Webcams
    • Other Equipment
    • Blog
    • How To
    • Training Videos
    • FAQ
    • User Manual
    • Release Notes
    • Terms of use
    • Contact
  • Feedback
    • Comments
    • User stories >
      • Mike Ridge
      • Tony Kay
      • Dave Bladen
      • Steven D Mills
      • Sue Crossland
      • Luke Dalby
      • McMaster University
      • Hangloose
      • Paul Waterhouse
      • Raf Sauvillers
    • User Videos
    • User Equipment
    • Organisations
  • About

Using Cropping To Create Square Videos and Square Photos

28/5/2016

0 Comments

 
Updated: Jan 2021
​
We had a request from a RightBooth user asking if it was possible to capture photos at the size 1080x1080 pixels, in other words, capturing square photos.

When asking why they wanted to do this, they showed us their required printer layout with four square photos arranged in a 2x2 grid placed above text as shown opposite.

This involves the use of photo cropping.
Picture

To Crop or Not To Crop?

If you look at the video and photo sizes listed in RightBooth Webcam Video and Photo Settings, you will see that your webcam can be set to provide a camera feed at one of a range of sizes, including 640x480, 800x600, 1280x720 and 1920x1080.
​
When you choose one of the webcam sizes, then your video and photo files will also be captured at these sizes.  You will notice that with all the sizes available, none of them are square.  So how do you capture square photos?
Here we will focus on how to capture photos at the size 1080x1080 pixels.

Applying Crop
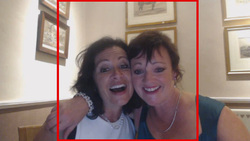
  • In RightBooth Settings, click on the Cameras tab, then select the  Webcam photo tab
  • Set the Photo size to 1920x1080  (this assumes your webcam offers this resolution, such as the Logitech C920)
  • Tick the Crop webcam photos checkbox
  • ​Set the W and H values to 1080​
Picture

How Cropping Affects The Photo Capture

Without cropping turned on, your photo files will be captured at 1920x1080 pixels like this:
Picture
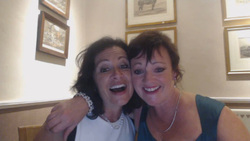
Photo saved at 1920x1080
But if you enable cropping (as described above) your photos will be cropped to the area indicated by the red outline and will be saved as square photo files having the dimensions 1080x1080 pixels.
Picture
Captured at 1920x1080
Picture
Photo saved at 1080x1080
You can see that by enabling cropping RightBooth will discard some of the webcam image in order to create your required photo aspect ratio.

Points to note:
  • When you turn on cropping, the cropped area will always be centrally over the webcam image
  • The cropping width and height value cannot be bigger than the webcam image
  • The cropped area is all that will be shown to users during the event, and is also the size that will be used in the Event Designer and the Print Layout Designer

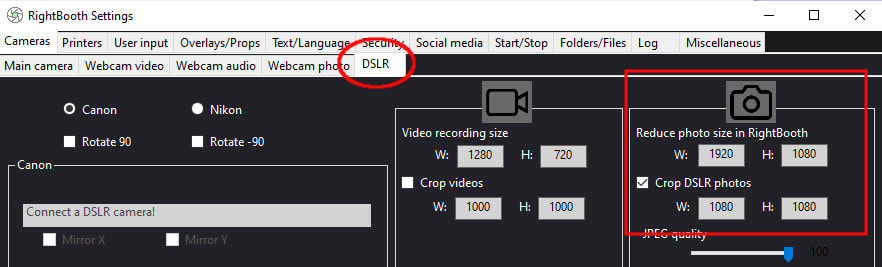
Cropping DSLR Camera photos
This is similar to cropping webcam photos.
  • In RightBooth Settings, go to the Cameras tab, then click the DSLR tab
  • Tick: 'Crop DSLR photos'
  • Set the W and H to 1080
Picture
0 Comments


Leave a Reply.

    Author

    Nigel Pearce

    View my profile on LinkedIn

    RSS Feed

    Archives

    February 2023
    January 2023
    December 2022
    November 2022
    October 2022
    September 2022
    August 2022
    July 2022
    June 2022
    May 2022
    April 2022
    March 2022
    February 2022
    January 2022
    December 2021
    November 2021
    October 2021
    September 2021
    August 2021
    July 2021
    June 2021
    May 2021
    April 2021
    March 2021
    February 2021
    January 2021
    December 2020
    November 2020
    October 2020
    September 2020
    July 2020
    June 2020
    May 2020
    April 2020
    March 2020
    February 2020
    January 2020
    December 2019
    November 2019
    October 2019
    September 2019
    August 2019
    July 2019
    June 2019
    May 2019
    April 2019
    March 2019
    February 2019
    January 2019
    November 2018
    October 2018
    September 2018
    August 2018
    July 2018
    June 2018
    May 2018
    April 2018
    March 2018
    February 2018
    January 2018
    December 2017
    November 2017
    October 2017
    September 2017
    August 2017
    July 2017
    June 2017
    May 2017
    April 2017
    March 2017
    February 2017
    December 2016
    November 2016
    October 2016
    September 2016
    August 2016
    July 2016
    June 2016
    May 2016
    April 2016
    March 2016
    February 2016
    January 2016
    December 2015
    November 2015
    October 2015
    September 2015
    August 2015
    July 2015
    June 2015
    May 2015
    April 2015
    March 2015
    February 2015
    January 2015
    November 2014
    October 2014
    September 2014
    August 2014
    July 2014
    June 2014
    May 2014
    April 2014
    March 2014
    February 2014
    January 2014
    December 2013
    November 2013
    October 2013

RightBooth logo
RIGHTBOOTH
​© 2013 - 2023 Aire Valley Software
News
​
Tutorials
​
FAQ
About
​
Contact
​
Terms of use and ​Privacy Policy
  • Home
  • Products
  • Try
  • Help
    • Video Settings
    • Webcams
    • Other Equipment
    • Blog
    • How To
    • Training Videos
    • FAQ
    • User Manual
    • Release Notes
    • Terms of use
    • Contact
  • Feedback
    • Comments
    • User stories >
      • Mike Ridge
      • Tony Kay
      • Dave Bladen
      • Steven D Mills
      • Sue Crossland
      • Luke Dalby
      • McMaster University
      • Hangloose
      • Paul Waterhouse
      • Raf Sauvillers
    • User Videos
    • User Equipment
    • Organisations
  • About