
|
RightBooth version 7.5.19 is released today.
This version now includes the ability to use the RightBooth green screen background removal feature when taking photos with a DSLR camera. Details on how to do this can be found here: https://www.rightbooth.com/greenscreen-setup.html
0 Comments
This video tutorial shows how to use RightBooth to design and present an interactive map or plan that will allow users to locate items on the plan. Typical uses include locating:
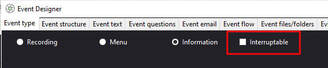
IMPORTANT Update: 27/10/20 I forgot to mention this important point in the video. Please ensure that you untick the following option: RightBooth Event Designer --> Event type --> Interruptible...  If this option is not ticked then the user can interact with any items on the information event screens that have click actions assigned to them. This will allow the seating plan interactivity to work as shown in the video.
If this option is ticked, then any user input into the event on any screen will cause RightBooth to interrupt the information event and start playing the event that is specified in the Event flow section of the Event Designer. New update released: version 7.5.14. This includes a new set of image assets that will help you when designing your interactive seating plan event screens for wedding receptions and other events: 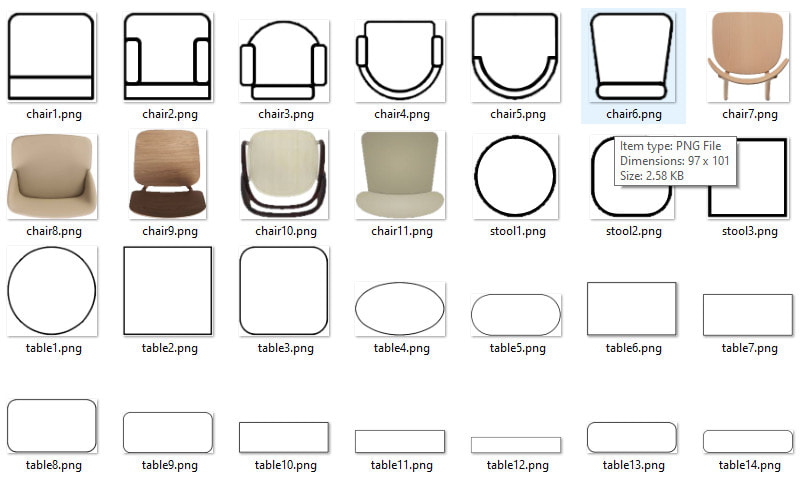 Note: You will need to download and install the full product from here to find these assets in the new library folder: Tables and chairs within the RightBooth Media Image Library. This release also adds the new feature: Add more screens which allows you to quickly and easily replicate a user defined screen multiple times in the Screen Designer. A training video will be posted soon that shows how to make use of these new assets and features when designing interactive seating plans within your RightBooth events. Update 26/10/20 If you are running RightBooth in a language other than English and you want these new image to appear in your RightBooth Media Library then you need to do the following:
C:\Users\Public\Documents\RightBooth7 Libreria\licensing.txt
If you would prefer to get the tables and chairs manually...
You may want to create many copies of a particular label item, such that each label contains a different word or phrase but is identical to the original label in all other respects, such as font style, colours, shadowing, etc. Starting with RightBooth version 7.5.13 you can now create copies of a label item, by right clicking on the label item and then from the popup menu choose: Create more labels – Click this menu option to show a dialog box into which you can type one or more lines of text. Then click the OK button to automatically create individual label items for each of the lines of text. Here is a example video of this enhancement in action: Starting with RightBooth version 7.5.12 you can now capture images of your event screens, saving them either as JPG files or PNG files. When the screen image is saved, all items on the event screen will also be captured and saved inclusively within the image. This feature is therefore useful in letting you use the Screen Editor much like a graphic design tool (such as the GIMP) for creating your own image designs composed from multiple items on the screen. To capture an event screen, first show the chosen screen in the Screen Editor, then right click anywhere on the screen background (i.e. avoid clicking on any of the items on the screen). You will then see a popup menu containing the following choice: Capture screen – You can click this menu item to show a File Save dialog box, prompting you to save the event screen as an image in the Backgrounds section of your RightBooth Media Library. Note that in the dialog you can choose to save the image either as a JPG or a PNG file. This screenshot shows an example of saving a Menu screen as a JPG file in the RightBooth Backgrounds folder... 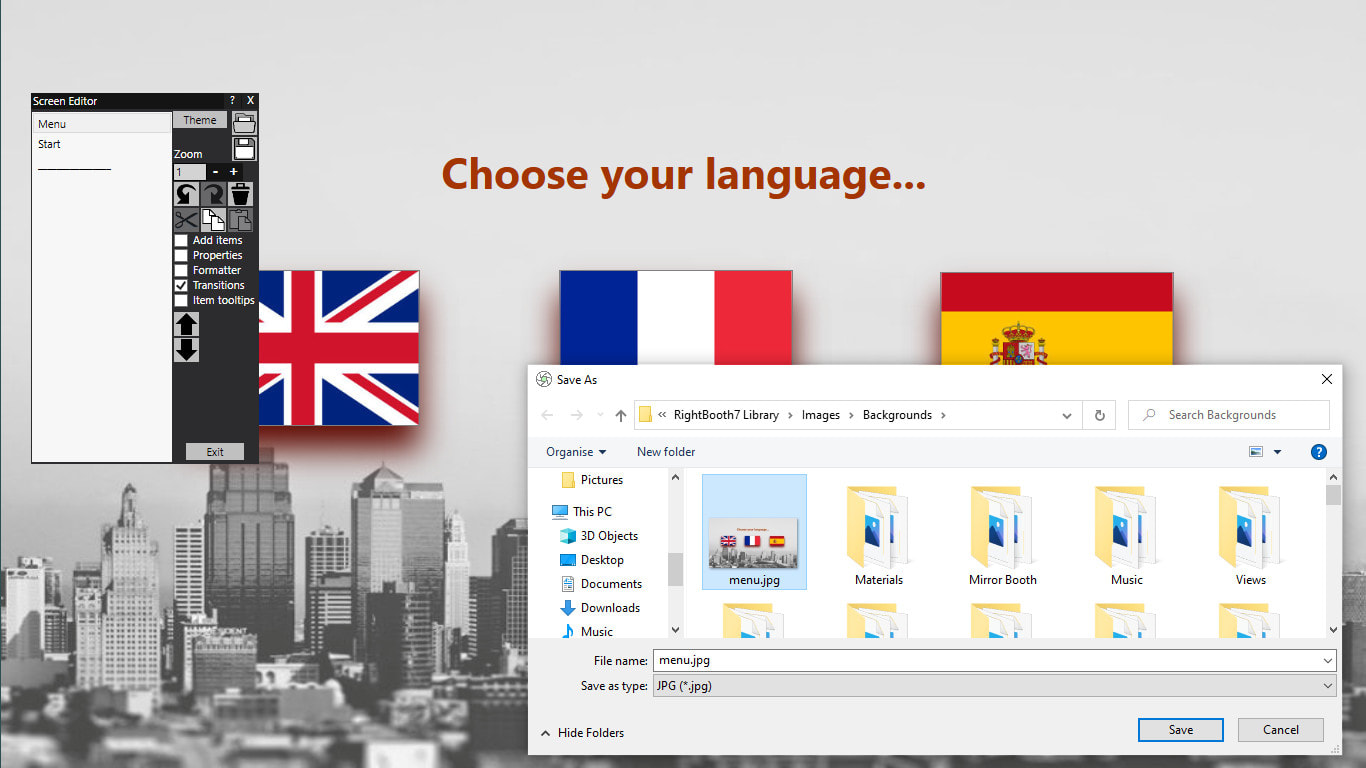 Updated 02/06/21 Starting from RightBooth version 7.5.10 you can now configure RightBooth so that it accepts spoken commands for controlling the playing event. How To To turn on voice commands, go to RightBooth User input settings and tick the option: Voice. Then in addition to your chosen user input method (e.g. Mouse or Touchscreen), voice commands will also be enabled for all your events. You will need to ensure your event is designed for voice commands as follows: In the Screen editor, on each event screen where you would like voice command control, add one or more label items. Type the word or phrase into the label item(s) that you would like to be used as a voice command. Then add an appropriate click action on the label item. For example, if you would like RightBooth to progress from the Start screen to the next screen in the event by saying ‘Start now’:
By default, some event screens have label items with predefined click actions and are therefore automatically enabled to accept voice commands. Examples include:
When speaking your commands, RightBooth voice recognition takes the spoken input from the Windows default microphone input device, so you must ensure that you have a working microphone attached to your system. This can be configured in Windows Settings under the section: System--> Sound. Check out this latest training video on Voice Commands: And here is the event file I used in the video. Simply download and save it in the folder: C:\Users\your_user_name\Documents\RightBooth7
Here's an idea for how you might use Voice Input: And here is the event file I used in the video:
Note: The label items containing each of the spoken guest names are positioned off the right hand edge of the Start screen. So in the Screen Editor, if you zoom the view down to 0.7 you will see them. Tips for Improving RightBooth Voice Recognition Accuracy
 1 - Create an information event
 2 - Make the Event Passive You don't want anyone interacting with the event, so you can make it ignore all user input. Note this action is only necessary if you are going to be displaying your event on a touchscreen.
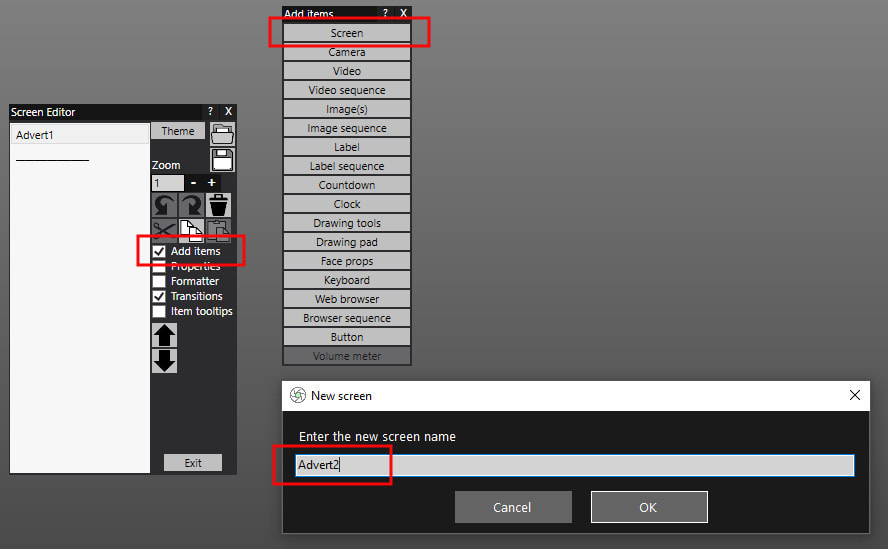
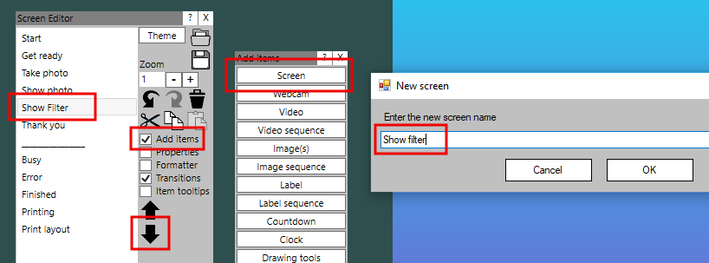
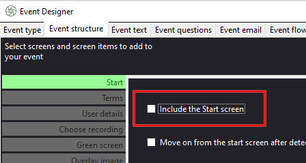 3 - Remove the Start screen
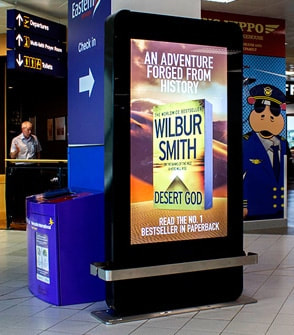
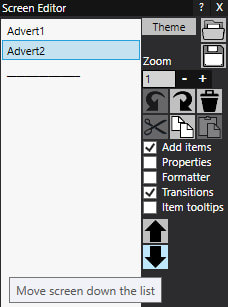
4 - Add some screens to your event This is where you need to plan your screens and get creative. Decide how many screens you require and what you want to show on them. For our example we will show 2 adverts.
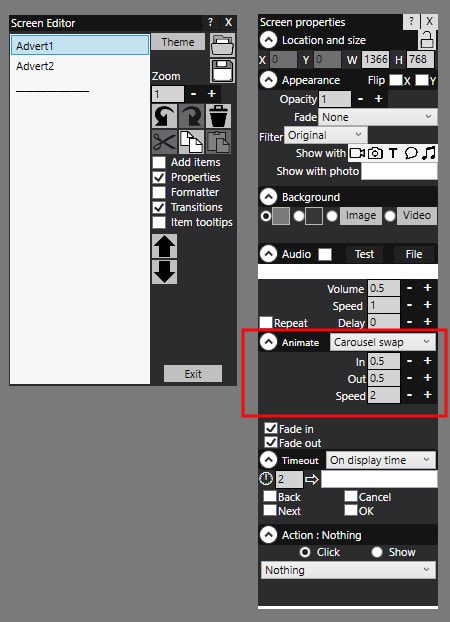
5 - Set the Display Time for each Screen
 Note in the above screen shot, the textbox next to the '4' seconds is empty. By leaving this text box empty, ( when the event is playing ) RightBooth will move on to showing the next screen in the list (Advert2) after 4 seconds. And if you also leave this box empty for Advert2, RightBooth will go back to showing the first screen in the list (Advert1) after Advert2 times out. 6 - Add content to your screens Now you can get creative and add your text, images, videos and or web pages to each of your screens. There are lots of tutorials on our website on how to do this. 7 - Save and Play Your Event In our example, our event will run indefinately, alternating between showing Advert1 and Advert2 for 4 seconds. You are obviously free to add as many screens as you require for your information and advertising kiosk. Further Suggestions Auto advancing video If you are playing a video on one of your event screens and you would like RightBooth to move to the next screen when the video finishes, just set the screen timeout property to: 'On video item'. Here we have added a video item to the Advert1 screen and we have set the screen property to 'On video item': 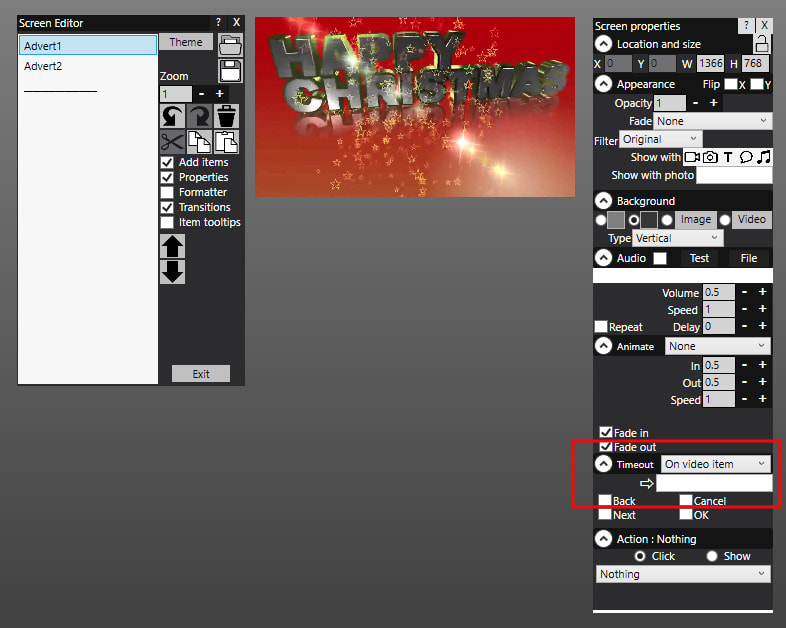 Screen Animations When playing the event, by default RightBooth will simply cut from one screen to another without any animation effects. Try adding an animation to each screen.
 Notes:
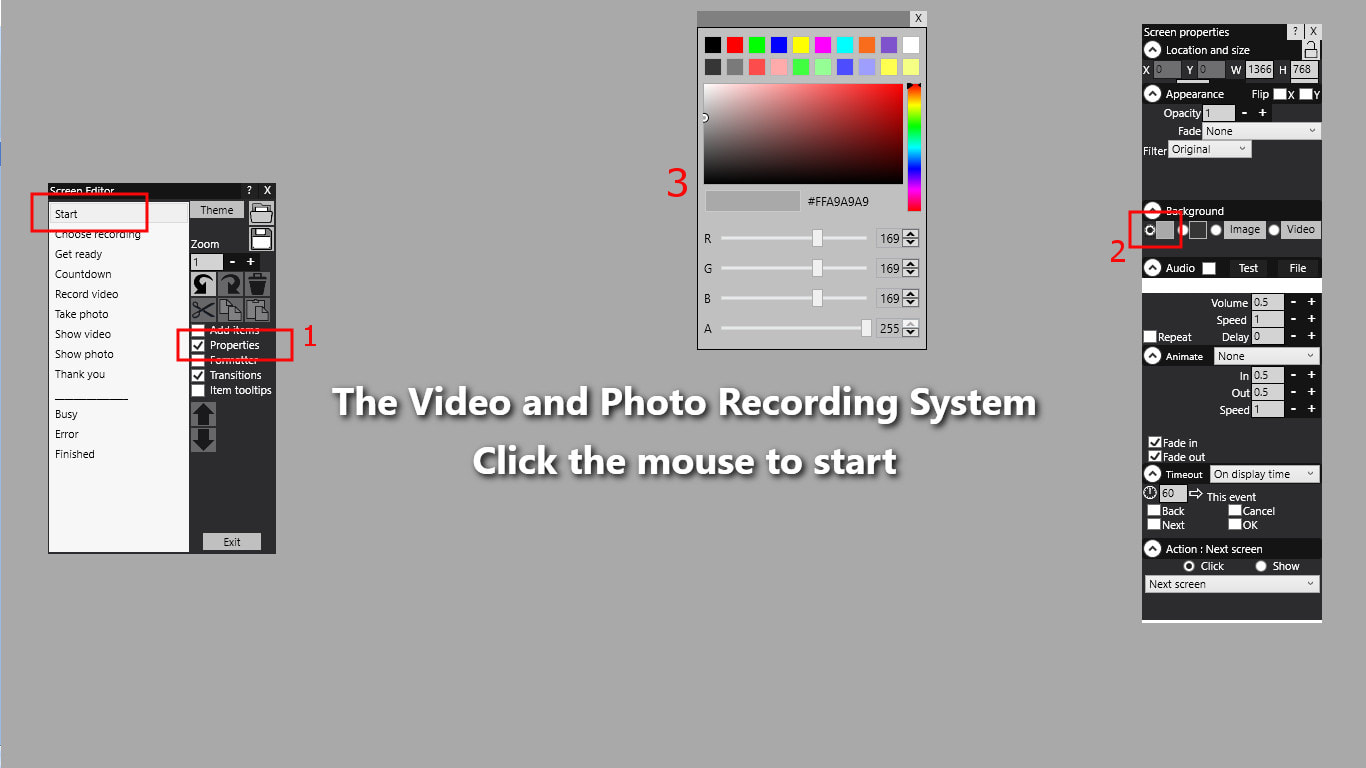
Random Ordering of Screens You can name your screens is such a way that RightBooth will display them in a random order. Full details available here: Random screens Updating Screen Content Remotely It is possible to alter the content of your screens without actually stopping the event from playing or from having to physically visit the kiosk. Full details on how to do this can be found here: Making Remote Changes Starting with version 7.5.7 we have now relaxed the licensing restrictions on RightBooth to allow you to install the software (together with a purchased product code) on equipment that you are to provide to third parties on a permanent basis (e.g. system sales). This process will be deemed a transfer of software ownership and all you need to do is to inform us of the new owners of your product together with the installed RightBooth product code(s) at the time of sale/transfer so that we can update our product code database accordingly. Please note that this new licensing provision does NOT apply to any earlier version of RightBooth so if you intend to provide RightBooth powered equipment to others on a permanent basis, please make sure you include RightBooth version 7.5.7 or higher on your equipment. See here for more details on the general Terms of Use for RightBooth: https://www.rightbooth.com/terms-of-use.html Also please refer to the new license wording that now ships in version 7.5.7 (or higher) which can be accessed by clicking the 'View license' button on the RightBooth 'About' panel: 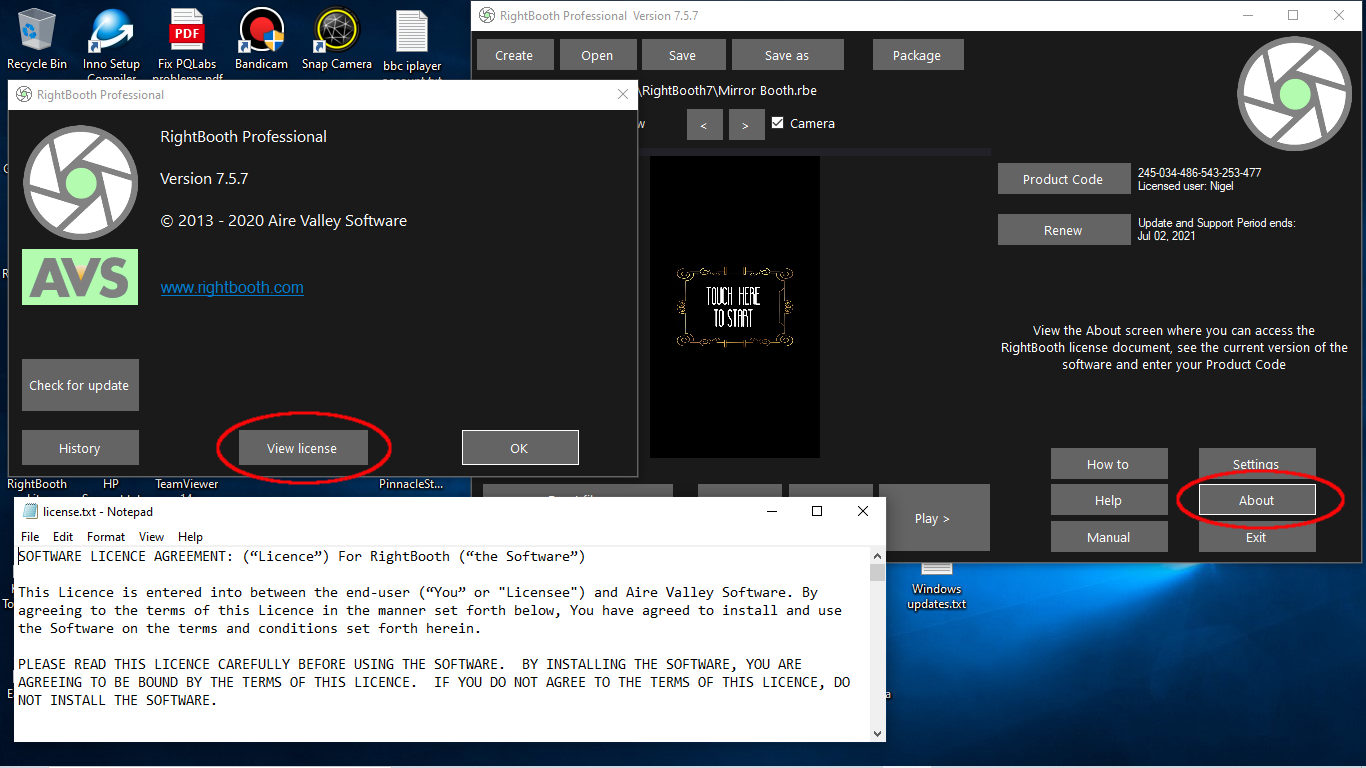 Starting with RightBooth version 7.5.5 it is now possible to give your event screen(s) a transparent background, which then lets you place event screen content directly on top of other applications. This then provides you with a quick and seamless way to access RightBooth's features directly within other applications. We will explain this feature using the following scenario: You are going to give an interactive presentation using a series of Powerpoint slides and you also need the ability to use RightBooth at any time during your presentation in order to take a photo or record a video. Here’s how: 1 - Configure RightBooth for transparent event screen overlay
We’ll now make use of these features. 2 - Create an event with a transparent background Create a standard RightBooth event that lets users choose to record a video or take a photo. The event has a Start screen which is edited to have a transparent background as follows:
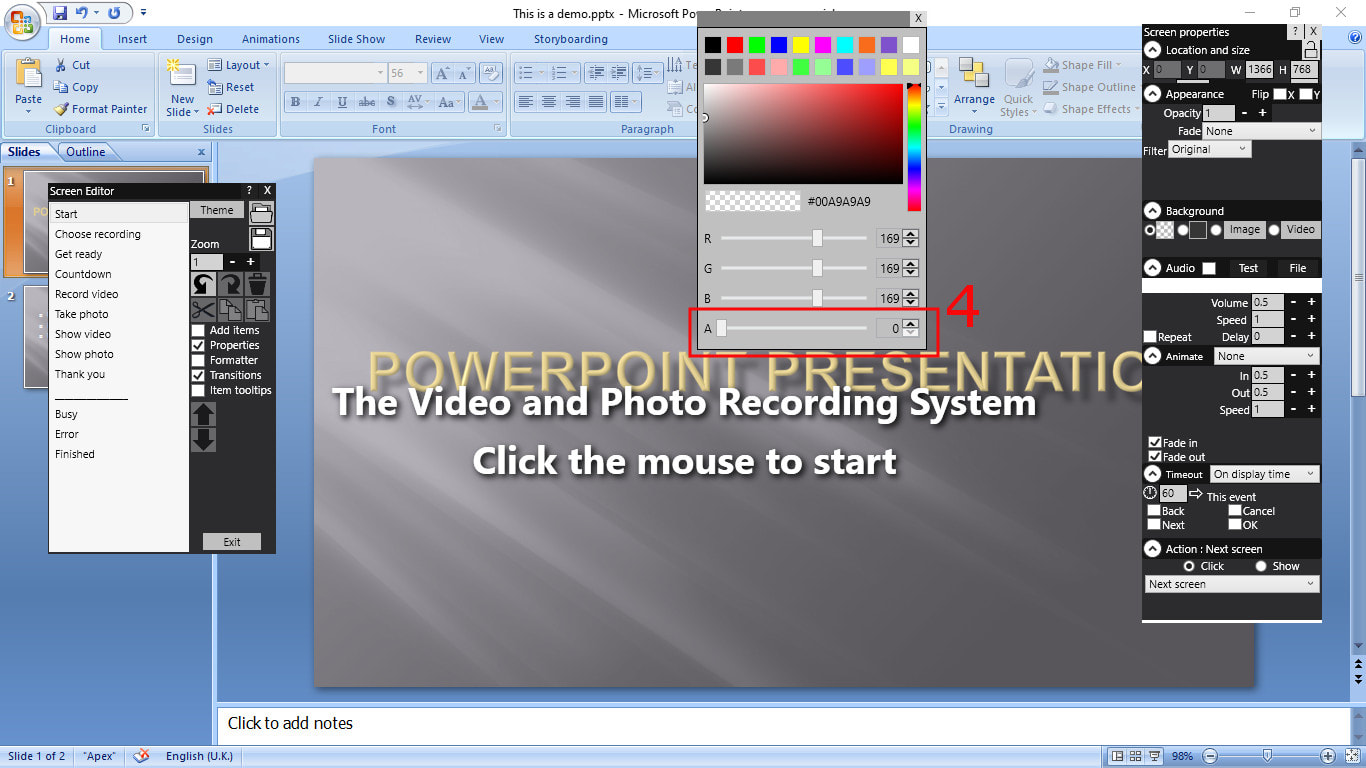 You will now find that the underlying application is both visible and able to be interacted with. In our example screenshot above you can now clearly see Powerpoint running behind RightBooth. 3 - Position Event Screen Content Continuing with our example, return to the Powerpoint application and start the presentation playing fullscreen, and then return back to the RightBooth screen editor to see the following result with the event screen content showing on top of the fullscreen Powerpoint slide: 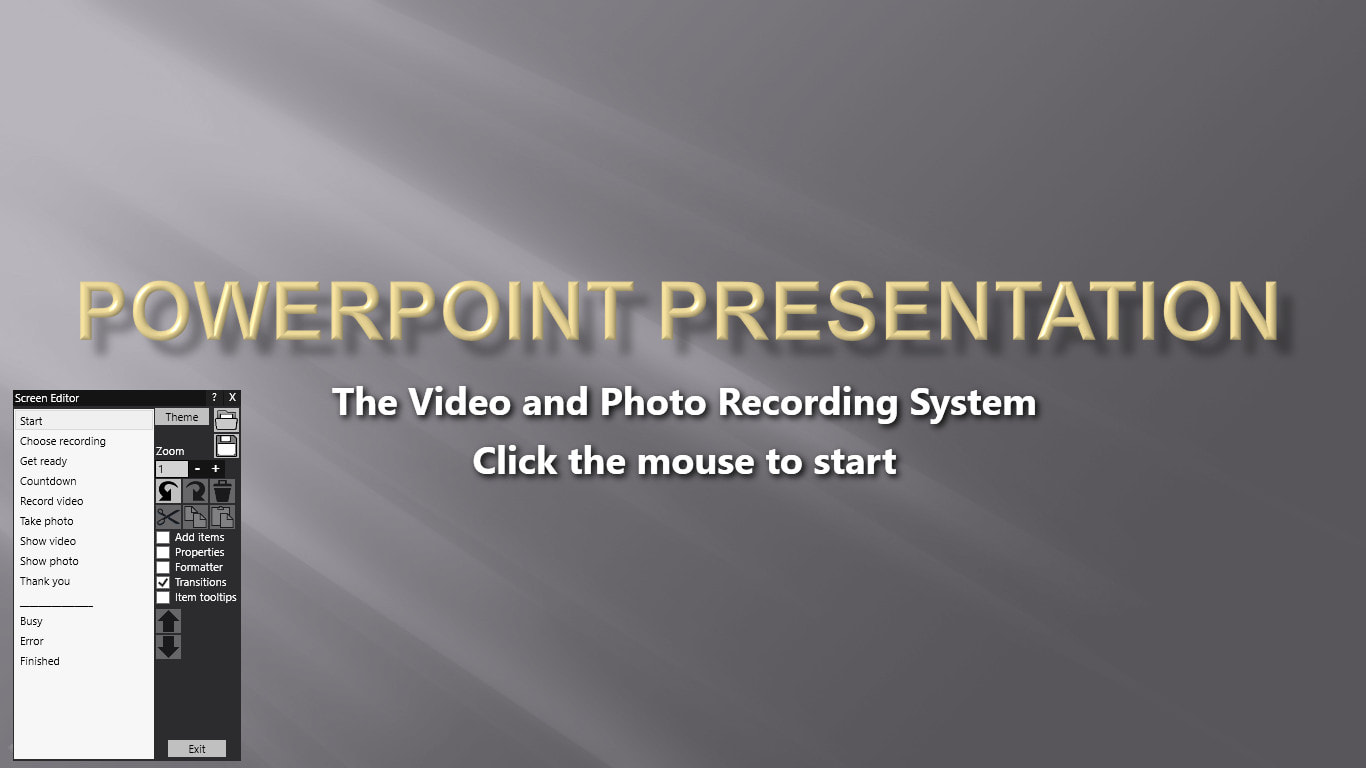 At this point you can now edit, size and reposition the RightBooth screen content so that it composes better with the underlying application. In this screen shot we have edited the RightBooth text, changed its colour to match the Powerpoint text, and moved it so that it sits in the bottom right corner of the Powerpoint slide: 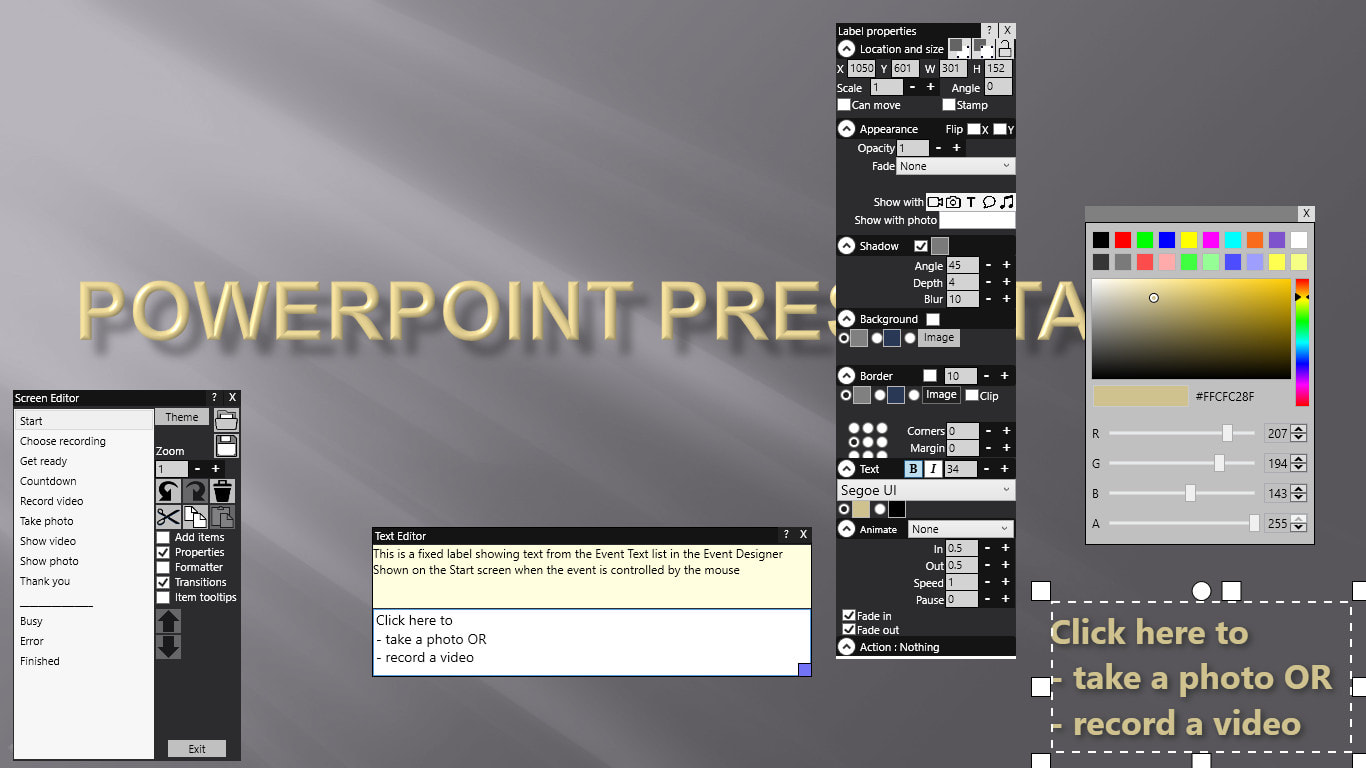 4 - Play the Event Now save and play the event file to see the following result showing the Powerpoint slide running behind the playing RightBooth event: 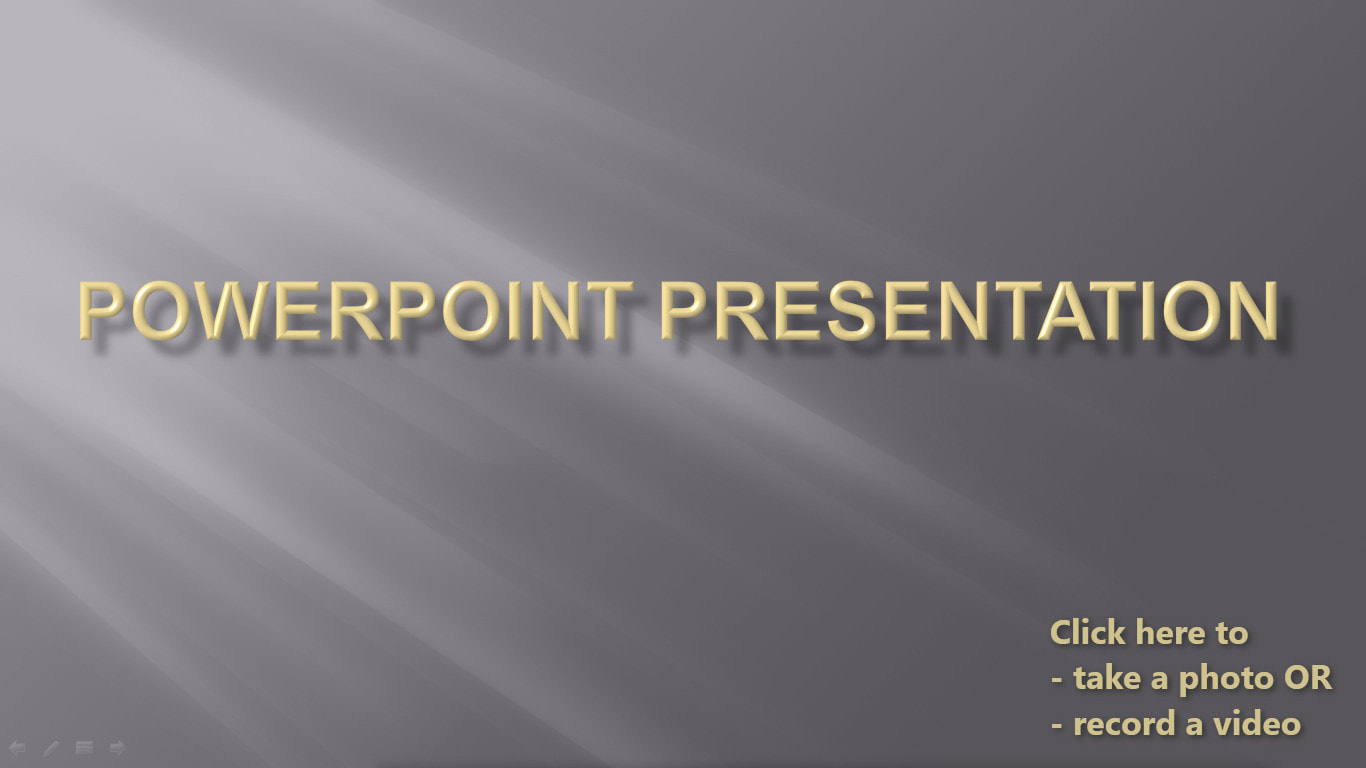 In this situation, Powerpoint continues to be fully interactive, so clicking on the Powerpoint slide will cause it to progress to the next slide while continuing to show the RightBooth transparent Start screen text at the bottom right: 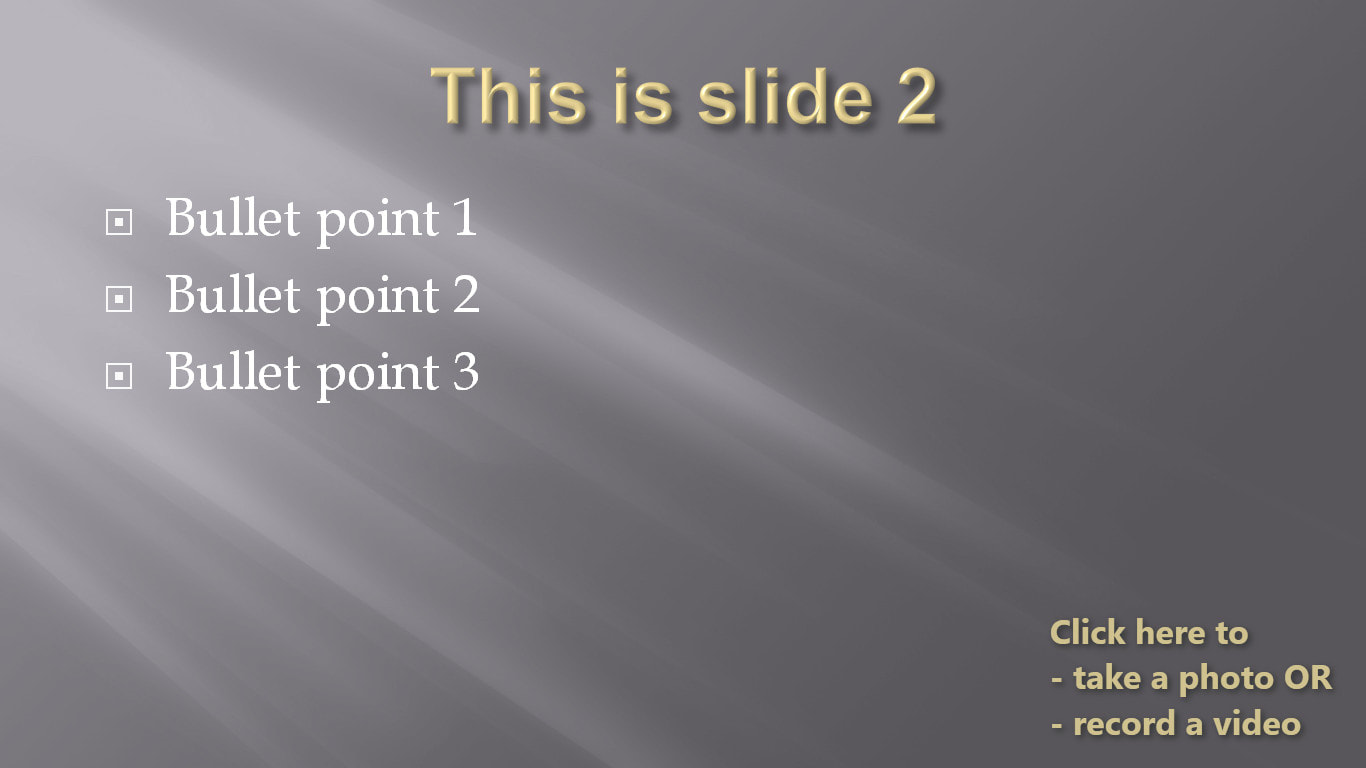 If you click (at any time) on the RightBooth text you will then be shown the next screen in the RightBooth event, effectively hiding the Powerpoint slide and allowing you to take a photo and/or record video, and after completing the task RightBooth will return to showing the transparent Start screen again, at which point you are able to continue interacting with the Powerpoint presentation. Here’s another example of mixing RightBooth with the Sky Go app. This is a screen shot of Sky Go without RightBooth overlaid: 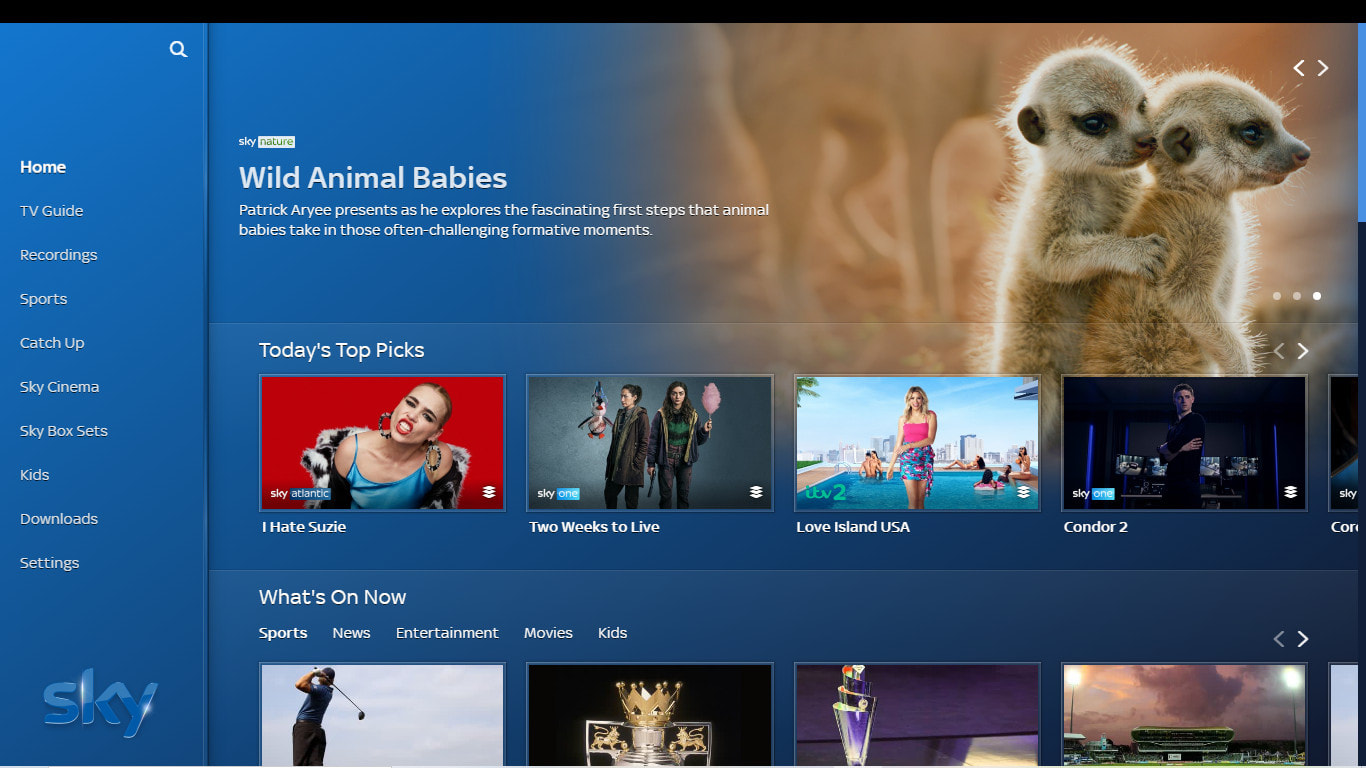 And here is RightBooth overlaying a blue styled button and text which gives access to take a photo: 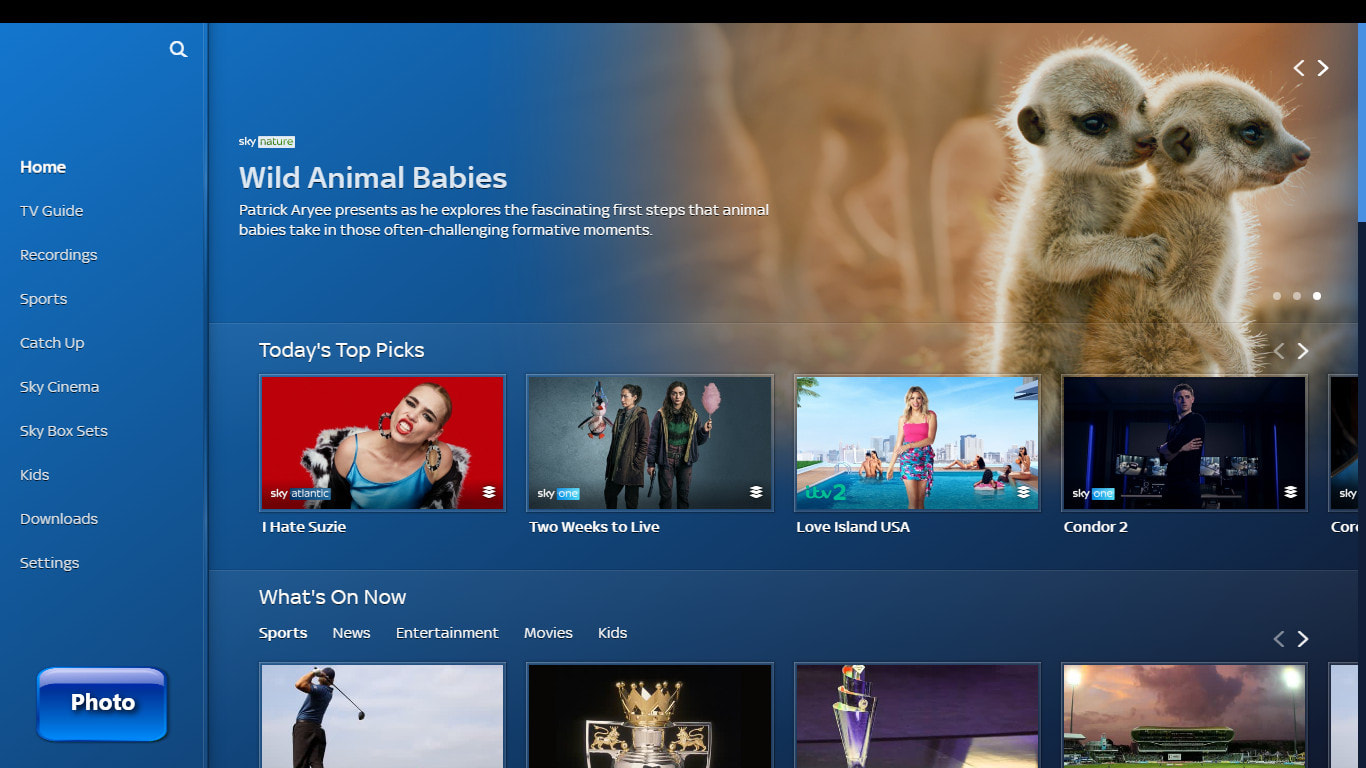 I’m sure you creative folk will think of other uses for transparent event screen backgrounds. And many thanks (once again) to Mike Ridge for suggesting this new feature.
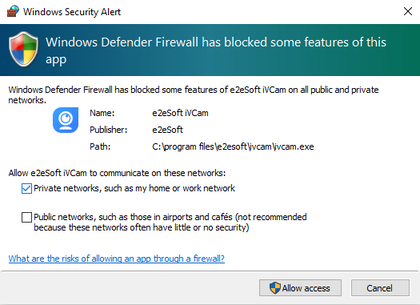
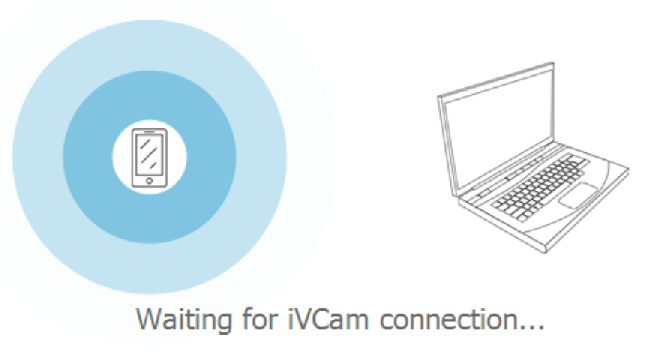
Modern phones and graphics tablets are fitted with extremely good cameras that rival (or even surpass) the quality you can expect from many webcams. So wouldn’t it be great if you could use your phone or tablet to provide its camera input into RightBooth while it is running on a Windows computer? Well now you can ! This article explains how to hook up your phone or iPad to a Windows computer and then use it as a webcam for recording videos and photos in RightBooth. As an example, here you can see the live camera feeding from an Apple iPad directly into RightBooth which is running on a laptop running Windows 10: 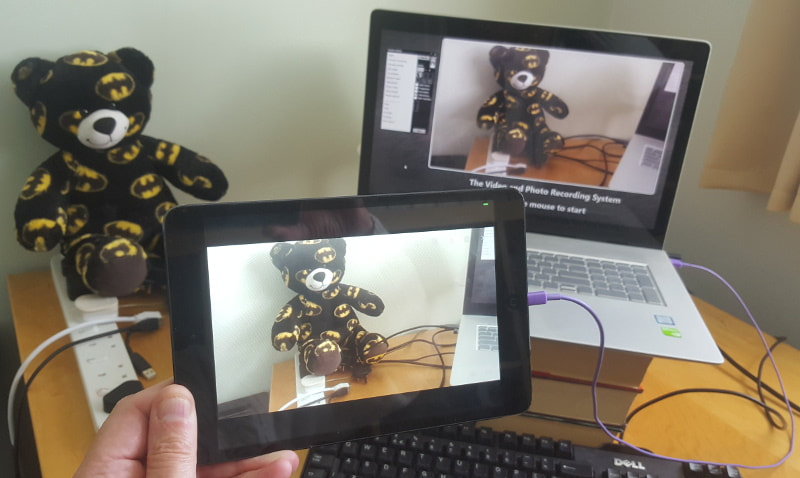 Note: Throughout this article where appropriate we will refer to your iPhone, iPad or Android phone as ‘your device’. Installing and Setup On Your Windows Computer 1) If you are planning to use an Apple device ( iPhone or iPad ) then you must install iTunes on your computer. Freely available here: https://www.apple.com/za/itunes/download/. Note: If you are planning to use an Android phone, then iTunes is not required. 2) Download, install and run iVCam from here: https://www.e2esoft.com/ivcam/ iVCam is an amazing piece of software that allows you to obtain the camera feed from your device and present it to Windows as a virtual webcam for use in RightBooth.
On Your Device
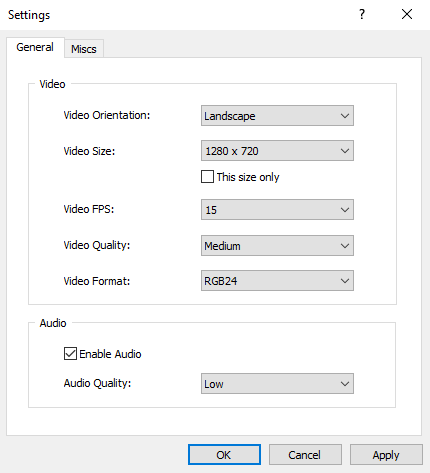
Note: If you purchase a Product Code for iVCam on your computer, it is not then necessary to purchase another code for the iVCam app on your device. If all is well, then the iVCam app on your computer will connect to the iVCam app on your device and you will see the live camera feed on your computer. Configuring iVCam On Your Computer In the iVCam app on your computer set the audio input to Speaker (e2eSoft VAudio): 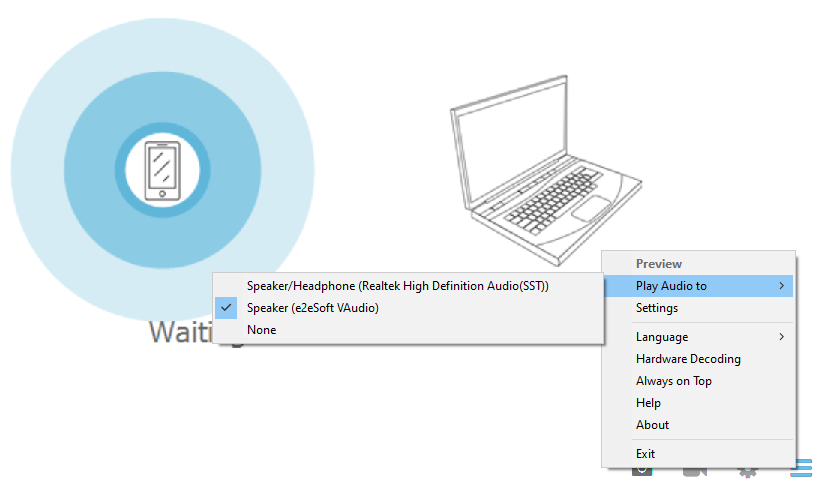 Then click Settings and choose video settings to suit your requirements.
Note that each time you Apply new settings in iVCam you may need to restart the iVCam app on your device. Once you have configured iVCam and it is showing the feed from your device, you can effectively minimise the app to the Windows Taskbar and forget about it. Recording Audio To be able to capture audio from your device you may need to download and install the Virtual Sound Card app on your computer: https://www.e2esoft.com/vsc/.
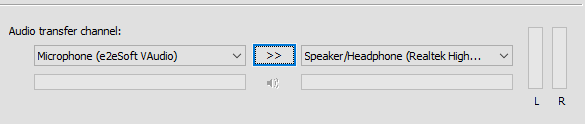 Then click the ‘ > >’ button to start the Virtual Sound Card:  Like iVCam, Virtual Sound Card will run in Trial mode, allowing you to evaluate it. If you find it works for you then you can purchase a Product Code which at the time of writing costs around $20. Configuring RightBooth to Work With iVCam

IMPORTANT. The ‘Default’ options were introduced in RightBooth version 7.5.3 to correct a bug that exists specifically when using iVCam. iVCam sometimes fails to provide the correct video sizes to RightBooth, which effectively means that in this situation the RightBooth Video size list cannot always be relied upon. However, by choosing the Default option, RightBooth will interrogate the webcam driver directly to determine which video size was chosen in the iVCam settings (see earlier). Therefore we recommend that you upgrade to version 7.5.3 for this solution to work correctly. If you are using a version of RightBooth less than 7.5.3, you may run into problems where RightBooth could be using the wrong size for its iVCam video manipulations, which in turn will cause issues with many of RightBooths features, including video cropping, overlays, inking, stamps and item positioning in event screens and print layouts. That’s it. Job done ! RightBooth will now use your device to record videos and take photos, and the quality is very good. OK. Imagine how thin you could make your physical video booth housing if you used an iPhone instead of a webcam or a DSLR camera. !! Happy building. A special shout out to Mike Ridge for drawing my attention to iVCam and also for helping me to work all this out. Cheers, Nigel. Today we are releasing RightBooth 7.5.0.
This is a new major product release. You can find details of what's new here. Notes
You may have noticed that some fonts do not appear in RightBooth's Screen Editor font list. This is an issue that affects many Windows applications and to be honest I am not 100% sure why this happens. But there is a solution... It is possible to create a new font (from the offending font) which will then be compatible with (and appear in) RightBooth. Here's how: For this article I will use the font Calissha Script, which can be downloaded here: http://fontsfree.net/calissha-script-webfont-font-download.html If you install Calissha Script in Windows and then run RightBooth you will find that it does not appear for selection in RightBooth's font list even though it has installed correctly in Windows. To resolve this:
The new font will be downloaded to your PC and you can then install this into your Windows fonts as follows:
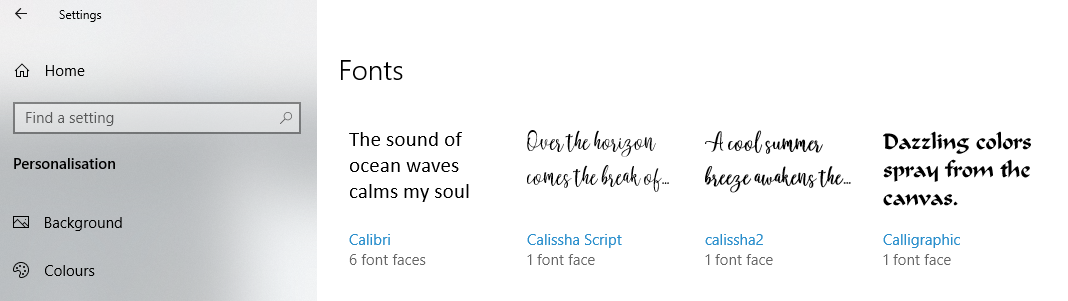 Now when you run RightBooth you will be able to choose the 'calissha2' font in the Screen Editor font list... 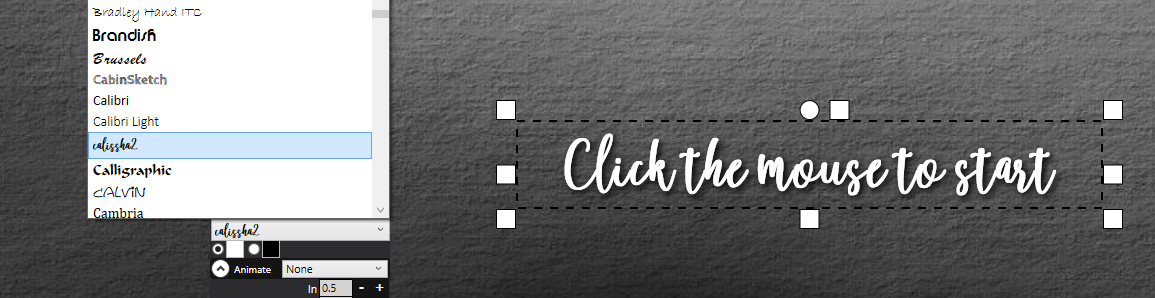 Note in the above screen shot that the 'Calissha Script' font is not listed.
If anyone knows why this happens, please let me know. You may have noticed a drop in activity on the site recently.
We are all currently experiencing the most challenging and unprecedented time in living memory and like many of you our business has been adversely affected by the sharp downturn in global activity. Having said this, it has provided an opportunity to concentrate on developing and adding new features into RightBooth. More information to follow within the next few weeks. I wish you all well and please stay safe. Nigel. Starting with RightBooth version 7.3.28 the way that screen items are resized has changed.
To size an item in the Screen Designer, first click on any item on the screen in order to select it. This will then display the pickup sizing boxes on the right side edge, the bottom edge and the bottom right corner of the selected item. Now you you have two sizing options:
Updated: Feb 2021 RightBooth can allow other applications to modify your photos as part of the RightBooth event flow. This article explains how to apply Photoshop filters to your RightBooth photos. Step 1 - Get Photoshop Perhaps it goes without saying but the process described in this article will only work if you actually have a copy of Photoshop installed on the same PC as RightBooth. At the time of writing, Photoshop is no longer available as a single purchase product, so you must take out a monthly subscription. This can start out from as little as £8 per month on a rolling contract. Visit www.adobe.com for all the details. Step 2 - Create some Photoshop Droplets What are Photoshop Droplets? A droplet is an executable file generated by Photoshop that allows you to apply a set of actions to an image just by providing the droplet with the filename of a photo. When the droplet runs, it will open Photoshop, load the RightBooth photo, then apply all the actions to the photo and re-save the modified photo with the same filename, overwriting the original. Using this approach, you can create droplets that can modify photos in many different ways using any of the incredible photo manipulation features available in Photoshop. This article will not be explaining how to create Photoshop droplets, there is a huge amount of information on how to do this on the Internet. Here is a typical article: https://pixel77.com/how-create-droplet/
Step 3 - Use the Droplet in RightBooth To do this:
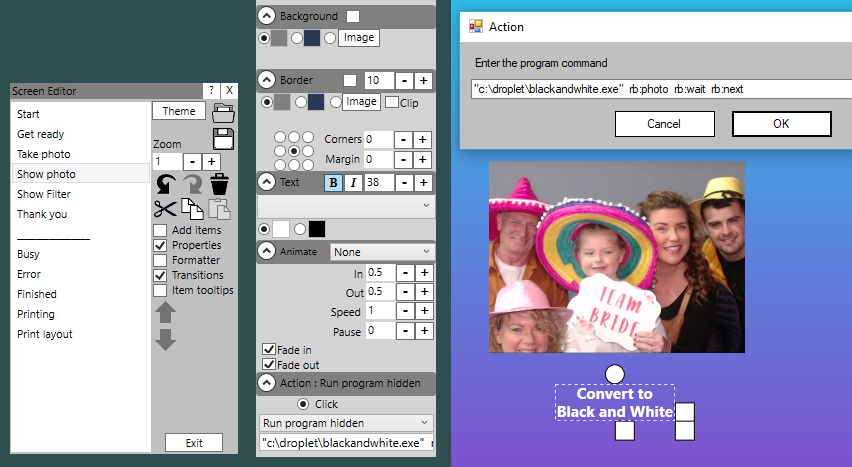 Now when the event is played and a photo is taken, if the user clicks (or touches) the label item, RightBooth will:
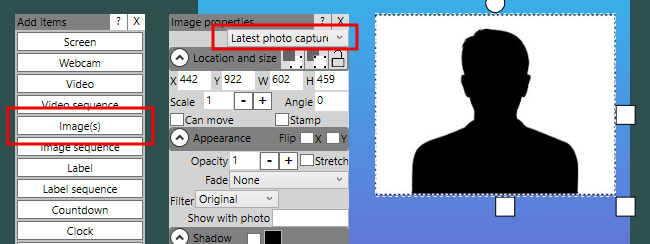
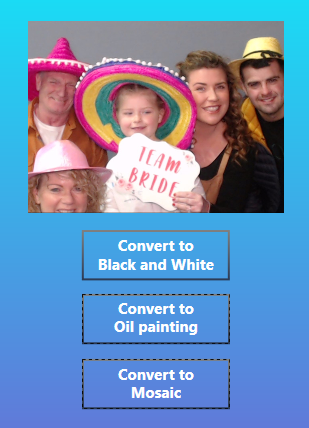
Step 4 - Show the modified photo in RightBooth In order to show the user the resulting modified photo:
 Now when the event is played if the user clicks (or touches) the 'Convert to Black and white' label item on the 'Show photo' screen, RightBooth will then show the modified black and white image on the 'Show Filter' screen.
Allow Users to Change their Filter Choice If you would like users to try a different filter after having chosen one:
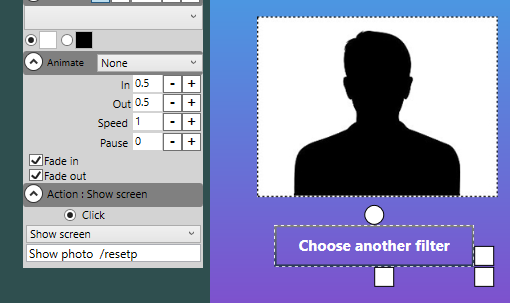 Now when the event is played if the user clicks (or touches) the 'Choose another filter' label item on the 'Show Filter' screen, RightBooth will return to the 'Show photo' screen and will show the user the original, unmodified photo again ( due to the /resetp parameter ), allowing the user to select another filter. Prevent Photoshop appearing
When a Photoshop droplet runs it will automatically open Photoshop and apply all the actions to the photo. This may cause Photoshop to appear in front of your event when the user selects one of the filters. To prevent Photoshop appearing you can set the RightBooth event to remain on top of all other applications as follows:
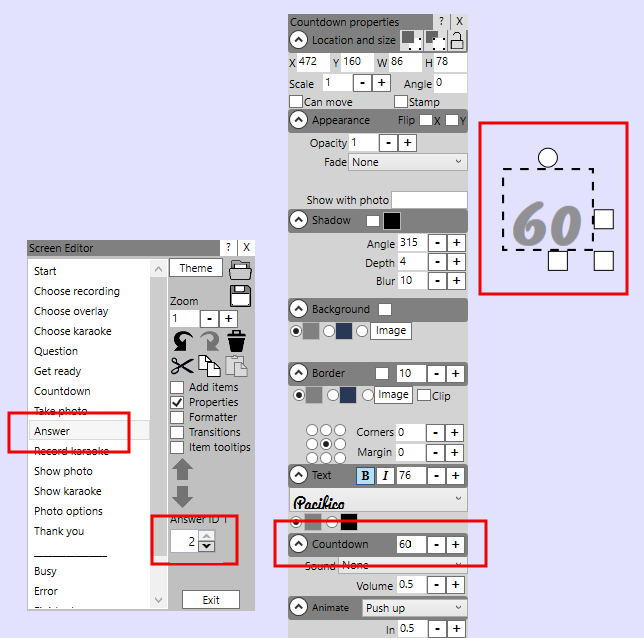
Updated: Jan 2021 If your RightBooth event contains questions that require video answers then the recording time for each answer is initially set to the value you have entered in the Maximum recording time text box. Here you can see we have set the event to be a Question event and the default recording time has been set to 40 seconds: 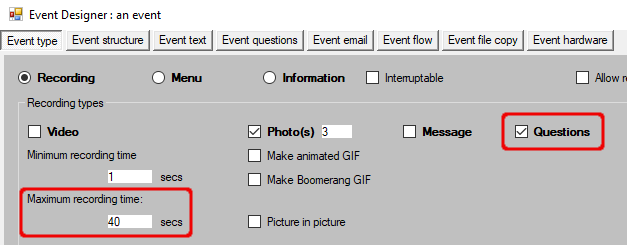 In this example, every time you add a new question to the Questions table (in the Event questions section) the question will be given an initial video recording time of 40 seconds. However, once a question has been added to the event, subsequent changes to the Maximum recording time value will not alter the recording time for any of the existing video answers in the event. This is because each defined video answer maintains its own independent recording time once it has been created. So what if you want to alter the recording time for one (or more) of the video answers in your event? Here's how:
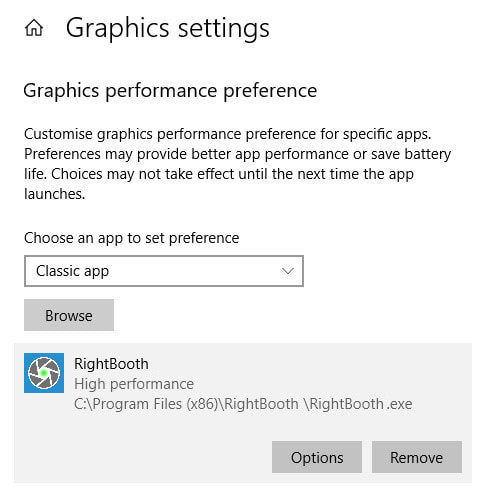
 RightBooth is a graphics intensive application, especially if you are using multiple video files and graphics animations in your event designs. For this reason you may find that it performs better if you add RightBooth to the Windows 10 graphics performance list and set it to 'High performance'. To do this:
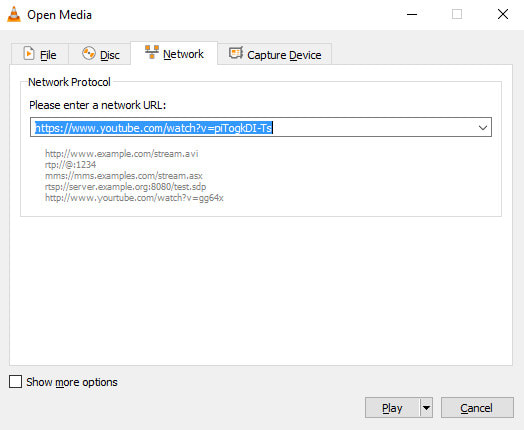
 Over the years I have tried many apps and online utilities for downloading videos from the Internet, especially YouTube. These utilities tend to come and go, and some of them can install all kinds of unwanted files, services and viruses on your PC. This article describes what I consider to be one of the safest methods for downloading videos from the Internet. Step 1 - Get VLC Media Player This excellent and well trusted freeware app can be downloaded here: https://www.videolan.org/index.html Step 2 - Obtain the URL of the video you want to download For example in YouTube find a video and start it playing. Then right click on the playing video and choose: 'Copy video URL' from the popup menu. Step 3 - Paste the Video URL into VLC and Start it Playing
 Step 4 - Get the Video Location URL Once the video starts playing in VLC media player, on the main menu select: Tools --> Codec Information and then copy the Location URL: 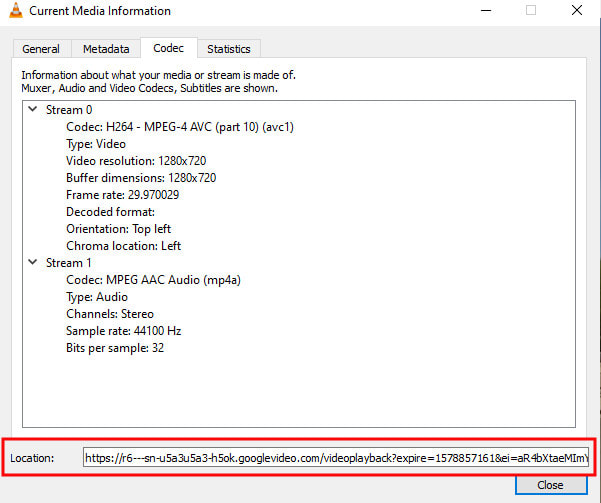 Step 5 - Enter the Location URL into your Browser Address Bar
Navigate to the video location by pasting the copied location url into the address bar of your browser. When the video is playing in your browser, right click on the playing video and choose 'Save As' from the popup menu to download the video to a chosen folder on your PC. Job done, and without any risk of installing unwanted garbage on your PC :-) RightBooth version 7.3.19 has just been released. It allows you to add video backgrounds to your karaoke video recordings (and your standard video recordings). Here's a small section of a karaoke video I received from a RightBooth user. It was created using the karaoke recording feature and the real-time green screen video background replacement feature. It was recorded at 720p, 30fps using a Logitech C920 and it just shows what you can achieve when you have the right equipment, the right lighting and the right software... And here is a photo showing the actual green screen background set up that was used for the karaoke video recording: 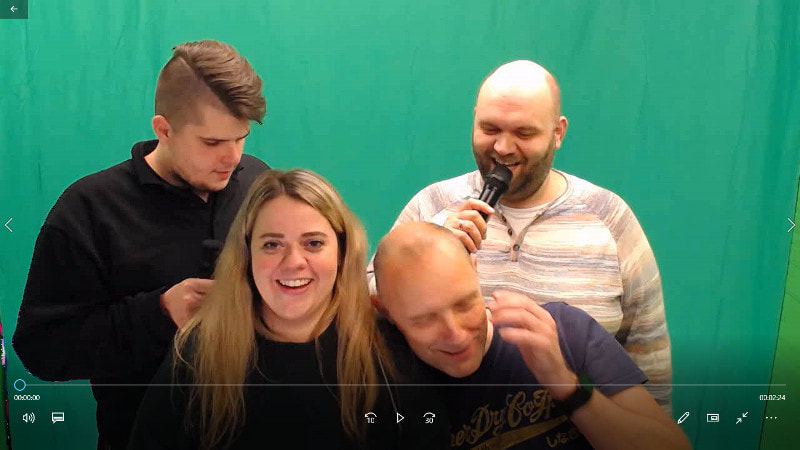 When recording videos with a webcam you might want to encourage your users not to shout into the mic by providing visual feedback on the current audio input level during the recording. This is where the volume meter item comes in handy.
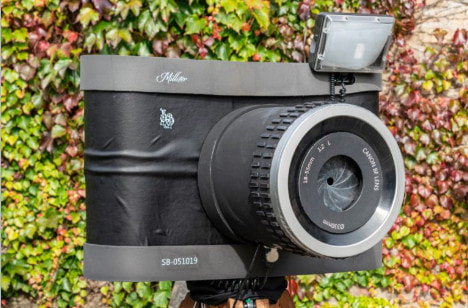
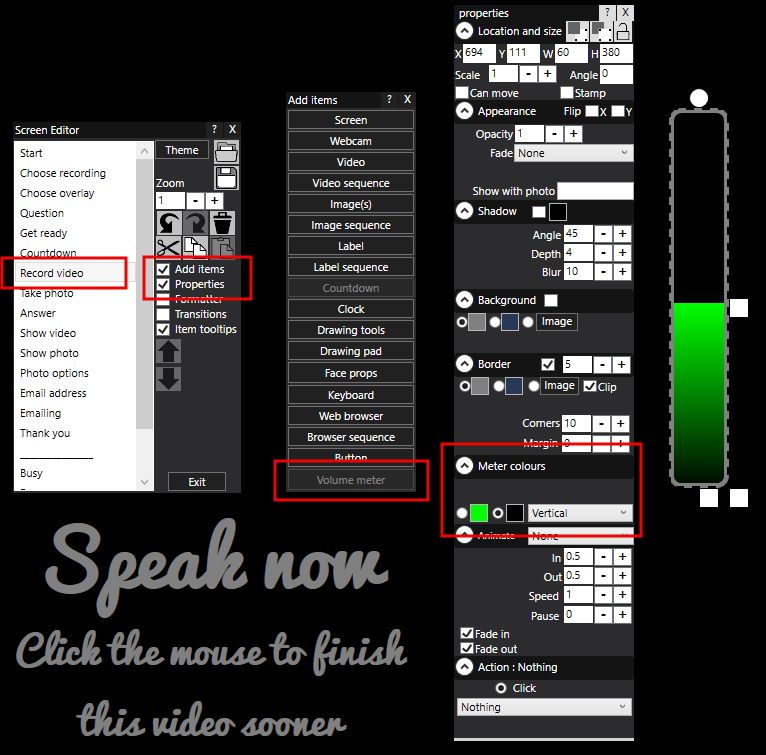 Now play the event and when you record videos the volume meter will show you the current audio input level. This video shows how the meter provides constant feedback, using my drill to provide a consistent noise ! :-) ... DISCLAIMER: Please be advised that the hardware configuration and wiring information presented in this article has not been reviewed by qualified people with the expertise required to provide you with complete, accurate or reliable information. Therefore we (Aire Valley Software) cannot guarantee the validity of the information found here and we do not guarantee expressly or implicitly, nor take on any legal responsibility about the correctness, the exhaustiveness or the usefulness of the information. For these reasons we cannot be held liable for any problems that may arise as a result of acting upon this information. You should ALWAYS seek the advice of a qualified professional electrician. Article COB LED lights produce excellent light and these can be used to greatly improve the quality of your webcam (and DSLR camera) photo capture quality, especially when the room's ambient lighting conditions are not great. This article shows you how to design your own low cost 'flash setup' using COB LED lights situated near your webcam which point towards your users and are automatically controlled by RightBooth’s USB relay switch action command. Step 1 - Items list Obtain the following items:
Step 2 - Build Connect the items together as follows, you don't need a soldering iron :-)... 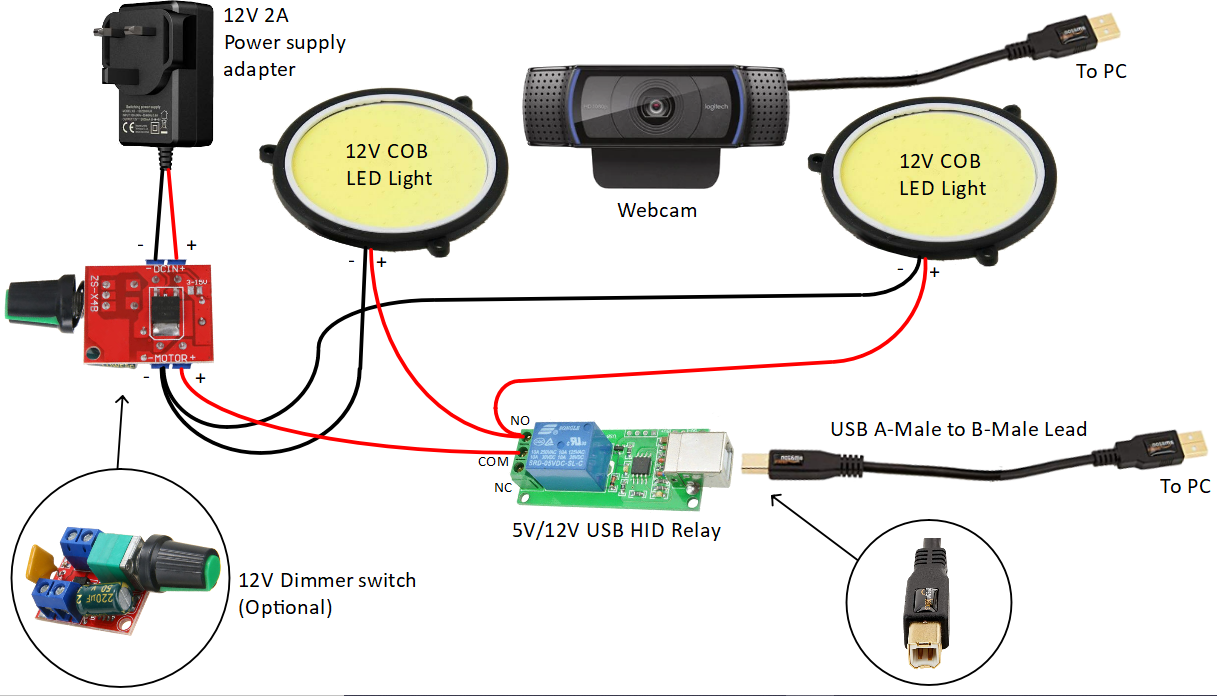 Note that in this setup the single switch USB relay takes its power from the PC via the USB port. 1 and 2 way relays can take power from the USB but if you are using a 4 way relay (or larger) you will need an additional 12V adapter to power it. Step 3 Testing Make sure your flash setup is powered, and the webcam and relay are both connected to USB ports on your PC.
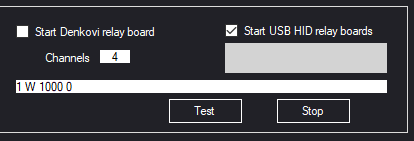 If your flash setup is wired up correctly, then each time you press the Test button, the COB lights will turn on for 1 second, then turn off. You can use the knob on the dimmer to set the brightness of the lights to your preferred level. Step 4 Use the flash lights in your events
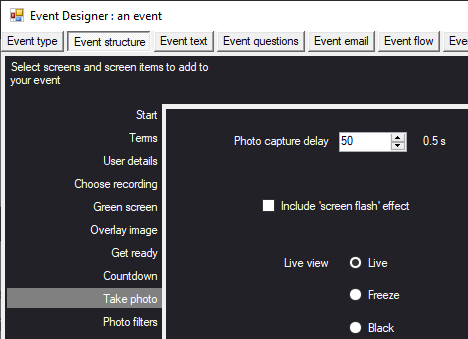 This is the amount of time that RightBooth will wait before taking a photo on the ‘Take photo’ event screen.
 Save your event. Job done !
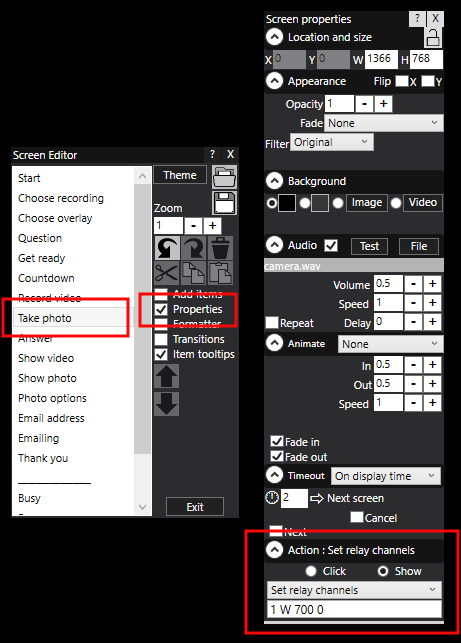
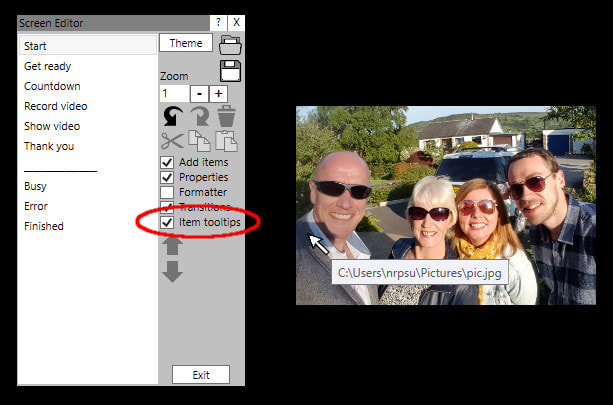
The Result When you play your event, each time the ‘Take photo’ screen is shown, your COB lights will be switched on before each photo is taken and will then switch off immediately after. Note: You may want to play around with the timings. In this article the lights are turned on, then 0.5 seconds later the photo is taken, then 0.2 seconds later the lights are turned off. Tip: To ensure that the lights are definitely on when the photo is taken, try pointing the webcam at the lights, while you tweak the capture timings, and if the captured photo is showing complete white out, then you know you've got it right ! When you create your RightBooth events you will usually include images and videos from various locations on your computer. As time goes by, when you return to previously created events you may forget which folders the referenced files are located. Here's how you can discover the location of the files in your events.
 RightBooth version 7.3.1 introduces some additional action commands for improved control of one or more USB relay boards. This video shows some of the new capabilities and full details can be found in the latest RightBooth User Manual: IMPORTANT: Be sure to obtain programmable HID relay boards. Here is a typical supplier:
https://www.ebay.co.uk/itm/152464651505?ul_noapp=true |
AuthorNigel Pearce 
Archives
April 2024
|
||||||||||||||||||||||||||
 RSS Feed

|
|